Saturday, October 29, 2011

Iron Chef at Home - Battle: Cheddar!

Hey there!

I'm sure most of you have caught an episode or two of the TV show Iron Chef America. I watch it nearly religiously (well, whenever I'm home at 8 pm on a weekday); I really enjoy the way the competing chefs put together super-neat meals apparently out of thin air.

The basics of the program are this: A professional guest chef challenges one of the "Iron Chefs", the secret ingredient is revealed (each course needs to feature this ingredient as the central feature), then the chefs have an hour to whip together 5 courses. Once time has elapsed, the meals are served to a panel of judges who then score the meals based on taste, presentation and originality. The winner is the one with the highest score. And that's it!

Now, adapting this to the home cook is pretty much impossible, but I've heard of a variety of methods folks have made their own "Iron Chef" competition for fun. Good example: some campers at the Blue Skies music festival did a "Battle: Potato" after leaving a dozen spuds cooking in the campfire the night before.

So, sure enough, Kari and I gave it a go in our own way on . It really stemmed from her talking about making Broccoli-Cheddar Soup and my responding by saying "I could make mine and we'll compare". And from there the idea blossomed to do a "Battle: Cheddar". So, for a couple of days we set about cobbling our ideas, recipes (very much a departure from the TV show) until that Friday it was "go" time!


A big hunk of "secret ingredient"

We fleshed out the details to be that we would each make 4 dishes at the same time, then eat them in turn (one of mine, then one of Kari's and so on) and generally compliment how good we are at cooking. I had the insane notion of using the 1-hour time limit, but luckily Kari talked me out of it, especially since it took us about 2 and a half hours! And Kari skipped making her dessert, so we only had 7 dishes in the end. To be fair to ourselves, the people on Iron Chef are professionals, have 2 sous-chefs and their own kitchen set-up. Kari and I had to do it all ourselves while using only one kitchen (there was some close-calls in the running-into-each-other department).

That being said, it was really, REALLY tasty food and we had a blast making it. Now, Kari and I have very different cooking styles. She likes to find really interesting recipes on the Internet or in cookbooks and try them out, tweaking as she goes. Me, I like to make stuff up on the spot (or shortly before) and fix it as I go. This sometimes leads to ruined dishes, but I guess I have to be true to my rebellious nature. So, in the name of simplicity, and accuracy, I'm going to present my recipes as I conceived them, while linking the recipes Kari made to the original online resources.


If you're going to cook 7 dishes at the same time, you might want to unplug this!

Recipes

First Dish - Potato-Bacon-Cheddar Frycake with Spiced Honey

This one started as a conceptual nod of the hat to the Czech fast food juggernaut known as smazeny syr, which is a breaded patty of Edam cheese deep fried, put on a bun and topped with a glob of mayo. Well, I didn't really think that would be a proper use of our "secret ingredient", so I started wondering what might make a good "patty"-like appetizer. And slowly, I conceptualized having a hash brown-type potato cake on the bottom with melted cheddar on top all breaded together. And then, naturally, I decided to throw in some bacon. I don't think further explanation is required. Well, of course, when it come together, not all the elements were working well - the potatoes weren't quite right and I'd chopped the bacon too coarsely. So, with my usual "frak it" attitude, I went ahead and made the "frycake" as best as I could. What I lost in best texture and presentation, I made up for in flavour. The idea of garlic-and-sriracha-spiked honey drizzled over top helped in that department.

The recipe below describes more what I should have done rather than what I actually did.
Serves 4

Frycake

Ingredients

Boiling potatoes for the Frycake
- 2 potatoes, finely diced
- 4 slices smoked bacon, cooked and finely chopped
- 1/2 cup old cheddar, grated
- 1/2 cup milk
- 2 tbsp butter
- 1/2 cup panko breadcrumbs
- fat for frying (bacon fat, butter or vegetable oil)

Directions
- Boil potatoes until tender and drain.
- Add milk and butter and mash potatoes to desired consistency (thicker, but not lumpy).
- Stir in bacon and cheddar and form into patty.
- Heat fat for frying in a fairly large frying pan.
- Fry until both sides are golden brown and crispy and cheese has melted.
- Serve drizzled with Spiced Honey.

Spiced Honey on the left, Cheddar "Chips" on the right.
 Spiced Honey

Ingredients
- 3 tbsp honey
- 2 cloves garlic, minced
- 1 tsp butter or olive oil
- 1/2 tsp maple syrup
- 1 tsp sriracha sauce

Directions

- Melt butter/heat oil in a frying pan and fry the garlic until golden (be careful not to burn it - discard any burnt pieces)
- Add cooked garlic, syrup and sriracha to honey and let sit for 30-60 minutes.


Here's how it looked on the plate (sorry for the failed crop job) - it could definitely use some refinement to the presentation, but MAN was it tasty!


Giving it a try...


She likes it!


Second Dish - Beer-Broccoli-Cheddar w. Egg Salad "Crouton"

Kari got this one from the Food Network and stripped it down. There was no "Bavarian wheat beer" but rather a Creemore offering, but I don't remember which variety. Here's the original recipe post:


Broccoli and beer - how could you go wrong?


The result was terrific and my gal tweaked the recipe for the egg-bacon mixture that topped the "crouton" to include some super-tasty smoked paprika. It gave it an extra element of smokiness that was just awesome...


... And what a gorgeous presentation!

That's one helluva crouton!

Mmmm, slurpy goodness!


 Third Dish - Shrimp "Gratinée"

Alright, I don't really know if the term "gratinée" (or gratin) quite applies to this recipe, since most "gratin" involves topping a kind of casserole with cheese and breadcrumbs for browning. I didn't do that here. Really, this was a kind of shrimp and veggie sauté that I transferred to a pie dish, covered with cheese and set under broiler until the cheese was bubbling and golden. OK, so maybe "gratinée" is accurate... Either way, I had fun making it and thoroughly enjoyed eating it!

Shrimp "gratinée"

Ingredients

- 1/2 pound thawed and peeled medium shrimp
- 2 tbsp olive oil
- 3 cloves garlic, minced
- 1 red pepper, finely chopped
- 1 small onion, finely chopped
- 2 stalks celery, finely chopped
- 1 cup (200 g) white or cremini mushrooms, quartered
- pinch dry basil (or 1 tsp fresh basil, chopped)
- pinch dry oregano (or 1 tsp fresh oregano, chopped)
- salt and pepper to taste
- 1/2 cup dry white wine
- handful baby spinach leaves, rinsed clean
- 4 kalamata olives, sliced (optional)
- 1/2 cup grated old cheddar
- 2 tbsp flat-leaf parsley, roughly chopped

Directions

- In a large frying pan, heat oil on medium heat
- Once hot, add garlic, onion, red pepper and celery and sauté for about 10 minutes.
- Add shrimp, mushrooms, salt, pepper, basil, oregano and wine and sauté for another 10 minutes.
- Add spinach and olives (if using) and stir-fry until spinach has wilted.
- Turn on broiler
- Transfer mixture to an oven-proof dish and place under broiler until cheese is bubbling and golden.
- Top with parsley and serve.

You kind of need a glass of white wine with this dish

Fourth Dish - Cheddar Dumplings in Tomato Sauce


This tasty bit of cheesy goodness was Kari's and, unfortunately, it was the plate that broke our bellies' back. It also was a bit overdone. But the non-burnt parts were lovely!

Here's the recipe Kari originally used, but she used her own tomato sauce recipe, which is her secret, but the dumplings were super-tasty. Unfortunately, they were pretty dense and after 4 dishes full of cheese, that was about all we could handle.

http://allrecipes.com/recipe/cheddar-tomato-dumplings/detail.aspx

Fluffy goodness!


And, after all that feasting, the inevitable outcome was:


Full of cheddary goodness and snuggling a cat. Life is sooo hard!

Now, there are still three dishes that we made but didn't get a chance to eat. I'll present those in a subsequent post.

So, the lesson learned from Iron Chef at Home? Well, for me, it's that the best part of kickass cuisine is always the preparation! Although the eating part isn't too shabby either...

Until next time, make sure your kitchen is the second most exciting room in your home!
Cheers!


Saturday, October 22, 2011

So bad, it's good! (and vice versa)

OK, we all know that I tend to go a little crazy with some of the meals I make. There's a reason my size 34 jeans aren't quite as roomy as they once were. But, what can I do? I love making food and someone's gotta be there to taste test it!

But once in a while I think I go too far. An example of this comes from one recent evening, as I was watching the Food Network yet again. This time I was tuned to a show called Eat Street, which is all about the burgeoning food truck industry across North America (although in Ottawa, said industry has quite a ways to go).  On one episode they featured a place called Pig Vicious out of Austin Texas. Naturally, their shtick is bacon. And being obnoxious crust punks (that's a compliment in my circles). Anyhoo, one of their tasty treats was Bacon-Wrapped Pickles. I know what you're thinking, CRAZY! Well, stand back, because they deep fry that muther!

I'd seen all I needed, I jumped up and declared that this was going to be part of the "nibblies" meal Kari and I were trying to figure out for that night. And I did it! God help me, I did it! And you can do it too! Just consider yourselves warned: unless you have a bucket of water nearby, DO NOT eat more than three of these! One of these is probably half your daily sodium intake.

So, here's how you make them:

Deep Fried Bacon-Wrapped Pickles (for 8 pieces)

Ingredients

- 2 high-quality dill pickles, quartered into spears
- 8 strips bacon
- 8 toothpicks
- 1 cup vegetable oil for frying

Directions

- Take piece of bacon and wrap tightly around pickle spear.
- Affix bacon into place with toothpick (otherwise the bacon will unravel while cooking, as you can see in the picture below).
- Place oil in a small saucepan, allowing for enough depth to deep fry pickles. Heat oil on medium-high (to test if the oil is ready, flick a drop or two of water into the oil from a couple of feet back. If it sizzles, the oil is ready for frying).
- Drop pickles in one at a time into oil using slotted spoon or tongs. Fry 4 pieces at a time (so two batches total) for about 3-4 minutes or until bacon has reached desired crispiness.
- Remove from oil using slotted spoon or tongs. Place finished pickles on paper towel to drain oil.
- Serve with Homemade Ranch Dressing (recipe to follow).


Deep Fried Bacon-Wrapped Pickles! BOW DOWN! Also, they kinda look like severed Mummy fingers, so if you're having a Halloween party, these might fit that bill too!  


So, of course if you're going to be this decadent, you need a dipping sauce too! So, as Deep-Fried Pickles in a pub normally come with Ranch Dressing, we figured we'd make our own. I left the task to Kari who went to the Internet to find our how it's made. She found this:


Now, we were missing buttermilk and sour cream,  but these were replaced fairly effectively with yogurt and cream cheese. Also, a couple of drops of liquid smoke helped give the dressing a flavour more complimentary to the bacon.

So, basically stir together all the ingredients you see in the picture to the left, add some liquid smoke and there you go!


There was some cheating involved in this "Nibblies-o-thon". We made sliders (mini-burgers) but they were store-bought President's Choice "Smokin Stampede Brisket Mini Beef Sliders". That being said, we did top them with homemade Bruschetta  (with some chopped Kalamata olives thrown in for good measure). I don't know if Bruschetta Burgers are a thing, but it worked pretty well here!


Bruschetta Sliders and a six of beer, sounds like a good night to me!


So, once everything was compiled, here was the entire spread:


It ain't health food, but sometimes you gotta go for artery clogging goodness!

And that is that! It was a tasty meal full of salty treats. Not something to do on regular basis, but we all need the occasional junk-food-esque pig-out (or at least a sampling).

Until next time!

Cheers!

Thursday, October 20, 2011

Building the Bases Yourself

One of my favourite aspects of home cooking is making something from scratch that most people would never dare to. Things like spice blends, sauces, condiments and curry pastes are usually store-bought and most cookbooks will assume that on the reader's behalf. You'll often see in cookbooks entries like "2 tablespoons store-bought xyz".

Unfortunately, most store bought "mélanges" feature the same problem that all processed food does: too much goddamn salt or too boring a flavour! So, today I'm going to show a few examples of blends, mixes and pastes that I make myself and find a damn sight better than anything I can find at the supermarket. Let's first look at Thai Red Curry Paste.

Thai Red Curry Paste

In the case of most Thai cooking, most recipes, including curries, ask for more salt than I'm comfortable using. But at least when you make it yourself you get to control the amounts of whatever the ingredients are. So, if you think the recipe's calling for too much salt or spice or whatever, who says you have to follow it to the letter? Cooking is always, ALWAYS about making food you want to eat the way you want to eat it.

I first came across this Red Curry Paste recipe in a cheap little 5$ softcover Thai cookbook and have been tweaking it for years. But the basics as presented do make for a tasty, tasty curry. Now, most Thai Red Curry Paste recipes call for something called "shrimp paste", which is pretty much what it sounds like. Thing is, shrimp paste contains a metric frak-ton of sodium, and it goes bad a lot faster than someone like me can use it. So, I stopped bothering. I never found the shrimp paste added that much to the curry. Also, this allows for a vegetarian curry paste without really sacrificing any flavour.

Ingredients

- 10-12 red Thai chili peppers (also called "Bird's-eye peppers"), seeded and ribs removed - basically, using rubber gloves, slice each chili in half with a sharp knife, cut away all white parts (the "ribs") and rinse away the seeds under cold water. The seeds and ribs provide most of the heat. If you want a more fiery paste, keep some or all of the seeds and ribs. Don't say I didn't warn you though!
- 4 shallots, thinly sliced (I wouldn't recommend substituting onion in this case)
- 3 garlic cloves, chopped
- 1 tbsp chopped galangal (similar to ginger with more of a licorice flavour, available fresh at most Asian grocers) - substitute with ginger if not available
- 2 stalks lemon grass, chopped (you only want the soft middle part of the lemon grass, discard the wooden exterior)
- 5 fresh kaffir lime leaves, chopped (substitute with dry if fresh not available. Both can be found at Asian grocers, especially Thai ones. Go figure!)
- 4 fresh cilantro roots, chopped (when buying a bunch of fresh cilantro, chop off the roots and set aside to use for curry pastes)
- 10-12 black peppercorns
- 1 tsp ground coriander seeds
- 1/2 tsp ground cumin seeds
- pinch of cinnamon
- 1/2 tsp shrimp paste (purely optional)
- 2 tbsp olive or vegetable oil

Directions

To make the paste, all you have to do is toss all the ingredients into a food processor and pulse, adding a bit of oil at a time, until everything is well blended and "pasty". See below.

Not terribly "red", is it?

Really authentic Curry Paste is done up in a mortar and pestle, but it's time consuming and fairly coarse, which doesn't allow the flavours to blend as well. At least that's my opinion.
So, now all you have to do is use this homemade paste instead of store bought, and you'll make this version of Red Curry better by leaps and bounds. Trust me!

Spice Blends

Spice blends are one of my all-time favourite ways to play with flavours in fun ways that reflect what I like best. Now, I'll admit making your own spice blends is somewhat labour intensive. Who wants to whip together a curry powder from scratch when so many shops offer a wide and delicious variety? And in many cases, I'll agree. I've never bothered making my own curry powder, garam masala, herbes de provence, poultry seasoning, etc...

But there's at least one that I've come to find indispensable (Can you guess which one? Hint: it starts with a "b") and I think any BBQer worth his tongs should at least try to make their own personalized rib or pulled pork rub at some point. Which brings me to the next recipe.

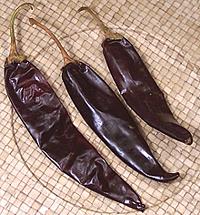
In my last post, I talked about a local multicultural supermarket called Grace Ottawa that sells dried Guajillo, Arbol, Cascabel and Mulato chillies. Well, the next spice blend is one I invented using all four and a few other ingredients. But before I get into the recipe, I figure a little description of each chilli is warranted:

- Guajillo chillies


These are long, thin, fairly mild with smoky undertones and fruity/cocoa flavour. Think dark chocolate covered raisins.

- Arbol chillies


These are thin and quite small, basically similar in appearance to the Thai bird's-eye chilli but longer. These have a fairly straight-forward chilli heat and flavour, reminiscent of cayenne pepper but a little brighter. Essentially you could grind up a bunch of these into powder and use was a replacement for cayenne pepper with very little difference in flavour and heat.

- Cascabel chillies


These look a little like bell peppers, but much smaller (about the size of a small plum) and have a flavour similar to guajillo chilis, but with a bit more heat. They taste a bit like red wine.

- Mulato chillies


Mulato chillies are a bit weird looking, they're wrinkly like a raisin. They have minimal heat and a sweeter flavour with hints of licorice on top of the guajillo's fruity/chocolatey flavour. These are a common ingredient in molé sauce.

So, those are just a few chillies among many others commonly used in Mexican cooking, but also adapted by chefs around the world.

Now, the great thing about dried chillies (and many dried ingredients) is that with enough effort and patience, ANYTHING can become powder, which means anything can become a spice blend, and by extension, a rub for meat.

Another neat dried item I've found in multicultural/Asian groceries are dried kaffir lime leaves. While I prefer using fresh lime leaf when cooking Thai food (see above), I like the ability to pulverize into a powder that can add amazing flavour to spice blends.


Another fun seasoning to work with is star anise. Star anise has a (VERY!) strong licorice flavour and it's easy to go too far and it'll overpower whatever you're making. So use it sparingly.


When working with star anise, you'll only want to use part of the pod, unless you want enormous licorice flavour.

So, now to put all these crazy flavours together along with some friends in what I like to call Four Chilli Powder (I know, I'm Mr. Originality).

Four Chilli Powder Spice Blend

Before you get started on this, go buy a cheap coffee grinder. GO! NOW! OK, got it? Good, because without some kind of spice grinder, this whole effort is kinda futile.

Ingredients (adjust amounts and ratios as you see fit)

- 1 guajillo chilli
- 1 mulato chilli
- 3-4 arbol chillies
- 2 cascabel chillies
- 4-5 dried kaffir lime leaves
- 1/2 tsp whole coriander seeds
- 1/2 tsp whole cumin seeds
- 1/4 star anise pod (2 "arms" and seeds contained within)
- 2-3 green cardamom pods (you can crack the pods and just use the seeds, but I find the "shells" also infuse flavour. Whatever part of the pod doesn't get properly ground you can throw out)
- 1/2 tsp salt (I like to use smoked salt)
- 1 tsp smoked paprika (optional)

Directions

- In batches, depending on the size of your spice grinder, grind all ingredients until they become a powder (or as powdery as you want)
- Mix everything together in a bowl and store in glass jars
- For rib or pulled pork rub - Mix 1 part spice blend to 2-3 parts brown sugar (depending on how spicy you want to make your meat) and rub onto meat 12-24 hours before cooking, wrapping in plastic.


So, there you go, a couple more examples of how you can make your own personalized pastes, blends, etc. If there's one thing I encourage in the kitchen, it's to give your food your own touch! Enjoy! Play! Have fun! And if it sucks, at least you tried!

Cheers!

Monday, September 26, 2011

Summertime Soup and Salad Showcase (with Sandwiches)! - How's that for alliteration?

Hi there!

OK, before I even get started, I confess that the main impetus for this post is to show off various pictures I've taken since May of some of the tastiness I've enjoyed in the past 4 months. So, while the ingredients might not be in season any more, it gives readers something to look forward to next year! Heck, my post about Fall meals still gets the most hits, even in Summer.

This post is mainly a celebration of some of this past Summer's little culinary joys (keep in mind that for me, Summer starts in mid-May and ends with snow), mainly some lovely soups and salads that were made over the course of the season.

We'll start with the soups. You'd think soup wouldn't be a very summery meal, but the right soup can certainly hit the spot if you're in the mood for it, and it's a good way to use vegetables that you might not be interested in eating whole (like beets or fiddleheads).


Fiddlehead Soup (serves 4)

Once again, that lovely fern known as the fiddlehead comes back into my kitchen. What can I say? They're tasty veggie goodness! I cooked more with fiddleheads this Summer than I ever had before. The season was shorter this year, but I got what I could as often as possible. This soup was adapted from a few online sources (especially the use of potato - VERY good as a thickener and this recipe could easily be vegan-ized and still turn out creamy).

- 1 lb. fiddleheads, scrubbed and trimmed (try to remove as much of the brown bits as possible, there have been stories of food poisoning linked to fiddleheads, but in this case you're cooking the heck out of them and they'll be safe, but the brown bits are still nasty)
- 2 tbsp butter (or olive oil for vegan)
- 1 onion, diced
- 3 cloves garlic, minced
- 1 potato, finely diced
- 2 stalks celery, sliced
- 6 cups vegetable stock
- 1/2 tsp thyme
- 1/2 tsp coriander
- pinch nutmeg
- pinch cayenne
- 1 cup light cream or 2% milk (use non-dairy substitute for vegan)
- salt and pepper to taste


Directions

- First, you want to blanch your fiddleheads (basically boil in about a centimetre deep of water) for about 10 minutes. Fiddleheads are quite tough and need thorough cooking. Strain and reserve fiddleheads.
- In a pot, melt butter and sauté garlic and onions for about 3 minutes on medium heat.
- Add celery and potatoes and cook for another 5-6 minutes. Add fiddleheads and cook for another 5 minutes. Keep 2-3 fiddleheads per serving aside for garnish.
- Stir in vegetable stock, thyme, coriander, nutmeg and cayenne.
- Bring to a boil then reduce heat to medium-low (3-4).
- Simmer for about 35-45 minutes, then stir in milk or cream.
- Simmer for another 10 minutes and turn off heat. Season to taste.
- Using an immersion blender, puree soup until a thick consistency is reached. If you don't have an immersion blender, you can use a normal blender, but make sure you allow air to escape and cover the hole with a damp towel. Otherwise, the steam will get trapped in the blender and cause it to blow up all over your kitchen. Not good when dealing with hot soup.
- Serve soup hot with reserved fiddleheads as garnish. Serve with your favourite sandwich or on its own.

The high-end version of "Soup n' Sammich Combo"


Summer Borscht (serves 4)


I call this "Summer Borscht" because of it's bright golden colour, not what you'd expect when thinking of beets. Really, though, it works just the same with regular beets. While traditional borscht often calls for sour cream, I went with yogurt in this case and it was really tasty. If you don't know, borscht is basically a beet soup of Slavic origin. The thing that made this recipe sing was to roast the beets before cooking them in the soup. I also added some shredded zucchini, certainly not an element of traditional borscht, for body and a bit of extra veggie goodness. So, let's get to it!


Ingredients

- 1 lb. golden beets (or regular red beets), scrubbed clean and green tips removed.
- 1 tbsp olive oil + 1 tsp for drizzling on beets (see below)
- 1 tbsp butter
- 1-2 carrots, sliced very thin
- 1-2 celery stalks, sliced very thin
- 1 small onion, diced
- 2-3 cloves garlic, minced
- 1 tsp caraway seed
- 1 tsp celery seed
- 1 tsp dried thyme
- 1 cup shredded zucchini
- 4 cups vegetable stock
- 2 tbsp white wine vinegar (or red wine vinegar)
- 1 tsp fresh thyme leaves
- 1 tsp fresh sage, chopped
- plain, Balkan-style yogurt to serve
- salt and pepper to taste


The simple joy of making soup
Directions

- Preheat oven to 350 F
- Take a large sheet of foil, lay beets out flat and drizzle with olive oil and salt, wrap foil tightly and roast beets in the oven until tender (about 20 minutes). Remove and allow to cool slightly. Once cooled, peels beets (the skins come off very easily once roasted) and set aside.
- Melt butter in a pot on medium heat and add 1 tbsp olive oil. Once butter and oil have heated, stir in carrots, celery, onion, garlic, caraway seed, celery seed and dried thyme. Cook vegetables until soft, stirring frequently (about 10-15 minutes).
- Stir in roasted beets and cook for another minute or so.
- Stir in shredded zucchini, vegetable stock and white wine vinegar. Bring to a boil.
- Reduce heat to medium-low (3 or 4) and allow soup to simmer and reduce for about 30-40 minutes. In the last 10 minutes or so, make the Open-faced Cheese Toasts (see below).
- Once soup has finished simmering, puree using immersion blender (see instructions in previous recipe).
- Serve hot with a dollop of yogurt or sour cream and an Open-faced Cheese Toast.


Mmmmmm, melty...
 Open-faced Cheese Toasts

- 2 slices dense pumpernickel bread
- 2 tbsp basil pesto
- 1 tomato, cut into 6 slices (I used yellow tomato, but any will do!)
- 1 cup grated extra-old cheddar
- 2 sprigs cilantro (optional garnish)

Basically, just place on a cookie sheet and broil until cheese melts. Remove from oven and garnish with cilantro. Use parchment paper to avoid getting melted cheese stuck on your cookie sheet. It sucks, don't let it happen to you!


The finished product!

Next is a simple but unconventional salad featuring some of the best produce to be found in late Summer. 

Pepper, Celery and Zucchini Salad w. Feta

When we think of salads, we often think of iceberg lettuce and a few random veggies drowning in some creamy dressing. Personally, I can't stand a ton of dressing and iceberg lettuce has about ZERO nutritional value or taste. My salads are usually spinach-based, but sometimes I just want a whack of crunchy veggies. The following basically falls into that category.

Salad

- 1 red pepper, either coarsely diced or julienned
- 1 yellow, either coarsely diced or julienned
- 2 stalks celery, thinly sliced
- 1 yellow zucchini, sliced (about 1/2 inch thick)
- 1 green zucchini, sliced (about 1/2 inch thick)
- 3 tbsp crumbled feta cheese
Dressing

- 1/4 cup olive oil
- juice of half a lemon
- 2 tbsp balsamic vinegar
- 1 tsp dry basil
- salt and pepper to taste


Basically just toss all ingredients with the dressing and serve!


BONUS: Subtly Spicy Burgers (I made these to go with the above salad).

There's a multicultural grocery store near my work that sells whole dried chilies like Arbol, Mulatto, Guajillo and Cascabel. All you have to do to make them usable is grind them into powder using a coffee grinder. I strongly suggest that anyone who's serious about making awesome food pick themselves up a cheap coffee grinder for use with whole spices. The difference between grinding your own spices right before use is surprising and well worth the effort.

Now, I was making burgers and just wanted to add a subtle spicy flavour. Basically I took a pound of lean ground beef, added about 1 teaspoon of powdered Guajillo chili (good old fashioned chili powder works well also) and mixed it all together.  Some finely chopped cilantro would also work well in a burger. Next I formed the burgers into 1/4 pound patties, threw them on the grill and there you! The cute flower-pattern bun came from a bakery in the Byward Market (the name escapes me) and I topped it with the ever-popular Sriracha Mayo.


So there you go! Some of the best of the past season. Now that it's Fall, expect some heartier fare to come out! 

And as a parting bonus, here's Kari!

Life is good when you eat gorgeousness on your deck at sunset. Especially with such lovely company! 


Cheers!


Sunday, September 11, 2011

Not Your Average Sandwich! - 2nd Edition

Hi again!

Before I get started, I have to plug my sweetie's new blog: Love and Food in Ottawa. Basically it's Kari's take on the wide wonderful world of cookery and ingenious uses for vodka.

That being said, it's time for another edition of "Not Your Average Sandwich!", because, well, sandwiches rock! Seriously, if "The Next Food Network Star" is a sandwich guy, what does that tell you?

So, it's no surprise that at the Nick & Kari homestead, we eat a lot of sandwiches. Why? Well, they're easy, they usually encompass all basic food groups, and you can control your portions fairly easily. But who really needs to explain why sandwiches are awesome, I think we all know they are and have our own reasons for that opinion. So let's get to the food, dude!

1 - Reuben Sandwiches w. Oven Fries and Russian Dressing


Reuben Sandwiches with Homemade Russian Dressing and Oven Fries
 
This one was Kari's idea, my execution. Often, on the days I work early, our dinner planning consists of her emailing me a dinner idea and me going with it. So, when she proposed Reuben sandwiches (and bought all the necessary fixins'), I was glad to execute. But, we had nothing to put on the side (except gorgeously fat dill pickles). I figured some homemade oven fries would fit the bill!

So, first off, what's a Reuben? Well, its origins are somewhere in a US deli, but as with most recipes, the details are sketchy. Basically, it's a corned beef sandwich on rye (light or dark? Most recipes I've read don't specify) with Swiss cheese and sauerkraut, then done up grilled cheese style.

Reuben Sandwich (for 1 sandwich, repeat as needed)

Ingredients

- 2 slices rye bread (I prefer dark rye for a Reuben, but light is fine also)
- 3-4 slices corned beef, pastrami or smoked meat (for folks from Eastern Ontario and Quebec, corned beef and pastrami are considered somewhat inferior cousins of smoked meat)
- 2 tbsp sauerkraut
- 1/2 tsp caraway seeds (optional, for the sauerkraut)
- 1/4 cup beer (optional, for the sauerkraut)
- 1 tbsp Russian dressing (recipe to follow or use store bought)
- 1-2 slices Swiss cheese (Emmenthal also counts)

Directions
- First, you may want to fry up the sauerkraut, for two reasons. One, I find that the brine most sauerkraut is kept in is bit too sour. Two, it's very wet coming out of the jar so this helps dry it out a bit. Basically, toss the sauerkraut, caraway seeds and beer (because beer is always good) into a hot pan and stir fry until the sauerkraut starts to brown a little. Remove from heat and put aside in a small bowl.
- Spread a little Russian dressing on the inside of each slice of bread.

- Layer meat on a slice of bread, then sauerkraut, then cheese and top with last slice of bread.

- In a frying pan, melt butter on medium heat and coat pan.

- Carefully place the sandwich onto the hot pan. 

- Fry up sandwich until the first side is crispy and golden and cheese has melted slightly (about 5 mins).

- Using a spatula, and the Force, flip sandwich over, ensuring it stays together.

- Cook for another 5 minutes and serve with fries and a pickle!
 
Mmmmm... pickle...
Oh wait, you say, what about those fries? Well, they're pretty darned easy. Here's how!

Oven Fries

Ingredients

- 3-4 medium-sized potatoes, washed, scrubbed and cut into 1/2 inch thick fries or wedges
- 2-3 tbsp olive oil
- seasoning (get creative! Salt and pepper are just fine, but I usually like to throw in something interesting from the spice rack)


Directions

- Pre-heat oven to 400 degrees.
- Once you've cut your potatoes, give them a thorough rinse in cold water. Do this 2-3 times. This gets of excess starch and helps make the potatoes more crispy out of the oven. At least that's what I think causes it... Dry potatoes as best as possible using a towel or paper towel. 

- In a large bowl, toss potatoes in oil and seasoning until well-coated.

- Line a baking sheet with parchment paper or aluminium foil and spread out potatoes evenly.

- Place in the oven and bake for about 20 minutes, turning occasionally.

- Remove fries from the oven and serve with sandwiches and extra Russian dressing for dipping.

Speaking of Russian Dressing:

- Stir together 4 tbsp mayo, 2 tbsp ketchup, 1 tsp minced onion, 1 tsp red wine vinegar and 1/2 tsp black pepper.


And that's that! Serve it all with ice cold beer and enjoy!


Open-faced Arctic Char Gravlax w. Smoky Sour Cream


More Gravlax? Really? DAMN RIGHT!
 OK, OK, I admit it, I have a bit of an obsession with the art of curing and smoking meat and fish. Why? Well, it might have something to do with the fact that both are a form of "hands-off" cooking. There really isn't much work involved past the initial process of setting up a fire or coating a piece of meat in a salt-based cure. But the results when done right? Oooooh Baby! That's good eatin'!

So, as I've posted before, Gravlax is a Scandinavian dish where one salt-cures salmon. Well, when I got to the grocery store, I noticed that the Arctic Char was actually cheaper than the Pacific Sockeye (probably because the Char is farmed), so I decided to give it a try. Of course, that meant having to season it differently as well! Oh no, a chance to tweak a recipe, shucks darn!

Now, the original recipe calls for brown sugar, dill, black pepper and whiskey. Well, small problem, I couldn't find a crumb of dill in the whole kitchen. So, I decided to skip it. But that left a need to add something else to flavour the salmon. Well, since the colour and flavour of Arctic Char is a little lighter than salmon, I figured a lighter flavour would work as well, something yellow and bright. In this case, I squeezed about 1/4 of a lemon's worth of juice, grated about 1 tbsp of grapefruit zest and added about a tbsp of maple syrup. The grapefruit zest was the kicker, it added such flavour and zing. Wonderful stuff! I also, for fun, added a half-teaspoon of a smoky spice rub mixture I picked up at a local farmer's market. So, I mixed that all up with the kosher salt, created the appropriate salt crust to cure the meat, and left it in the fridge for 2 days.

Well, needless to say, the first bite was delightful, with bright flavours. Unfortunately, Gravlax is only for the true fish lover, it will have a 'fishy' flavour to it unless you're using it fresh out of the water. Me, I don't mind so much, but when Kari took a bite, her first reaction was "MMMMMMMM!", her reaction ten seconds later was "Eeeeeeew, low tide!" (be reminded that Kari has been only been eating fish and seafood since we've been dating and she's a hard sell).

Now, no matter how much you love fish and Gravlax, it can't be eaten on its own, it just doesn't work. You need some kind of bread to put it on and something creamy to balance the texture. So, it just so happened that we had this dense organic rye in the fridge (the kind you can find in the supermarket or speciality delis and it's so dense that 5 slices weigh about a kilo). So, I threw that in the toaster (it takes forever to even develop a toasty crust) and about ten minutes later took it out (I kid you not!).

Next, I needed that creaminess and there's nothing better with Gravlax than sour cream! Now, that being said, I find sour cream kind of boring. It needed some kick. So, smoked paprika to the rescue! A pinch of that stirred into a tbsp of sour cream and ka-BLAM!! That sour cream was kickin' like a mule! So I spread that onto the bread, topped it with the Gravlax, and then I needed some garnish. Still without dill, I instead used a little rosemary and more grapefruit zest.

What you had in the end was a flavour roller-coaster. I have become a convert to the Church of Grapefruit Zest with Fish. I think they have a PO Box somewhere in Florida...

So, voila! more sandwichian excellence. Hope you enjoy it!

Cheers!