Good day yet again!
Alright, I've been at this blogging business for a while now. I still don't know if anyone out there in Internet-land is reading, but that's ok because I started this mostly as a means of killing time at work. Now hopefully the original purpose of "Dude, Cook!" has not been lost on all of you and a few of you have tried your hand(s) at cooking up something delicious. Even better, I'm hoping at least some of you have grown to enjoy it!
Now, ask any semi-accomplished cook and they'll tell you they have at least one 'favourite' recipe that they've invented/adapted. Me, I have a few, but I think I like the following recipe the best because it's so easy, prolific and, I imagine, healthy!
Way back when, I was a pretty domesticated fellow; I lived with my fiancée and she was a pretty darn good cook in her own right. One of her specialities was beef burritos. They were tasty, spicy, and one batch provided lunches for quite some time. Well, some time in 2006 I found myself having a craving for burritos, but for some reason I NEEDED chicken to be the meat. I know, weird.
So, I put together a quick recipe in my mind, confirmed some of the elements using the Internet, and went to town the next night. The results were so much better than I expected.
Since then, I've not made this recipe nearly as much as I should. Especially in this frozen season where nothing is quite as satisfying as this taste-filled, protein-packed, cheese-covered spicy treat. So, with that in mind, I give you my version of the Chicken Burrito:
Chicken Burritos
Ingredients
- 2 cloves garlic, minced
- 2 tbsp veg or olive oil
- 1 lb cooked chicken meat, shredded (skinless) - breast or thigh works well
- 1 can black beans, drained (reserve some liquid)
- 1-2 ripe tomato, minced
- 2 tbsp cumin
- 2 tbsp chili powder
- 2 tsp cayenne pepper
- 1 tsp salt
- 1 small red onion, finely diced
- 1 sweet red pepper, finely diced
- ½ cup salsa (use homemade or PC Black Bean and Corn Salsa)
- hot sauce to taste
- ¼ cup chopped fresh cilantro
- 6 large flour tortillas
- ½ cup grated cheddar and/or Monterey Jack (optional)
Preparation
- In large skillet or saucepan, fry garlic in oil
- Add chicken, beans, tomato and spices, ‘mashing’ together with a potato masher into a pasty consistency (use bean liquid if necessary)
- Cook for 10-15 mins.
- Add onion, pepper and salsa; cook for 10-15 more mins., or till water has been cooked out
- Stir in hot sauce and remove from heat; add cilantro once mixture is no longer hot
- Spoon mixture into tortillas and arrange into appropriate shape (this is something that I cannot teach you, I still suck at this part)
- Bake for 10-15 mins. at 350 F
- Top with grated cheddar or Monterey Jack if desired
- Wrap and freeze extra burritos
And that's that! Try it, I bet you'll enjoy it!
Cheers!
Monday, January 24, 2011


Saturday, January 22, 2011
Smoking - Part 2 - Pork Tenderloin and Seafood
Hey kids!
I'm back with more on my new favourite cooking activity: smoking. Now I started out with ribs, which is the meal that takes the longest of the ones I've tried so far. Some day I'm going to give pulled pork a shot, but that's at least 12 hours worth of smoking; not exactly a practical idea for the middle of Winter. So, the hardest recipe has already been accounted for, but the next ones require a little more finesse in flavouring. As I mentioned before, ribs are almost a blank canvass for flavouring. Pork tenderloin also has a certain neutrality of flavour, but it's important to keep an eye out for the danger of oversmoking the pork, thus drying it out. Fish, on the other hand, is very distinctive in its flavour and, while I've not screwed it up yet, could easily be ruined with the wrong kind of wood or too much time in the smoker.

Smoking's easy, even in Winter!
Alright, let's start with the pork tenderloin. The first time I made it, in the Summer of 2009, I used a similar rub to my ribs, about 3 to 1 parts brown sugar to berbere spice. The second time was for a "holiday" party this past December (what my friend, the hostess, calls Chrismakuh) and I wanted to go with a more seasonal flavouring. Here's the rub recipe (as extrapolated from my brain, it might not be exactly what I used):
- 1/2 cup brown sugar
- 1/2 tsp cinnamon
- 3 green cardamom pods, ground
- 2 cloves, ground
- 1/2 tsp ground nutmeg
- 1 tsp ground black pepper
- 1 tsp salt
- 2 tsp rosemary, crushed or ground
Rub the meat with this mix, wrap in plastic and refrigerate for about 3-4 hours. Remove from fridge and let warm up a little.
Prep fire in the smokebox and soak wood chips. The great thing about pork is that it tastes good with almost any kind of smoke flavouring it. In the case of a tenderloin, I would avoid using just hickory or mesquite, the smoke flavour would be too strong. Now, I use maple lump charcoal for everything on my BBQ and just on its own imbues a tasty smoke flavour, but it's a bit one-dimensional. For pork tenderloin, I've used either a mix of hickory and cherry (the first time, which nicely complimented the spicy rub), or apple (for the 'festive' meal). I think apple is my favourite flavouring wood when avoiding the spicy route (you know, the one Columbus was looking for); it adds a distinct yet subtle flavour and sweetness.
Once your fire is going and you reach a cooking temperature of around 225-250 degrees Fahrenheit, place the tenderloin(s) inside the the grill and smoke for 1.5 to 2 hours. Wrap the tenderloin in foil, spray with a bit of apple juice, and return to smoker for another hour. Unwrap and smoke for another 30 minutes to finish. You may need to put it in the oven for 10 minutes at 350 to ensure it's done, but it should be OK. The thing about tenderloin is that it stays a little more pink than other cuts of pork even when it's overcooked. So, don't think that it isn't done just it's a bit pink. If the meat is no longer translucent and juices run clear when you cut it, it's done. Basically that's the rule for all pork and chicken.
Slice pork into medallions and serve any which way you like! The first time, I served the pork as is with some gorgeously roasted sweet potatoes my friend made. For the Christmakuh meal, I made an apple-cranberry compote, but it didn't turn out quite as I wanted, so I won't reprint the recipe here. But if your Aunt Betty or Matante Lise makes a good homemade relish, give it a try with this!
SMOKING SHRIMP
Next up, shrimp. Because they're so small, shrimp don't require much time in the smoker. The only time I ever tried this, most of the space was taken up by the fish I was smoking at the same time (more on that later), but I was easily able to fit a pound worth of shrimp in the gaps between the pieces of fish and they turned out fine.
First step is to marinate the shrimp for an hour or two. This adds a lot of flavour, but also adds a great deal of moisture that will mess up the texture a little bit, but there's a way to fix that. It's up to you if you want to peel the shrimp or not, I don't.
Basically, thaw out a pound of medium shrimp and place in the marinade outlined below.
 Shrimp Marinade
- juice of 1/4 lime
- 1/2 cup olive oil
- 2 tbsp minced fresh ginger
- 2 crushed garlic cloves
- 2 cardamom pods, crushed
- 8-10 coriander seeds, crushed
- 4 tbsp brown sugar
- 1 tsp salt
- 1 tsp cracked black pepper
Start your fire and prepare shrimp for smoking. I imagine just about any kind of wood will work here since shrimp is such a versatile meat. I used a mix of Apple and Alder wood chips, soaked for a half hour, as always. You'll want your temperature to sit at around 225 degrees Fahrenheit and the smoking process will only be an hour or so.
Now, when I first tasted the shrimp, it was cooked, but a little mushy. That's probably due to trapped moisture. No problem, the magic "10 minutes in the oven at 350" solution works in this case as well.
Peel shrimp for guests or let them do it themselves! Serve with some kind of dipping goodness, even good old fashioned cocktail sauce if you wish!
SMOKING FISH
OK, now we get into what I think is my favourite exercise in smoking: FISH!!!!
Now I'll be the first to admit that fish isn't to everyone's taste, but it's interesting to note that many folks who would normally avoid fish like the plague get their taste buds in a tizzy when you serve up a gorgeous slab of smoked salmon.
Now, I've never done salmon on the smoker. Mostly because I know what it tastes like and it wouldn't be terribly original. So, back in the early Fall, I was on a mission to find a kind of fish that wouldn't be like the all too familiar smoked salmon or trout. Enter tilapia. Tilapia is a firm fleshed and sweet white fish that isn't chock full of that 'fishy' taste that makes other kinds of smoked fish so distinctive. I gave it a shot after some online research on how to cure or brine the meat. I found a good brine recipe, but cut down the amounts of salt.
The second time I smoked tilapia for a family get-together, I made sure to reduce salt amounts even further and add a few nuances to the brine for flavouring. Here's what I came up with:
 Tilipia Brine (for approx. 1-2 lb. of fillets)
- 4 cups water
- 1/2 cup salt
- 1/2 cup (white) sugar
- juice of 1/4 orange- juice of 1/4 lime
- 2 crushed garlic cloves
- 3 bay leaves, crushed
- 1 tsp cracked black pepper
- 2 cardamom pods, crushed
- pinch cayenne pepper
As you can see, I'm fairly low-tech when it comes to writing down recipes. I bashed the brine/marinade recipes for shrimp, tilapia and Arctic char while at work.
 Here is the tilapia brining away. Important to note about brining: NEVER use a metal container. The acidic elements in the brine will react with the metal and leech god-knows-what into the meat. Glass or ceramic are best, but plastic is OK for short term brining.
 Brine the fish for about 2 hours. Once ready, ensure you rinse the fish well to get rid of some of the salt, and pat as dry as possible before putting in the smoker.
Start your fire and aim for a steady 210-225 degrees. Use Alder or Apple or both. It'll take about 2 hours to smoke for 2 pounds of tilapia fillets. Once done, I found that the flavour was delicious and unique, but the texture was a bit rubbery. So once again I went to the 15 minutes in the oven fix-all. Not sure why it works so well, but it does! I guess it's because it cooks off any excess moisture that might mess with the texture of the meat.
So, when I committed to smoking a bunch of fish for a family gathering, I had originally thought I was going to do trout as well as tilapia, but when I got to the fish section of the supermarket, the Arctic char was practically leaping out at me. Arctic char is similar to salmon, but with a more distinctive flavour and lighter texture. I couldn't pass up the opportunity to give it a shot.
First was coming up with a good brine. I thought a dose of orange and maple would be good, but I wanted to keep the flavours subtle. Char is so good on its own that trying to do too much with it would be like dousing filet mignon in ketchup. So here's what I came up with:
 Arctic Char Brine (for up to 1 lb. fillet)
- 2 cups water
- 1/4 cup salt
- 1/4 cup brown sugar
- juice of 1/8 orange
- 1 tsp maple syrup
- 1 crushed garlic clove - black pepper to taste
- 1 tbsp chopped fresh dill
I smoked the char at the same time as the tilapia and it all turned out in the end. Again, 15 minutes in the oven was the finishing touch. It was sooooo delicious. I'd gladly do that one again!
So, that's about it. Smoking fish is easy and tasty. Don't fear the fish! Next on the "To Smoke" list: chicken, beef brisket and pulled pork!
And, as an added bonus, here are some pictures of fish smoking process before the big family Xmas gathering on December 30, 2010.

The whole shebang marinating/brining.


The finished product! I whipped together some whipping cream and sour cream for a makeshift crème fraiche. Worked great!

My brother being grabby! Too bad I didn't have a wooden spoon handy to give his knuckles a well-deserved rap!

I also whipped up some crostini-type dealies for an added bonus.
Monday, January 3, 2011
Smoking - Part 1 - Overview and Ribs
-
Happy New Year, fellow foodophiles!
Here's a tale that has no business being told in the middle of Winter, but I did promise to blog about smoking food a while back and I wouldn't want anyone accusing me of blogular reneging.
Back in Summer of 2007, I moved into a one-bedroom apartment on my own. This was the first time I'd done so since 2003 and I found myself needing a lot of stuff, namely a barbecue to go on my awesome deck, which was the main reason why I took this apartment in the first place! Now, where I'm from, there are laws prohibiting gas barbecues in apartments. The reason for this? There's a safety risk in having a potentially explosive propane tank inside. Now I know that many people flout this law, but it got me thinking that perhaps I should explore the idea of a charcoal barbecue instead, which is completely legal. I know I covered this in my April post about BBQ season, but it's part of the narrative, so stick with me here.
Anyhoo, off I went to Canadian Tire with my girlfriend and picked out a very affordable BBQ with an offset smoker box. I didn't really think I'd use the smoker much, but it was about a 20 dollar difference from the model that didn't have the box, so I figured "you never know" and bought it. Here's a picture of my baby (the smokebox is the smaller compartment on the left)!

I went a couple of years before even trying out the smoker, but finally gave it a go in the Summer of 2009. I figured the first thing to try was ribs. After all, ribs are one of the best "blank canvasses" when it comes to cooking, and it's not difficult to cover up your mistakes with lots of BBQ sauce. But before you can smoke anything, you need fuel!
CHOOSING YOUR WOOD
I prefer using lump charcoal. It provides a more natural flavour and ignites faster. Lump charcoal burns a lot faster than briquettes, but that's OK when smoking, because you usually smoke food at low temperatures and something that burns fast will allow you to regulate your heat better. In addition to charcoal, you'll need some kind of wood to help flavour the smoke. I've acquired lots of different types of wood from Home Hardware and Canadian Tire. I imagine Wal-Mart, Rona, Lowe's and many others also carry wood for BBQ/smoking. Right now, I've gathered a supply including Maple, Cherry, Apple, Alder, Hickory, Mesquite and Cedar. I'd like to get some Pecan and Peach as well, if only to see how different a flavour they impart. I read a story online from an expat in Thailand mentioning how the locals use Mango wood to smoke their food. How awesome would that be!?!?
Now, you may ask yourself, which wood should I be using? Well, that all depends on what you're smoking. I've only done pork, fish and shrimp so far, so I haven't used all the types available. But here's a basic guide to what woods match well to what foods:
- Alder: mild and slightly sweet. Best with fish, pork and poultry
- Apple: fruity and sweet, especially good with pork. I like to use it with fish as well, but that might not be considered "normal"
- Cherry: rich, fruity, slightly sweet. Goes well with any meat. I like to smoke pork tenderloin with a mix of cherry and hickory.
- Hickory: rich, strong smoky flavour. Probably the most common wood used in smoking and good for anything except possibly fish (Hickory would overpower the natural flavour of any white fish and maybe even salmon). A mix of Hickory and Mesquite is good for spicy or peppery meats like ribs and beef brisket.
- Mesquite: strong but slightly sweet. Good for poultry, beef and pork. As with hickory, too strong for fish.
- Cedar: VERY strong flavour, probably too strong for most meats. Since cedar has a very distinctive pine taste, it would overpower just about everything if used in more than the tiniest amounts. And apparently it might be toxic. Makes we wonder why the heck Home Hardware sells it! grumblegrumblegrumble...
- Maple: strong and sweet. Maple could realistically be used with any meat, but the amounts have to be regulated. Also, since most lump charcoal you get in this part of the wood is made of maple, you'll get a maple smoke flavour from that.
Of course, most of this was figured out through a combination of trial and error and Internet research. But, to sum up what I've done and used so far:
- Ribs (made three times): Hickory and Mesquite (and a handful or two of Cherry and/or Apple)
- Pork Tenderloin (made twice): Cherry and/or Hickory
- Tilapia (made twice): Apple and/or Alder
- Arctic Char (made once): Apple and Alder
- Shrimp (made once): Apple and Alder
Alright, let's go on to the first thing I ever smoked: RIBS!
SMOKING RIBS
During a slow day at the office, I took to the Internet for advice on how to pull off smoked ribs. I'd previously done slow cooker ribs and baked/grilled ribs with varying results, but all being tasty (more on that process in this post). One piece of advice though, if you're going to slow cook ribs, remember to skim the fat off the top! I forgot to do so and my ribs were pretty much too fatty to be edible.
Anyhoo, as with just about everything else, the 'Net was chock full of helpful advice. I compiled a bunch of info from a variety of sites, and I've tried a few different ideas. Now, the whole "fall off the bone" concept is one I haven't quite mastered yet, but I've gotten pretty good at the "damn that's tasty" side of it. So, let's get into the "how-to" of smoking ribs. I'm assuming you rushed out and bought an offset smoker or Big Green Egg or something like it and are ready to get on with it!
Right, first things first. What kind of ribs are you going to use? Well, smoking involves a certain amount of drying out of the meat, so I'd go for the more tender cut: back ribs. Side ribs are better for the oven or slow cooker. I've also heard that short ribs work well for smoking, but I haven't given it a try.
For now, let's stick to back ribs. So, how do you smoke a tasty rack of ribs? Well, I'll be the first to admit that I haven't quite gotten the whole 'tenderness' aspect of it figured out, but I'm getting close. So, don't get frustrated, all cooking is a journey towards perfection, but rarely does one arrive.
So, you'll need to prep your rack(s) of ribs before they can be smoked. You'll want to give yourself a day to either brine, marinate or rub your ribs. I've only used the rubbed method, but I'm quite curious to try brining ribs. It's done wonders for my smoked fish recipes (more on those in a bit).
Before you can rub/brine/marinate your ribs, you'll need to remove the membrane, found on the underside of the rack (concave rather than convex); otherwise your ribs will be rather tough. Now removing this thing is somewhat difficult, and is best done with a sharp knife, pliers, possibly even gloves, and great care and patience. I tell you what, let's let the Internet take care of this lesson:
http://www.ehow.com/video_2339996_pork-rib-membrane-removal-tips.html
Alright, now that your membrane is removed, it's time to have some fun! It's rub time! Now, there are rib rubs all over the place. Just pop into any store that sells BBQ equipment and you'll see many brands of rub for sale. Same applies to the supermarket.
Now, being the self-reliant fella that I am, I make my own rub very simply out of a mix of brown sugar and berbere spice, with about a 2-to-1 ratio of sugar to spice.
Here's the berbere spice recipe from the May 27th post:
Berbere spice
1 teaspoon fenugreek seeds
1/2 cup ground dried serrano chili peppers or other ground dried chili peppers
1/2 cup sweet paprika
2 tablespoons salt
2 teaspoons ground ginger
2 teaspoons onion powder
1 teaspoon ground cardamom (preferably freshly ground)
1 teaspoon freshly grated nutmeg
1/2 teaspoon garlic powder
1/4 teaspoon ground cloves
1/4 teaspoon ground cinnamon
1/4 teaspoon ground allspice
Finely grind the fenugreek seeds with a mortar and pestle or in an electric spice or coffee grinder. Combine the remaining ingredients and add the ground fenugreek seeds, mixing well. Refrigerate in an airtight container for up to 3 months (although I've had batches last 6 to 9 months in the fridge and be fine).
Now, the berbere spice is pretty fiery and makes for a rather spicy rib. If you prefer things a bit more tame, there are numerous recipes on the 'Net. For example, here's one from About.com:
Kansas City Rib Rub
Ingredients:
Combine all ingredients together and transfer to an air tight container. Maybe stored up to six months.
Nick's note: You could omit the cayenne if you want barely any heat at all.
Now, once you have your rub all mixed together, I suggest getting a glass/pyrex lasagna pan, place a rack at a time in the pan and generously apply the rub all over, pressing it firmly into the meat to ensure it is absorbed. You might even want to score (slice small cuts on the surface) the meat a bit for maximum absorption.
Once the meat has been coated with the rub, wrap it in plastic wrap, pressing all air out, and store in the fridge for 12-24 hours and dream of smoke and pork and joy.
Next day...
Let's hope you picked a nice sunny day and have an empty calendar for the day, because you're about to embark in a 6-7 hour smoking bonanza. It might be time-consuming, but MAN is it therapeutic! Having a case of cold beer around doesn't hurt either...
So, take your ribs out of the fridge and unwrap them. Let them warm up a little bit, for say 30 minutes. Here's what they look like out of the fridge:
 While the ribs are getting closer to room temperature, you're going to want to get a large container of some sort and fill it halfway full with water. Take handfuls of whatever wood chips you would like to use and soak them in water for at least 30 minutes. That allows the wood chips to burn slowly in the smoker and produce lots of delicious smoke.
Next we start the fire. Let's be clear off the bat: AVOID any kind of chemical fire starter, especially when smoking. It ruins the flavour and is probably not too healthy. So how do you start a fire without lighter fluid? Well, a lot of people swear by the chimney starter, but I have my own method of starting a fire that works pretty well. I use an electric starter like this one:
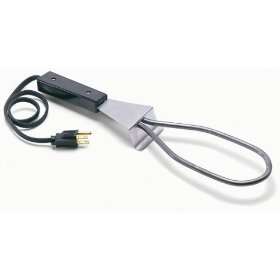
You can find it at the same stores you find all your other BBQ supplies. Just plug it into an extension cord or outdoor outlet. The element heats up quickly and becomes red-hot. Find a way to keep the starter fixed in a position that allows you to pile charcoal on top in a pyramid-type formation as best as possible. Once this is done, leave it for about 10-15 minutes and let the element do its job. You'll hear the fire starting as the charcoal begins to crackle. At this point, unplug the starter and gently remove it from the pile of now-smoldering coals, trying your best not to disturb the coal bed, and put it aside somewhere fireproof as it cools down.
You're not looking for a huge fire here, because we don't want the temperature going over 225-250 degrees Fahrenheit. Keep the pile under about half a foot in diameter and no more than 3-4 inches high. If it isn't hot enough, you can always add more charcoal. If it's too hot, it's a lot harder to remove lit coals! If the fire needs a bit of a boost to get it going, there's always blowing on it, but I find fanning it with a fairly large piece of box board works perfectly.
So now our fire's going and the wood chips are soaking, so it's time to get the meat on the smoker! Place the meat directly on the racks of your main grill area if you're using an offset barrel smoker like mine. Otherwise, follow the instructions on the box!
 Don't worry about the bright patch on the front rack, that's sunlight!
So, now all you have to do is shut the lid and let the smoke do the work! We'll call this Step 1 of what some nice person on the Internet called the "3-2-1 method" of smoking, which consists of 2.5 to 3 hours of smoking the meat as is, followed by 2 hours of smoking the ribs "tented" (wrapped in foil and moistened with some sort of liquid, I use apple juice), and finally 1 hour smoking unwrapped to finish.
Now, I have a little confession to make: I usually cheat and put anything I've smoked in the oven at 350 degrees for 10-15 minutes. It just seems to make everything right in the end. Not entirely sure why...
 So, as you're going through Step 1, ensure you have a steady stream of smoke flowing through the smoker to the meat, add handfuls of wood chips to the fire as you go to keep the smoke going. Also, try to keep the temperature between 225 and 250 degrees. Any smoker should come with a thermometer built in. As for the meat, you don't need to do a thing to it during Step 1.
Now, it's best not to open the lid to the BBQ too much because the smoke can escape, but if you're like me, you occasionally want to look in, just to see how it's coming along.
And because you like to take pictures:

As you can see below, the meat is definitely cooking.

This is about what the ribs are going to look like at the end of Step 1. After 2.5 to 3 hours have passed, it;'s time for Step 2. Remove the ribs from the grill using tongs and place each rack on a piece of heavy-duty aluminium foil large enough to completely wrap up the ribs. Spray a good amount of apple juice or other liquid (but not alcohol or vinegar, as these may dry out the meat) on each rack of ribs, on both the top and bottom. This is going to help steam the ribs and make them more tender. Wrap up the ribs tightly, containing all the juice, and return them to the smoker for another 2-2.5 hours.
 At this point, you might want to get started on the finishing sauce, if you're making one. I posted the recipe for my homemade BBQ sauce back in July, but you can make variations if you want or even use a high-quality store-bought sauce. To be honest though, the ribs will be tasty with or without sauce. It's up to you how you want to serve and/or eat them.

Pull them out of the oven, serve with whatever you're having on the side and chow down!
Is there anything classier than serving a meal on cooler?
Till next time, enjoy!
Happy New Year, fellow foodophiles!
Here's a tale that has no business being told in the middle of Winter, but I did promise to blog about smoking food a while back and I wouldn't want anyone accusing me of blogular reneging.
Back in Summer of 2007, I moved into a one-bedroom apartment on my own. This was the first time I'd done so since 2003 and I found myself needing a lot of stuff, namely a barbecue to go on my awesome deck, which was the main reason why I took this apartment in the first place! Now, where I'm from, there are laws prohibiting gas barbecues in apartments. The reason for this? There's a safety risk in having a potentially explosive propane tank inside. Now I know that many people flout this law, but it got me thinking that perhaps I should explore the idea of a charcoal barbecue instead, which is completely legal. I know I covered this in my April post about BBQ season, but it's part of the narrative, so stick with me here.
Anyhoo, off I went to Canadian Tire with my girlfriend and picked out a very affordable BBQ with an offset smoker box. I didn't really think I'd use the smoker much, but it was about a 20 dollar difference from the model that didn't have the box, so I figured "you never know" and bought it. Here's a picture of my baby (the smokebox is the smaller compartment on the left)!

I went a couple of years before even trying out the smoker, but finally gave it a go in the Summer of 2009. I figured the first thing to try was ribs. After all, ribs are one of the best "blank canvasses" when it comes to cooking, and it's not difficult to cover up your mistakes with lots of BBQ sauce. But before you can smoke anything, you need fuel!
CHOOSING YOUR WOOD
I prefer using lump charcoal. It provides a more natural flavour and ignites faster. Lump charcoal burns a lot faster than briquettes, but that's OK when smoking, because you usually smoke food at low temperatures and something that burns fast will allow you to regulate your heat better. In addition to charcoal, you'll need some kind of wood to help flavour the smoke. I've acquired lots of different types of wood from Home Hardware and Canadian Tire. I imagine Wal-Mart, Rona, Lowe's and many others also carry wood for BBQ/smoking. Right now, I've gathered a supply including Maple, Cherry, Apple, Alder, Hickory, Mesquite and Cedar. I'd like to get some Pecan and Peach as well, if only to see how different a flavour they impart. I read a story online from an expat in Thailand mentioning how the locals use Mango wood to smoke their food. How awesome would that be!?!?
Now, you may ask yourself, which wood should I be using? Well, that all depends on what you're smoking. I've only done pork, fish and shrimp so far, so I haven't used all the types available. But here's a basic guide to what woods match well to what foods:
- Alder: mild and slightly sweet. Best with fish, pork and poultry
- Apple: fruity and sweet, especially good with pork. I like to use it with fish as well, but that might not be considered "normal"
- Cherry: rich, fruity, slightly sweet. Goes well with any meat. I like to smoke pork tenderloin with a mix of cherry and hickory.
- Hickory: rich, strong smoky flavour. Probably the most common wood used in smoking and good for anything except possibly fish (Hickory would overpower the natural flavour of any white fish and maybe even salmon). A mix of Hickory and Mesquite is good for spicy or peppery meats like ribs and beef brisket.
- Mesquite: strong but slightly sweet. Good for poultry, beef and pork. As with hickory, too strong for fish.
- Cedar: VERY strong flavour, probably too strong for most meats. Since cedar has a very distinctive pine taste, it would overpower just about everything if used in more than the tiniest amounts. And apparently it might be toxic. Makes we wonder why the heck Home Hardware sells it! grumblegrumblegrumble...
- Maple: strong and sweet. Maple could realistically be used with any meat, but the amounts have to be regulated. Also, since most lump charcoal you get in this part of the wood is made of maple, you'll get a maple smoke flavour from that.
Of course, most of this was figured out through a combination of trial and error and Internet research. But, to sum up what I've done and used so far:
- Ribs (made three times): Hickory and Mesquite (and a handful or two of Cherry and/or Apple)
- Pork Tenderloin (made twice): Cherry and/or Hickory
- Tilapia (made twice): Apple and/or Alder
- Arctic Char (made once): Apple and Alder
- Shrimp (made once): Apple and Alder
Alright, let's go on to the first thing I ever smoked: RIBS!
SMOKING RIBS
During a slow day at the office, I took to the Internet for advice on how to pull off smoked ribs. I'd previously done slow cooker ribs and baked/grilled ribs with varying results, but all being tasty (more on that process in this post). One piece of advice though, if you're going to slow cook ribs, remember to skim the fat off the top! I forgot to do so and my ribs were pretty much too fatty to be edible.
Anyhoo, as with just about everything else, the 'Net was chock full of helpful advice. I compiled a bunch of info from a variety of sites, and I've tried a few different ideas. Now, the whole "fall off the bone" concept is one I haven't quite mastered yet, but I've gotten pretty good at the "damn that's tasty" side of it. So, let's get into the "how-to" of smoking ribs. I'm assuming you rushed out and bought an offset smoker or Big Green Egg or something like it and are ready to get on with it!
Right, first things first. What kind of ribs are you going to use? Well, smoking involves a certain amount of drying out of the meat, so I'd go for the more tender cut: back ribs. Side ribs are better for the oven or slow cooker. I've also heard that short ribs work well for smoking, but I haven't given it a try.
For now, let's stick to back ribs. So, how do you smoke a tasty rack of ribs? Well, I'll be the first to admit that I haven't quite gotten the whole 'tenderness' aspect of it figured out, but I'm getting close. So, don't get frustrated, all cooking is a journey towards perfection, but rarely does one arrive.
So, you'll need to prep your rack(s) of ribs before they can be smoked. You'll want to give yourself a day to either brine, marinate or rub your ribs. I've only used the rubbed method, but I'm quite curious to try brining ribs. It's done wonders for my smoked fish recipes (more on those in a bit).
Before you can rub/brine/marinate your ribs, you'll need to remove the membrane, found on the underside of the rack (concave rather than convex); otherwise your ribs will be rather tough. Now removing this thing is somewhat difficult, and is best done with a sharp knife, pliers, possibly even gloves, and great care and patience. I tell you what, let's let the Internet take care of this lesson:
http://www.ehow.com/video_2339996_pork-rib-membrane-removal-tips.html
Alright, now that your membrane is removed, it's time to have some fun! It's rub time! Now, there are rib rubs all over the place. Just pop into any store that sells BBQ equipment and you'll see many brands of rub for sale. Same applies to the supermarket.
Now, being the self-reliant fella that I am, I make my own rub very simply out of a mix of brown sugar and berbere spice, with about a 2-to-1 ratio of sugar to spice.
Here's the berbere spice recipe from the May 27th post:
Berbere spice
1 teaspoon fenugreek seeds
1/2 cup ground dried serrano chili peppers or other ground dried chili peppers
1/2 cup sweet paprika
2 tablespoons salt
2 teaspoons ground ginger
2 teaspoons onion powder
1 teaspoon ground cardamom (preferably freshly ground)
1 teaspoon freshly grated nutmeg
1/2 teaspoon garlic powder
1/4 teaspoon ground cloves
1/4 teaspoon ground cinnamon
1/4 teaspoon ground allspice
Finely grind the fenugreek seeds with a mortar and pestle or in an electric spice or coffee grinder. Combine the remaining ingredients and add the ground fenugreek seeds, mixing well. Refrigerate in an airtight container for up to 3 months (although I've had batches last 6 to 9 months in the fridge and be fine).
Now, the berbere spice is pretty fiery and makes for a rather spicy rib. If you prefer things a bit more tame, there are numerous recipes on the 'Net. For example, here's one from About.com:
Kansas City Rib Rub
Ingredients:
1/2 cup brown sugar
1/4 cup paprika
1 tablespoon black pepper
1 tablespoon salt
1 tablespoon chili powder
1 tablespoon garlic powder
1 tablespoon onion powder
1 teaspoon cayenne
Preparation:
Combine all ingredients together and transfer to an air tight container. Maybe stored up to six months.
Nick's note: You could omit the cayenne if you want barely any heat at all.
Now, once you have your rub all mixed together, I suggest getting a glass/pyrex lasagna pan, place a rack at a time in the pan and generously apply the rub all over, pressing it firmly into the meat to ensure it is absorbed. You might even want to score (slice small cuts on the surface) the meat a bit for maximum absorption.
Once the meat has been coated with the rub, wrap it in plastic wrap, pressing all air out, and store in the fridge for 12-24 hours and dream of smoke and pork and joy.
Next day...
Let's hope you picked a nice sunny day and have an empty calendar for the day, because you're about to embark in a 6-7 hour smoking bonanza. It might be time-consuming, but MAN is it therapeutic! Having a case of cold beer around doesn't hurt either...
So, take your ribs out of the fridge and unwrap them. Let them warm up a little bit, for say 30 minutes. Here's what they look like out of the fridge:

Next we start the fire. Let's be clear off the bat: AVOID any kind of chemical fire starter, especially when smoking. It ruins the flavour and is probably not too healthy. So how do you start a fire without lighter fluid? Well, a lot of people swear by the chimney starter, but I have my own method of starting a fire that works pretty well. I use an electric starter like this one:
You can find it at the same stores you find all your other BBQ supplies. Just plug it into an extension cord or outdoor outlet. The element heats up quickly and becomes red-hot. Find a way to keep the starter fixed in a position that allows you to pile charcoal on top in a pyramid-type formation as best as possible. Once this is done, leave it for about 10-15 minutes and let the element do its job. You'll hear the fire starting as the charcoal begins to crackle. At this point, unplug the starter and gently remove it from the pile of now-smoldering coals, trying your best not to disturb the coal bed, and put it aside somewhere fireproof as it cools down.
You're not looking for a huge fire here, because we don't want the temperature going over 225-250 degrees Fahrenheit. Keep the pile under about half a foot in diameter and no more than 3-4 inches high. If it isn't hot enough, you can always add more charcoal. If it's too hot, it's a lot harder to remove lit coals! If the fire needs a bit of a boost to get it going, there's always blowing on it, but I find fanning it with a fairly large piece of box board works perfectly.
So now our fire's going and the wood chips are soaking, so it's time to get the meat on the smoker! Place the meat directly on the racks of your main grill area if you're using an offset barrel smoker like mine. Otherwise, follow the instructions on the box!

So, now all you have to do is shut the lid and let the smoke do the work! We'll call this Step 1 of what some nice person on the Internet called the "3-2-1 method" of smoking, which consists of 2.5 to 3 hours of smoking the meat as is, followed by 2 hours of smoking the ribs "tented" (wrapped in foil and moistened with some sort of liquid, I use apple juice), and finally 1 hour smoking unwrapped to finish.
Now, I have a little confession to make: I usually cheat and put anything I've smoked in the oven at 350 degrees for 10-15 minutes. It just seems to make everything right in the end. Not entirely sure why...

Now, it's best not to open the lid to the BBQ too much because the smoke can escape, but if you're like me, you occasionally want to look in, just to see how it's coming along.
And because you like to take pictures:


This is about what the ribs are going to look like at the end of Step 1. After 2.5 to 3 hours have passed, it;'s time for Step 2. Remove the ribs from the grill using tongs and place each rack on a piece of heavy-duty aluminium foil large enough to completely wrap up the ribs. Spray a good amount of apple juice or other liquid (but not alcohol or vinegar, as these may dry out the meat) on each rack of ribs, on both the top and bottom. This is going to help steam the ribs and make them more tender. Wrap up the ribs tightly, containing all the juice, and return them to the smoker for another 2-2.5 hours.

So after Step 2 has passed, unwrap the ribs again and place them back on the grill for another hour. Spray them again with apple juice to keep tender. If there any woods you want to experiment with, now's the time. The smoke won't penetrate right into the meat, but it will flavour the surface of it.
This is what your ribs will look like after being wrapped. GORGEOUS!

Smoke for another hour. Once done, place onto a baking sheet and cook in the oven for another 10-15 minutes. You can choose to cut them into segments before or after baking them. I did cut them up before baking last time and it worked well.
Pull them out of the oven, serve with whatever you're having on the side and chow down!
 |
Is there anything classier than serving a meal on cooler?
Till next time, enjoy!
Tuesday, December 28, 2010
A Toast To My Hometown's Better Eateries - Murray Street and Whalesbone
-
In case you haven't guessed yet, I'm from Ottawa, Ontario, Canada. Now, for those of you who read this and are unfamiliar with Canadian geography, Ottawa is Canada's capital. The Ottawa-Gatineau "metropolitan area" is Canada's 4th largest, while the city itself (without counting all the 'burbs) is the 6th largest. We clock in at about 1 million people.
Anyhoo, because of it's "government town" nature, Ottawa can get a bit dull. Perhaps we also have an inferiority complex due to our proximity to Montreal and Toronto which prevents some of our best aspects from shining through. That being said, we have a great, albeit tightly-knit, music scene, a whackload of excellent museums and galleries, and we're surrounded by natural splendour. Seriously, you can get lost in the woods within minutes of the downtown core.
But what I really love about this town is the FOOD! Since it's a tourist-friendly town and home to movers, shakers, lobbyists and leaders, naturally there are some really classy joints with old school flavour, where a guy like me would stick out like a sore thumb. But with the advent of the "foodie" movement of the past 15 years or so, we're seeing an upswing of restaurants that have a much more laid-back feel, but that have unbelievably good food.
Seriously, you know life is good when you can sit down and eat a gourmet meal wearing a Spider-Man t-shirt. And this is food that's so good you might find yourself gripping the table in amazement. Now, all good food comes at a cost regardless of the casual ambiance. Most of this places serve larger plates ranging in the 25-40 dollar range, and don't expect portions like the ones you get at Denny's. This is high end food that is hard to get, is usually produced by smaller local farms and environmentally sustainable fisheries and is of tremendous quality. This isn't the stuff you eat to fill you up in a pinch, this is "event eating".
Over the past few years, I've had the good fortune of eating at some wonderful places around this fine city and today's post is going to describe some of those places and talk a little about some of the plates I've had there. Also, I'm going to try my hand at cribbing and reprinting a recipe here and there. It might be a dismal failure, it might work out great. But be forewarned, I haven't actually tried any of these in my kitchen as yet.
1 - Murray Street - http://www.murraystreet.ca/
Murray Street is a very "homey" type of restaurant nestled along Murray Street in the Byward Market, which I discovered just today is also called "Gastro Alley". Which makes sense considering that it houses this place, Sweetgrass Aboriginal Bistro (more on that later), Khao Thai (some of Ottawa's best), Domus Café (which I've not had the pleasure of trying - yet) and a few others.
I first went there in 2008 shortly after its opening for a friend's birthday and there were a lot of growing pains in the experience (apparently the words "pork" and "duck" sound very similar in a noisy resto), but the food was tremendous and I did get my meal comped because they got my order wrong. I was a bit 'meh' about the whole thing, albeit well-fed. A couple of years passed and it was a Friday night and my lady friend and I decided to pop in for what has to be the highlight of their menu: duck confit poutine. For ten bucks, there really isn't a more "bang-for-your-buck" treat out there. If you don't know what poutine is, I'll give you the basics: it's french fries smothered in gravy topped with cheese curds. Now, the evil genius chef at Murray Street (Steve Mitton) took the gloves off with his take on it. And I quote their menu:
Poutine: Hand-cut herb spatzle (Spatzle is a kind of egg noodle), shredded duck confit, roast duck gravy, fresh cheese curds.
Now, I've never confited a duck in my life. But for those of you who are now intrigued, duck confit is basically pieces of duck meat braised/baked in duck fat. You can buy it pre-made at higher end butcher shops.
Anyway, this is a dish that is so tasty and rich, most people couldn't finish it. And it's a small plate. Definitely a "must try before you die" kind of dish.
Now, on a recent Saturday morning I went for brunch there and had a smoked fish/veggie scrambled egg. It was quite tasty, but not quite as mindblowing as my girl's duck confit cassoulet (again with the duck confit!). But if you want to impress at breakfast (as I keep the conceptual thread of my last post going), make this!
Smoked Fish Scramble
Ingredients
- 4 tbsp butter or 2 tbsp butter and 2 tbsp vegetable/olive oil
- 200 g smoked trout or salmon or other smoked fish
- 4 eggs
- 1/2 cup milk
- assorted chopped/sliced veggies - the one I had had rutabaga, onion and leeks (I think). I recommend onion and leek for sure, the rutabaga was a bit weird with eggs.
- 1/2 cup grated cheese (I'd say a sharp cheddar or smoked Gouda to compliment the fish)
Directions
- In a frying pan, melt 2 tbsp of butter or heat 2 tbsp of olive oil
- Sauté veggies until softened and put aside
- In a mixing bowl, crack eggs. Add milk and whisk with a fork until fluffy consistency reached.
- Roughly chop smoked fish into 1 cm pieces
- Melt 2 tbsp butter in a frying pan and coat bottom of pan
- Add eggs to pan and cook until they start to turn opaque
- Add rest of ingredients and cook until everything is well-heated
Serve on a plate or in a shallow bowl with fresh biscuits or multi-grain toast.
2 - The Whalesbone Oyster House - http://www.thewhalesbone.com/ -
I love seafood. You'd better like seafood. If not, this place won't be your cup of tea. But then again, let's peek at the menu, shall we?
Hey, Bone Marrow and Foie Gras? Beet Carpaccio? Roasted Veal Breast? Never mind, I'm almost tempted to go back soon and try all the non-seafood! Wait, no, let's not be crazy. But, it is ironic that it was here at a fish place that I first tried seared foie gras. And it was pretty damn delicious!
Speaking of foie gras, I feel it necessary to rant about this. My lack of previous exposure to foie gras (except in paté) is possibly because a lot of restaurants in Ottawa had been subjected to protests by uneducated animal-lovers who think that the gorging process that helps develop foie gras is cruel. So it was pulled from the menu at Beckta, Play and others. Methinks these holier-than-thou jerkstores have never actually visited Mariposa Farms where most restos in Ottawa get their foie gras. I'll betcha that those birds are treated a damn sight better than most people! Also, all farmed animals are born meat. The modern cow, pig, chicken and domesticated duck or goose only exists because it's going to be turned into food.
So, to all you political "eating meat is wrong and cruel" jackasses out there, I will simply say this: slaughtering farm animals is no more cruel than reaping crops. These creatures only exist to die and be eaten. Yes there are issues about how animals are treated in factory farms and they are valid concerns, but instead of tarring all carnivores and meat farmers with the same brush, why don't you find out where the factory farms are and conduct some sort of sit-in preventing their products from leaving, and allow the caring, conscientious farmer who loves and respects animals far more than you could ever fathom to carry on with their business.
And just in case I've not offended vegetarians quite enough, here's how I REALLY feel about this subject:

Now somebody get me a veal cutlet, some lamb stew and a tub of baby panda liver paté! (mmmmmm... panda liver... finger Ling-Ling gooood...)
OK, OK... PHEW! Getting carried away there. Back to the subject at hand: The Whalesbone Oyster House and its amazing food. I've only been twice and the first time I had the Seared Foie Gras plate followed by the Butter-Poached Lobster. What can I say? It's LOBSTER! Utterly delicious and perfectly tender. I had to stop myself from licking the plate.
The second time I went, I had a halibut dish as a main and it was gorgeous, but it was our appetizer that completely blew me away. Ladies and gentlemen, I give you Big Eye Tuna Belly.
This was a special off-menu appetizer and there is no way I can imagine being able to recreate the dense, meaty, yet delicate flavour of this dish. I wonder if it was a one-in-a-lifetime treat and that breaks my taste buds' collective heart.
Oh wait, it appears to be on their regular menu now! Excuse me, I have to run to Whalesbone RIGHT NOW!
OK, now I have to rein it back in. I'm stuck at work, no point in imagining that my Cobb Salad is somehow going to magically become a lightly seared piece of succulent tuna. Dammit...
I can't even remember what it was served with, it was seared, dusted with coarse salt and some sort of creamy mayo-like sauce, and it tasted like HEAVEN! If you ever get the chance to try anything like this, get on that! I'm wondering where and how I could find a piece of tuna of that quality and am drawing blanks. Luckily, Whalesbone has that covered too! They have an office at 504 Kent Street that allows members of the public to pick up some of their own succulent piscatorial offerings. Not to mention the "brown bag lunch", which I have not taken advantage of trying. Which makes me feel moronic since I live three blocks away, but am planning to leave the neighbourhood in a few months! So the lesson here is to take advantage of nearby treasures since you never know when you'll be leaving them behind.
That's it for now. Many more posts to come, including Part 2 of my toast to Ottawa. Hopefully they'll be up before the New Year!
Cheers!
In case you haven't guessed yet, I'm from Ottawa, Ontario, Canada. Now, for those of you who read this and are unfamiliar with Canadian geography, Ottawa is Canada's capital. The Ottawa-Gatineau "metropolitan area" is Canada's 4th largest, while the city itself (without counting all the 'burbs) is the 6th largest. We clock in at about 1 million people.
Anyhoo, because of it's "government town" nature, Ottawa can get a bit dull. Perhaps we also have an inferiority complex due to our proximity to Montreal and Toronto which prevents some of our best aspects from shining through. That being said, we have a great, albeit tightly-knit, music scene, a whackload of excellent museums and galleries, and we're surrounded by natural splendour. Seriously, you can get lost in the woods within minutes of the downtown core.
But what I really love about this town is the FOOD! Since it's a tourist-friendly town and home to movers, shakers, lobbyists and leaders, naturally there are some really classy joints with old school flavour, where a guy like me would stick out like a sore thumb. But with the advent of the "foodie" movement of the past 15 years or so, we're seeing an upswing of restaurants that have a much more laid-back feel, but that have unbelievably good food.
Seriously, you know life is good when you can sit down and eat a gourmet meal wearing a Spider-Man t-shirt. And this is food that's so good you might find yourself gripping the table in amazement. Now, all good food comes at a cost regardless of the casual ambiance. Most of this places serve larger plates ranging in the 25-40 dollar range, and don't expect portions like the ones you get at Denny's. This is high end food that is hard to get, is usually produced by smaller local farms and environmentally sustainable fisheries and is of tremendous quality. This isn't the stuff you eat to fill you up in a pinch, this is "event eating".
Over the past few years, I've had the good fortune of eating at some wonderful places around this fine city and today's post is going to describe some of those places and talk a little about some of the plates I've had there. Also, I'm going to try my hand at cribbing and reprinting a recipe here and there. It might be a dismal failure, it might work out great. But be forewarned, I haven't actually tried any of these in my kitchen as yet.
1 - Murray Street - http://www.murraystreet.ca/
Murray Street is a very "homey" type of restaurant nestled along Murray Street in the Byward Market, which I discovered just today is also called "Gastro Alley". Which makes sense considering that it houses this place, Sweetgrass Aboriginal Bistro (more on that later), Khao Thai (some of Ottawa's best), Domus Café (which I've not had the pleasure of trying - yet) and a few others.
I first went there in 2008 shortly after its opening for a friend's birthday and there were a lot of growing pains in the experience (apparently the words "pork" and "duck" sound very similar in a noisy resto), but the food was tremendous and I did get my meal comped because they got my order wrong. I was a bit 'meh' about the whole thing, albeit well-fed. A couple of years passed and it was a Friday night and my lady friend and I decided to pop in for what has to be the highlight of their menu: duck confit poutine. For ten bucks, there really isn't a more "bang-for-your-buck" treat out there. If you don't know what poutine is, I'll give you the basics: it's french fries smothered in gravy topped with cheese curds. Now, the evil genius chef at Murray Street (Steve Mitton) took the gloves off with his take on it. And I quote their menu:
Poutine: Hand-cut herb spatzle (Spatzle is a kind of egg noodle), shredded duck confit, roast duck gravy, fresh cheese curds.
Now, I've never confited a duck in my life. But for those of you who are now intrigued, duck confit is basically pieces of duck meat braised/baked in duck fat. You can buy it pre-made at higher end butcher shops.
Anyway, this is a dish that is so tasty and rich, most people couldn't finish it. And it's a small plate. Definitely a "must try before you die" kind of dish.
Now, on a recent Saturday morning I went for brunch there and had a smoked fish/veggie scrambled egg. It was quite tasty, but not quite as mindblowing as my girl's duck confit cassoulet (again with the duck confit!). But if you want to impress at breakfast (as I keep the conceptual thread of my last post going), make this!
Smoked Fish Scramble
Ingredients
- 4 tbsp butter or 2 tbsp butter and 2 tbsp vegetable/olive oil
- 200 g smoked trout or salmon or other smoked fish
- 4 eggs
- 1/2 cup milk
- assorted chopped/sliced veggies - the one I had had rutabaga, onion and leeks (I think). I recommend onion and leek for sure, the rutabaga was a bit weird with eggs.
- 1/2 cup grated cheese (I'd say a sharp cheddar or smoked Gouda to compliment the fish)
Directions
- In a frying pan, melt 2 tbsp of butter or heat 2 tbsp of olive oil
- Sauté veggies until softened and put aside
- In a mixing bowl, crack eggs. Add milk and whisk with a fork until fluffy consistency reached.
- Roughly chop smoked fish into 1 cm pieces
- Melt 2 tbsp butter in a frying pan and coat bottom of pan
- Add eggs to pan and cook until they start to turn opaque
- Add rest of ingredients and cook until everything is well-heated
Serve on a plate or in a shallow bowl with fresh biscuits or multi-grain toast.
2 - The Whalesbone Oyster House - http://www.thewhalesbone.com/ -
I love seafood. You'd better like seafood. If not, this place won't be your cup of tea. But then again, let's peek at the menu, shall we?
Hey, Bone Marrow and Foie Gras? Beet Carpaccio? Roasted Veal Breast? Never mind, I'm almost tempted to go back soon and try all the non-seafood! Wait, no, let's not be crazy. But, it is ironic that it was here at a fish place that I first tried seared foie gras. And it was pretty damn delicious!
Speaking of foie gras, I feel it necessary to rant about this. My lack of previous exposure to foie gras (except in paté) is possibly because a lot of restaurants in Ottawa had been subjected to protests by uneducated animal-lovers who think that the gorging process that helps develop foie gras is cruel. So it was pulled from the menu at Beckta, Play and others. Methinks these holier-than-thou jerkstores have never actually visited Mariposa Farms where most restos in Ottawa get their foie gras. I'll betcha that those birds are treated a damn sight better than most people! Also, all farmed animals are born meat. The modern cow, pig, chicken and domesticated duck or goose only exists because it's going to be turned into food.
So, to all you political "eating meat is wrong and cruel" jackasses out there, I will simply say this: slaughtering farm animals is no more cruel than reaping crops. These creatures only exist to die and be eaten. Yes there are issues about how animals are treated in factory farms and they are valid concerns, but instead of tarring all carnivores and meat farmers with the same brush, why don't you find out where the factory farms are and conduct some sort of sit-in preventing their products from leaving, and allow the caring, conscientious farmer who loves and respects animals far more than you could ever fathom to carry on with their business.
And just in case I've not offended vegetarians quite enough, here's how I REALLY feel about this subject:
Now somebody get me a veal cutlet, some lamb stew and a tub of baby panda liver paté! (mmmmmm... panda liver... finger Ling-Ling gooood...)
OK, OK... PHEW! Getting carried away there. Back to the subject at hand: The Whalesbone Oyster House and its amazing food. I've only been twice and the first time I had the Seared Foie Gras plate followed by the Butter-Poached Lobster. What can I say? It's LOBSTER! Utterly delicious and perfectly tender. I had to stop myself from licking the plate.
The second time I went, I had a halibut dish as a main and it was gorgeous, but it was our appetizer that completely blew me away. Ladies and gentlemen, I give you Big Eye Tuna Belly.
This was a special off-menu appetizer and there is no way I can imagine being able to recreate the dense, meaty, yet delicate flavour of this dish. I wonder if it was a one-in-a-lifetime treat and that breaks my taste buds' collective heart.
Oh wait, it appears to be on their regular menu now! Excuse me, I have to run to Whalesbone RIGHT NOW!
OK, now I have to rein it back in. I'm stuck at work, no point in imagining that my Cobb Salad is somehow going to magically become a lightly seared piece of succulent tuna. Dammit...
I can't even remember what it was served with, it was seared, dusted with coarse salt and some sort of creamy mayo-like sauce, and it tasted like HEAVEN! If you ever get the chance to try anything like this, get on that! I'm wondering where and how I could find a piece of tuna of that quality and am drawing blanks. Luckily, Whalesbone has that covered too! They have an office at 504 Kent Street that allows members of the public to pick up some of their own succulent piscatorial offerings. Not to mention the "brown bag lunch", which I have not taken advantage of trying. Which makes me feel moronic since I live three blocks away, but am planning to leave the neighbourhood in a few months! So the lesson here is to take advantage of nearby treasures since you never know when you'll be leaving them behind.
That's it for now. Many more posts to come, including Part 2 of my toast to Ottawa. Hopefully they'll be up before the New Year!
Cheers!
Sunday, December 12, 2010
Breakfast goodness - Part 2
-
Alright, last post dealt with some of the lighter breakfast options out there (not counting a bowl of oatmeal or Special K). This time we get into the more decadent breakfasts. If Part 1 was meant for a nice romantic "morning after", Part 2 is more in tune with the "must cure hangover with sex and grease" mentality. So, get ready for lots of greasy, sugary, fattening, booze-absorbing goodness!
Mmmmm, greasy! Now, in my version, I kind of took a lazy man's way out. As you can see, they keep the ingredients separate in this fry-up, but I hate dirtying dishes, so I threw the lot of ingredients in the same pan!
I shall explain...
Fry-up à la Nick
Ingredients
1 potato (the kind you use for boiling), diced small (about 1/2 centimetre, or 1/4 inch)
2 chorizo sausages, sliced thin
1/4 onion, sliced very thin
6-8 cherry tomatoes, halved (try to keep as much juice as possible)
2 eggs
1/2 cup grated cheddar
fresh ground pepper
other options
- diced red pepper
- sliced mushrooms
- various herbs of your choice
Directions
- boil potatoes until you can pierce with fork easily, strain and set aside (this shouldn't take more than 5-8 minutes)
- drizzle a bit of olive oil into a pan and heat
- add sausage and sauté for about 5 minutes
- add rest of ingredients and cook until eggs and veggies are done
- serve with toast and hot sauce
Trust me, it's a thing of greeeeezzzzzzy beauty.
French Toast - basics and variations
"I don't mean to brag, I don't mean to boast,
But I'm intercontinental when I eat French toast!"
- Beastie Boys, The Move
I don't about you, but I happen to think that French toast is the best of the "Sweet Three" of breakfast. The "Sweet Three" being French toast, waffles and pancakes, of course.
Most people would probably choose pancakes over French toast. The thing is that unless you have a wunderkind taking care of the pancakes, I find they often taste like sweetened lumps of dough. I am a much bigger fan of the other two.
Now, I will admit that waffles are perhaps the PERFECT (non-oven-baked) breakfast treat, if cooked to the point of nigh-burnt crispy goodness. But, having made and cleaned up the resulting batterstorm of mess in the past, I'm pretty much convinced they're not worth the frigging effort.
Which brings us to the delicious compromise that is French toast. What can be simpler than coating bread in an egg-milk mixture and frying it up?
Now, I have no idea where French toast comes from, but hey! Wikipedia says neat stuff!
"The earliest official mention of French Toast is in the Apicius, a collection of roman recipes dating back to the 4th or 5th century." http://en.wikipedia.org/wiki/French_toast
We all know that French toast is commonly explained as a excuse to use up stale bread, but I find if you use a nice artisan bread or baguette, it goes from being merely tasty to "Man, that's so good!". The key is to use bread that's a bit stale or started out being fairly hard. Soft bread falls apart when you try coating it in the egg-milk mixture.
Implement-wise, you'll need a mixing bowl for the egg-milk mixture, a frying pan to cook the French toast, a fork and knife and LOTS of maple syrup.
Making French toast - Basics
The simplest way to do up French toast is as follows (I know most of us learned this when we were 7, but you never know):
- Crack an egg into a bowl, pour milk in (not too much) and whisk together with a fork. Add a dash of cinnamon and vanilla if you wish. Add more egg and milk as needed.
- Take a slice of bread and place it in the egg-milk mixture, ensuring that the bread is fully coated.
- Shake off excess mixture (you want just enough to lightly coat the bread and not get it too soggy).
- Repeat previous two steps with as many slices of bread as needed.
- In pan, melt about 1 tbsp butter and coat pan with butter.
- Place coated slices of bread in pan and fry until golden brown, flip and do the same for the other side.
- Serve on a plate with whatever forms of decadence you see fit. I'm a fan of pure maple syrup and sliced fruit
Now that you have the basics, let's fancy things up a bit!
Variation 1 - Bananas Foster French Toast
This was a beauty of a breakfast that my girl Kari found online a few weeks back and, like any chef worth his or her salt, I made a damn sight easier.
Now, no matter how easy I would like to make this recipe, it's still going to require two pans. You'll need a fairly large frying pan and a smaller saucepan of some sort.
Ingredients
- French toast basics (eggs, milk, bread, vanilla, cinnamon, etc.)
- Bananas Foster
- 1-2 ripe bananas, sliced
- 3-4 tbsp brown sugar
- 2 tbsp unsalted butter
- pinch cinnamon
- (tiny) pinch nutmeg
- splash dark rum (optional)
- splash banana liqueur (quite optional, since I don't actually know where you can by the stuff!)
SIDE NOTE: Bananas Foster with booze is how I used to make it back in my line cook days, but when we made it for breakfast, there was no booze at all and it tasted fine. ALSO, I just looked up banana liqueur on the LCBO Web site and it would seem that Malibu sells a banana rum. So, perhaps use a bigger splash of that in place of both the dark rum and banana liqueur. Really it's up to you.
Directions
- In a frying pan, cook up French toast as indicated earlier.
- At the same time, in some other sort of pan, melt butter on medium-high heat, add brown sugar and stir until it dissolves. Add cinnamon and nutmeg. Continue stirring, bringing mixture to a boil.
- Add bananas and booze (if using). Stir all ingredients together until liquid is smooth and bananas have softened. Reduce heart to simmer.
- Serve French toast on a plate as normal and top with Bananas Foster sauce.
- Serve with your favourite breakfast pork. I somehow don't see steak working with this one.
2 - French Toast Sammiches with Ham and Chèvre
OK, now we get into possibly(?) more challenging (and untested) territory. This is an idea I want to try for a more savoury French toast dish, but I haven't actually tried it out yet.
The principle is pretty basic though.
First of all, prepare 2 pieces of French toast per sandwich as per the "basic" method. Once ready, put on a plate and let cool a bit.
Using the same pan, fry up as many slices of ham as you want until it reaches a nice texture (or don't, depends on how you like your ham). Once cooked, put aside as well.
On each slice of French toast, spread about a 1/2 tsp of goat cheese (aka chèvre).
Assemble your sandwich.
Put the pan back onto heat and reheat, until sandwich is warm and chèvre has melted slightly.
Serve topped with chopped green onion (if you wish).
Probably best eaten with a knife and fork, but it's up to you.
I swear to Jebus I'll try this out, take a picture, and post it for you all to see what it is I have in mind.
So, yeah, that's just a few forays into the crazy culinary art known as breakfast. Thing is that there really isn't much to making breakfast when you get right down to it. The basics of a tasty morning are simple: eggs, pig, some sort of bread or bagel, some kind of plant matter, and cheese. Assemble as you see fit!
And, if all else fails, there's always Corn Flakes.
Cheers!
Alright, last post dealt with some of the lighter breakfast options out there (not counting a bowl of oatmeal or Special K). This time we get into the more decadent breakfasts. If Part 1 was meant for a nice romantic "morning after", Part 2 is more in tune with the "must cure hangover with sex and grease" mentality. So, get ready for lots of greasy, sugary, fattening, booze-absorbing goodness!
First up is my take on an old British standard, the "fry-up". A fry-up is pretty self-explanatory: you fry up a bunch of stuff in a pan. Now the Brits do it up separately, basically making it a variation of the 2 egg special you'd get at your local greasy spoon (Ottawa folk, think Mellos).
Here's what a basic version of the English fry-up looks like:
 |
| Please note that I got this picture off the Internet, so whomever took it, please don't sue! |
I shall explain...
Fry-up à la Nick
Ingredients
1 potato (the kind you use for boiling), diced small (about 1/2 centimetre, or 1/4 inch)
2 chorizo sausages, sliced thin
1/4 onion, sliced very thin
6-8 cherry tomatoes, halved (try to keep as much juice as possible)
2 eggs
1/2 cup grated cheddar
fresh ground pepper
other options
- diced red pepper
- sliced mushrooms
- various herbs of your choice
Directions
- boil potatoes until you can pierce with fork easily, strain and set aside (this shouldn't take more than 5-8 minutes)
- drizzle a bit of olive oil into a pan and heat
- add sausage and sauté for about 5 minutes
- add rest of ingredients and cook until eggs and veggies are done
- serve with toast and hot sauce
Trust me, it's a thing of greeeeezzzzzzy beauty.
French Toast - basics and variations
"I don't mean to brag, I don't mean to boast,
But I'm intercontinental when I eat French toast!"
- Beastie Boys, The Move
I don't about you, but I happen to think that French toast is the best of the "Sweet Three" of breakfast. The "Sweet Three" being French toast, waffles and pancakes, of course.
Most people would probably choose pancakes over French toast. The thing is that unless you have a wunderkind taking care of the pancakes, I find they often taste like sweetened lumps of dough. I am a much bigger fan of the other two.
Now, I will admit that waffles are perhaps the PERFECT (non-oven-baked) breakfast treat, if cooked to the point of nigh-burnt crispy goodness. But, having made and cleaned up the resulting batterstorm of mess in the past, I'm pretty much convinced they're not worth the frigging effort.
Which brings us to the delicious compromise that is French toast. What can be simpler than coating bread in an egg-milk mixture and frying it up?
Now, I have no idea where French toast comes from, but hey! Wikipedia says neat stuff!
"The earliest official mention of French Toast is in the Apicius, a collection of roman recipes dating back to the 4th or 5th century." http://en.wikipedia.org/wiki/French_toast
We all know that French toast is commonly explained as a excuse to use up stale bread, but I find if you use a nice artisan bread or baguette, it goes from being merely tasty to "Man, that's so good!". The key is to use bread that's a bit stale or started out being fairly hard. Soft bread falls apart when you try coating it in the egg-milk mixture.
Implement-wise, you'll need a mixing bowl for the egg-milk mixture, a frying pan to cook the French toast, a fork and knife and LOTS of maple syrup.
Making French toast - Basics
The simplest way to do up French toast is as follows (I know most of us learned this when we were 7, but you never know):
- Crack an egg into a bowl, pour milk in (not too much) and whisk together with a fork. Add a dash of cinnamon and vanilla if you wish. Add more egg and milk as needed.
- Take a slice of bread and place it in the egg-milk mixture, ensuring that the bread is fully coated.
- Shake off excess mixture (you want just enough to lightly coat the bread and not get it too soggy).
- Repeat previous two steps with as many slices of bread as needed.
- In pan, melt about 1 tbsp butter and coat pan with butter.
- Place coated slices of bread in pan and fry until golden brown, flip and do the same for the other side.
- Serve on a plate with whatever forms of decadence you see fit. I'm a fan of pure maple syrup and sliced fruit
Now that you have the basics, let's fancy things up a bit!
Variation 1 - Bananas Foster French Toast
This was a beauty of a breakfast that my girl Kari found online a few weeks back and, like any chef worth his or her salt, I made a damn sight easier.
Now, no matter how easy I would like to make this recipe, it's still going to require two pans. You'll need a fairly large frying pan and a smaller saucepan of some sort.
Ingredients
- French toast basics (eggs, milk, bread, vanilla, cinnamon, etc.)
- Bananas Foster
- 1-2 ripe bananas, sliced
- 3-4 tbsp brown sugar
- 2 tbsp unsalted butter
- pinch cinnamon
- (tiny) pinch nutmeg
- splash dark rum (optional)
- splash banana liqueur (quite optional, since I don't actually know where you can by the stuff!)
SIDE NOTE: Bananas Foster with booze is how I used to make it back in my line cook days, but when we made it for breakfast, there was no booze at all and it tasted fine. ALSO, I just looked up banana liqueur on the LCBO Web site and it would seem that Malibu sells a banana rum. So, perhaps use a bigger splash of that in place of both the dark rum and banana liqueur. Really it's up to you.
Directions
- In a frying pan, cook up French toast as indicated earlier.
- At the same time, in some other sort of pan, melt butter on medium-high heat, add brown sugar and stir until it dissolves. Add cinnamon and nutmeg. Continue stirring, bringing mixture to a boil.
- Add bananas and booze (if using). Stir all ingredients together until liquid is smooth and bananas have softened. Reduce heart to simmer.
- Serve French toast on a plate as normal and top with Bananas Foster sauce.
- Serve with your favourite breakfast pork. I somehow don't see steak working with this one.
2 - French Toast Sammiches with Ham and Chèvre
OK, now we get into possibly(?) more challenging (and untested) territory. This is an idea I want to try for a more savoury French toast dish, but I haven't actually tried it out yet.
The principle is pretty basic though.
First of all, prepare 2 pieces of French toast per sandwich as per the "basic" method. Once ready, put on a plate and let cool a bit.
Using the same pan, fry up as many slices of ham as you want until it reaches a nice texture (or don't, depends on how you like your ham). Once cooked, put aside as well.
On each slice of French toast, spread about a 1/2 tsp of goat cheese (aka chèvre).
Assemble your sandwich.
Put the pan back onto heat and reheat, until sandwich is warm and chèvre has melted slightly.
Serve topped with chopped green onion (if you wish).
Probably best eaten with a knife and fork, but it's up to you.
I swear to Jebus I'll try this out, take a picture, and post it for you all to see what it is I have in mind.
So, yeah, that's just a few forays into the crazy culinary art known as breakfast. Thing is that there really isn't much to making breakfast when you get right down to it. The basics of a tasty morning are simple: eggs, pig, some sort of bread or bagel, some kind of plant matter, and cheese. Assemble as you see fit!
And, if all else fails, there's always Corn Flakes.
Cheers!
Saturday, November 20, 2010
Breakfast goodness - Part 1
-
Well, I am hoping that by now you've managed to cook your way into seduction as per the original aim of this blog. If you haven't, go back to the first post and try again!
As for the rest of you, now it's time for the most important meal of the day: Breakfast!
Alright, where to begin, hmmmmmmmm...
Well, I figure we'll start smallish and healthier.
An easy, nutritious and tasty breakfast is the smoothie. While not a solid meal, it has most of the ingredients one needs to start their day and is very simple to prepare (as long as you have a blender).
Basically, a smoothie is milk, fruit and a sweetener, if required. Many other ingredients can be thrown in as you see fit, such as yogurt, cereal (such as All-Bran for fibre) and vitamin supplements.
Here's a fairly tasty smoothie I make somewhat regularly:
Strawberry Banana Mango Smoothie
2 cups milk (2%, 1% or Skim)
1/2 cup banana slices
1/2 cup mango chunks (I use bags of frozen mango bought at the supermarket)
1/4 cup strawberries
1 tbsp sugar or honey
3 tbsp plain yogurt
Combine all ingredients in blender and blend until smooth.
If mixture is very thick, add more milk and continue blending.
Any kind of liquid can be substituted for milk. I've used pineapple and orange juice. You can always use soy/almond/hemp/whatever milk, if you can stand that stuff (I can't).
Serve in a couple of big glasses and there you have it.
Next up is an old favourite: the omelette. Now, omelettes aren't really complicated at all. They're basically made much the same way as scrambled eggs (I'll assume you all know how to make scrambled eggs), with just a bit more skill required.
I'll walk you through the process.
First of all, the size of the omelette is based on how many people are eating it. Let's assume Romeo (or Juliet) that this is an intimate breakfast for two. So, let's go with two eggs per person, grand total of four eggs.
Now, you need to figure out what you like in your omelette. I usually go with something simple like onion, red pepper, mushroom and cheddar, so let's assume you're going to make that too.
Dice onion and pepper fairly small (about half a centimetre in width), slice mushrooms. Sauté all veggies in butter until soft. Put in a bowl and set aside.
Crack the eggs in another bowl. (If you don't know how to crack an egg by now, I think this is about the time you rush out for McMuffins. Fail.) Add about 1/2 cup milk. Whisk with a fork. Set aside.
In a large (and I do mean large) frying pan, melt about 2 tablespoons butter. Yeah, omelettes aren't diet food either. As the butter melts, make sure you manipulate it as to coat the whole pan. This is VERY important, as it will help the omelette cook evenly and not stick. Be careful not to burn the butter either.
Once your pan is coated, pour in the egg/milk mixture. Let it cook on medium high heat until the edges start to become solid and recede from the sides of the pan.
Add your veggies and cheese and let cook for about 5 minutes, allowing the cheese to start melting.
Now this is the tough part: folding the omelette over. Make sure you have a fairly wide spatula or damn agile hands. You can either use the spatula to fold one side of the omelette onto the other, or do it by flipping one side onto the other with just the pan. Now, if you're like me, you suck at both and are going to break the omelette's beauty.
Here's what a properly folded omelette looks like:

Here's what mine usually look like (ignore the hash browns and sausages on the left of the plate):
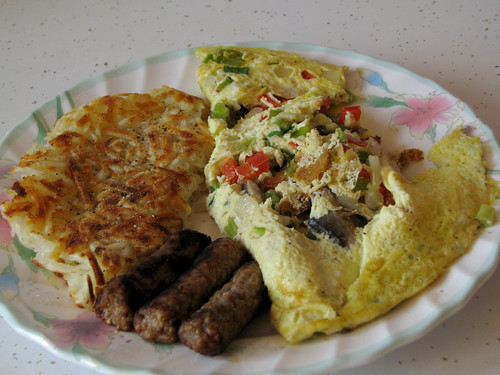
But if you're like me, presentation means sweet frak all, as long as it tastes good! Now, I like my omelettes (and all my eggs really) well done, almost crispy. Just remember that the longer you cook it, the drier the eggs will be. The goodness or badness of this fact is purely subjective.
Either way, once you've gracefully folded the omelette, or not, slide it onto a plate and slice into two equal servings. Serve one half to your guest and eat the other. Enjoy!
Now, the breakfasts I've shown you so far are somewhat reasonable affairs and not too over-the-top. That all changes with the next post. That's when we bring in the meat!
Until then, enjoy your morning!
Well, I am hoping that by now you've managed to cook your way into seduction as per the original aim of this blog. If you haven't, go back to the first post and try again!
As for the rest of you, now it's time for the most important meal of the day: Breakfast!
Now, if you're like me, breakfast isn't the first on your list of meals for practicing the fine art of cooking. I've always been a 'bowl of cereal and cup of coffee' kind of guy. That was before meeting my girlfriend who is a total breakfast-o-phile. She's made some craziness in that department! Example: tater tots, bacon and cheese smothered in Hollandaise sauce. I got through about 5 bites. Maybe she should send it in as a This Is Why You're Fat entry.
Now, that being said, I've had a lot of delicious breakfasts since we've been together and would like to share some of them with you.
Alright, where to begin, hmmmmmmmm...
Well, I figure we'll start smallish and healthier.
An easy, nutritious and tasty breakfast is the smoothie. While not a solid meal, it has most of the ingredients one needs to start their day and is very simple to prepare (as long as you have a blender).
Basically, a smoothie is milk, fruit and a sweetener, if required. Many other ingredients can be thrown in as you see fit, such as yogurt, cereal (such as All-Bran for fibre) and vitamin supplements.
Here's a fairly tasty smoothie I make somewhat regularly:
Strawberry Banana Mango Smoothie
2 cups milk (2%, 1% or Skim)
1/2 cup banana slices
1/2 cup mango chunks (I use bags of frozen mango bought at the supermarket)
1/4 cup strawberries
1 tbsp sugar or honey
3 tbsp plain yogurt
If mixture is very thick, add more milk and continue blending.
Any kind of liquid can be substituted for milk. I've used pineapple and orange juice. You can always use soy/almond/hemp/whatever milk, if you can stand that stuff (I can't).
Serve in a couple of big glasses and there you have it.
Another "healthy" choice is a simple offering of plain yogurt, granola and fresh strawberries. Slice the strawberries, toss in a bowl with granola, spoon in a generous dollop of yogurt, top with a teaspoon of maple syrup and voilà!
Omelettes
I'll walk you through the process.
Now, you need to figure out what you like in your omelette. I usually go with something simple like onion, red pepper, mushroom and cheddar, so let's assume you're going to make that too.
Dice onion and pepper fairly small (about half a centimetre in width), slice mushrooms. Sauté all veggies in butter until soft. Put in a bowl and set aside.
Crack the eggs in another bowl. (If you don't know how to crack an egg by now, I think this is about the time you rush out for McMuffins. Fail.) Add about 1/2 cup milk. Whisk with a fork. Set aside.
In a large (and I do mean large) frying pan, melt about 2 tablespoons butter. Yeah, omelettes aren't diet food either. As the butter melts, make sure you manipulate it as to coat the whole pan. This is VERY important, as it will help the omelette cook evenly and not stick. Be careful not to burn the butter either.
Once your pan is coated, pour in the egg/milk mixture. Let it cook on medium high heat until the edges start to become solid and recede from the sides of the pan.
Now this is the tough part: folding the omelette over. Make sure you have a fairly wide spatula or damn agile hands. You can either use the spatula to fold one side of the omelette onto the other, or do it by flipping one side onto the other with just the pan. Now, if you're like me, you suck at both and are going to break the omelette's beauty.
Here's what a properly folded omelette looks like:
(side note: Avocado Omelette? YES PLEASE!)
Here's what mine usually look like (ignore the hash browns and sausages on the left of the plate):
But if you're like me, presentation means sweet frak all, as long as it tastes good! Now, I like my omelettes (and all my eggs really) well done, almost crispy. Just remember that the longer you cook it, the drier the eggs will be. The goodness or badness of this fact is purely subjective.
Either way, once you've gracefully folded the omelette, or not, slide it onto a plate and slice into two equal servings. Serve one half to your guest and eat the other. Enjoy!
Now, the breakfasts I've shown you so far are somewhat reasonable affairs and not too over-the-top. That all changes with the next post. That's when we bring in the meat!
Until then, enjoy your morning!
A new pasta recipe of utter luxury - sort of...
-
Hello again!
It's easy enough to make pasta, as demonstrated (hopefully) in my first set of posts. And the great thing about pasta is that you can experiment to your heart's content with the sauce. You can go from something light like an oil and garlic sauce to the decadent richness of an Alfredo or vodka sauce. But what we have here is the pinnacle of decadent. So decadent, in fact, that we're going beyond pasta into the lovely terrain of gnocchi.
Gnocchi is a potato dumpling of sorts, about 1 inch long. You can find it in supermarkets in the pasta section. It cooks in mere minutes and is about as substantial a base for sauce as you can find. You can also make it at home with different ingredients than potatoes (Me or my girlfriend are going to make sweet potato gnocchi at some point).
Here's what it looks like:

Gnocchi is the kind of stick-to-ribs food that would be great after a day in the snow (or an hour shovelling the driveway), especially when you top it with a Gorgonzola-cream sauce. Be warned, this is the opposite of diet food!
Potato Gnocchi w/Gorgonzola-Cream Sauce
Ingredients
1 package potato gnocchi (about 500 grams)
1 tbsp unsalted butter or olive oil
1 small onion, cut in half and sliced thin
3-4 cloves garlic, minced
1 cup whipping or table cream
1/2 cup 2%, 1% or skim milk
100 g (approx) Gorgonzola or other blue cheese (the original recipe calls for Stilton, but that can overpower the palette)
2 tsp finely chopped fresh thyme
2 tsp finely chopped fresh rosemary
Fresh ground black pepper to taste
Directions
In a fairly large pot, bring salted water to boil.
While water is heating to a boil, in a saucepan, melt butter/heat oil (you're using the butter/oil to sauté the garlic and onions, so it's up to you which one you want to use, both are tasty, olive oil is probably better for you).
Sauté onions and garlic until they start to turn golden brown, about 6-8 minutes on medium-high heat.
Add cream and milk and bring to a boil. Be careful when bringing to a boil as the cream/milk mixture will bubble over very quickly making a total mess. Reduce heat to low (2-3) as soon as it boils. Let sauce simmer and reduce a bit (3 minutes or so)
Add cheese a little at a time, stirring constantly, until all cheese has melted into sauce.
Add thyme, rosemary and pepper. Reduce heat to minimum.
Back to the water: once boiling, add gnocchi, stirring to separate each piece. Boil for about 3 minutes. Gnocchi will be ready when it floats to to the top of the pot.
Empty gnocchi into a strainer and drain water. Put gnocchi back into pot.
Pour sauce into pot with gnocchi and mix well.
Serve in bowls with good bread to soak up sauce, a salad, and your favourite wine.
Enjoy!
Hello again!
It's easy enough to make pasta, as demonstrated (hopefully) in my first set of posts. And the great thing about pasta is that you can experiment to your heart's content with the sauce. You can go from something light like an oil and garlic sauce to the decadent richness of an Alfredo or vodka sauce. But what we have here is the pinnacle of decadent. So decadent, in fact, that we're going beyond pasta into the lovely terrain of gnocchi.
Gnocchi is a potato dumpling of sorts, about 1 inch long. You can find it in supermarkets in the pasta section. It cooks in mere minutes and is about as substantial a base for sauce as you can find. You can also make it at home with different ingredients than potatoes (Me or my girlfriend are going to make sweet potato gnocchi at some point).
Here's what it looks like:
Gnocchi is the kind of stick-to-ribs food that would be great after a day in the snow (or an hour shovelling the driveway), especially when you top it with a Gorgonzola-cream sauce. Be warned, this is the opposite of diet food!
Potato Gnocchi w/Gorgonzola-Cream Sauce
Ingredients
1 package potato gnocchi (about 500 grams)
1 tbsp unsalted butter or olive oil
1 small onion, cut in half and sliced thin
3-4 cloves garlic, minced
1 cup whipping or table cream
1/2 cup 2%, 1% or skim milk
100 g (approx) Gorgonzola or other blue cheese (the original recipe calls for Stilton, but that can overpower the palette)
2 tsp finely chopped fresh thyme
2 tsp finely chopped fresh rosemary
Fresh ground black pepper to taste
Directions
In a fairly large pot, bring salted water to boil.
While water is heating to a boil, in a saucepan, melt butter/heat oil (you're using the butter/oil to sauté the garlic and onions, so it's up to you which one you want to use, both are tasty, olive oil is probably better for you).
Sauté onions and garlic until they start to turn golden brown, about 6-8 minutes on medium-high heat.
Add cream and milk and bring to a boil. Be careful when bringing to a boil as the cream/milk mixture will bubble over very quickly making a total mess. Reduce heat to low (2-3) as soon as it boils. Let sauce simmer and reduce a bit (3 minutes or so)
Add cheese a little at a time, stirring constantly, until all cheese has melted into sauce.
Add thyme, rosemary and pepper. Reduce heat to minimum.
Back to the water: once boiling, add gnocchi, stirring to separate each piece. Boil for about 3 minutes. Gnocchi will be ready when it floats to to the top of the pot.
Empty gnocchi into a strainer and drain water. Put gnocchi back into pot.
Pour sauce into pot with gnocchi and mix well.
Serve in bowls with good bread to soak up sauce, a salad, and your favourite wine.
Enjoy!
Subscribe to:
Posts (Atom)