Monday, March 21, 2011

A Toast To My Hometown's Better Eateries - Beckta

Hey all!

I'm back again with more of my impressions of some of the finer places to eat in Ottawa.

Well, today's post is a bit special in that I'm retelling one of the better dining experiences I've ever had in my life.

Kari's (my girlfriend/fellow unicorn hunter) birthday was March 15, so the preceding Saturday night we celebrated by going to what is generally considered Ottawa's finest restaurant, Beckta. We decided to go full out and have the 5-course tasting menu with cheese plate and wine pairings. Add a few cocktails and tip and the whole thing clocked in at 400 bucks. Good thing I have disposable income this month! But, totally, absolutely and utterly worth every penny.

The difference between Beckta and every other restaurant I've been to is in the service. No one server takes care of you, although there's a 'mostly' dedicated server. Instead, each server takes care of you as needed or as available. Special props to Alex, the 'bread guy' who delighted us with three different kinds of bread, but especially made our night by describing the process of caramelizing butter (which was served with the bread, and was good on everything!) and to Bill who was our dedicated server and made my night by being able to describe our meals and wine pairings without coming off too condescending or pretentious (something that I was glad to see didn't happen too often, because I was expecting it a little, although the sommelier's forced guffaws at my jokes were a little grating).

Truly, these are people who make an art of service in a very traditional context that I had never experienced before. I was delighted, although not sure how much of it I could stand long term or recurring. I'll always be a 'casual' diner and like my servers to "keep it real" for the most part. However, this is an experience easily found at many other restos in Ottawa, leaving the Beckta caliber of service in the category of "special occasion", where it should rightfully remain. And no one gave me the hairy eyeball for dancing in my chair. (The food was really good, what was I supposed to do??)

Now, the food itself was inspired with nearly zero slips or disappointments in a 5-course meal (6 if you count the cheese plate). It was a true culinary wonderland of surprises as we had no idea what our courses would be until they were in front of us. Something I really appreciate since, as you may remember from my last post (http://dudecook.blogspot.com/2011/02/if-i-were-chef.html), I too would like to "surprise" my clientele (if I had a business that had such things) with unannounced menu items. And as an added bonus, they wrote up the whole menu and gave us a print-out after we were done. YAY!

So, here's the menu with my impressions:

Openers

- Amuse-gueule of tuna rilletes and red pear on an in-house sesame cracker
- Cocktail of sparkling wine and passion fruit puree

The flavours of the tuna and the cocktail mixed beautifully, with elements of earthy, tangy and fishy (in a good way) all intermingling on the taste buds. It was kind of like there were go-go dancers on my tongue.

1st course

- Trout: Vanilla Bean and Coffee Cured Trout, Yukon Gold Potato Blinis (little pancakes), Berg en Dal Goldenrod Honey, Candied Bacon
- Wine pairing: Vouvray, Chateau Gaudrelle, France, 2009

The menu said the trout was smoked, but if it was, it must have been a very cold smoking technique. I must investigate further...

So, a wonderful mix of flavours in this one, with the blinis being little pockets of potato-flavoured air and the honey being like none I've ever tasted. If I have one issue with this dish, it's that the flavouring of the trout was a bit too subtle when paired with the bold salty-sweetness of the candied bacon. If I were doing it (and consider this the gauntlet lain to anyone who reads this), I'd have hot-smoked my trout (or, what I would preferably use, Arctic char) to give it a stronger, woodier flavour. Now, that being said, I'm simply a fairly talented amateur, so what do I know?

The wine was a great compliment here, having a subtle fruity taste and strong mineral tang in the finish. It pepped up the flavours of the dish tremendously without losing its own character.


2nd course

- Eggs Benedict: Homemade muffin, 'Nduja pâté, Lamb Pancetta, Tempura-Fried Egg Yolk, Meyer Lemon Hollandaise, Micro Osaka
- Wine pairing: Cuvée 13 Sparkling Rose, 13th Street, Niagara Peninsula 2007

Wow. This dish introduced me to something that is going to haunt me till the day I die: Lamb Pancetta. Lamb... freakin'... Pancetta!!! SOOOOOOOOOOOOOOOOOO GOOOOOOOOOOOOOOOOOD!!!
Imagine bacon, but with lamb's delicious subtle gaminess. Yeah, I need to figure out that one and make my own. As God as my witness, I will never go without Lamb Pancetta again!

OK, OK, there was also all the other bits of deliciousness that I need to describe. Well, let's make it simple: the muffin was tasty, especially the texture. The egg yolk was, well, egg yolk fried in tempura. Since I'm not a huge egg fan, I can't give it its proper due. BUT, in a nice surprise, Bill told us that the yolk would be runny and get all over everything (which made me cringe as I hate runny yolk). Lo and behold, a nice solid yolk.

As for the hollandaise, well, hollandaise is another one of those culinary items that does not really send me to the moon. It's damn tasty, but just not one of my faves. But the addition of the Meyer lemon really made it dance. Definitely one of the best I've ever had.

With this dish, I'm going to make clear culinary ignorance and declare that I have no freaking clue what 'Njuda pâté nor Micro Osaka mean. Internet to the rescue!

Nduja pâté: Oooooooh, it's like a pork pâté made from the head! THAT's what that extra meaty subtleness was!

Micro Osaka: I suspect this was actually a kind of beer that helped flavour the rest of the dish, but not sure how they incorporated it...

In the end, this course could have been Lamb Pancetta on a soda cracker and I would have been impressed! OM!

As for the wine pairing, I was completely taken aback at the flavour of the sparkling wine. Normally, I'm not a huge fan of sparkling wine. I find it needs to be mixed with something. But the elements of this wine on the tongue were complex and remarkable. The flavour that came out the strongest, and this might sound crazy, was turmeric. Yeah, earthy, dense turmeric in a sparkling wine. Weird, eh?


3rd course

- Quail: Seared Quail, Boudin Noir, Ghost Pumpkin Puree, Grilled Cortland Apple, Port Syrup
- Wine pairing: Pinot Noir, Appleby Lane, New Zealand 2008

Well, now, ain't this fancy? Quail, eh? I'll be honest, I've never had quail before. Turns out it's delicious! It's basically a leaner, slightly more restrained version of duck. Whatever the glaze/sauce it was cooked in was magnificent. Oh wait, maybe that was the Port Syrup. Mmmmmmmmm....

So, on top of that, there was the Boudin Noir, which is essentially blood sausage. I'd never had it before, but I found the flavour quite reminiscent of haggis. Good thing I love haggis!

The Ghost Pumpkin Puree (ghost pumpkin and white pumpkin are the same thing) was subtly flavoured, imagine a less strong tasting squash. Didn't really taste like pumpkin, but that isn't a bad thing!

I loved the Grilled Cortland Apple element. There's something magical yet totally simple about grilled apple.

The whole came together as a kind of autumnal comfort dish, and paired tremendously with the New Zealand Pinot Noir. Being especially fond of Pinot Noir, I was very pleased to try one from a region I didn't even know grew Pinot Noir grapes! As a good Pinot should be, it was light and flavourful.

It was around this time that I'd begun dancing in my chair, I hope no one minded...

Intermezzo

- Iced Earl Grey Tea, Burnt Oranges

Umm, Iced Tea! With Burnt Oranges! Cleared the palette well, but that's about all I can say. Not a big Iced Tea fan...

4th course

- Bison: Seared Bison Striploin, Taro Root Robuchon, Tame Mushrooms, Bok Choy, Red Cabbage, "Broken" Ponzu of Soy Reduction and Yuza Gastrique
- Wine pairing: Cabernet Sauvignon, Bommarito, Napa Valley, California 2006

First they brought out the Cabernet Sauvignon, the sommellier hinting that it was time for the 'big guns', which prompted yours truly to wonder out loud if the next dish might consist of something that had once had four legs and might bleed on the plate. No response. Then, out came the steak knives. *Insert meat squee here*

So, needless to say I was almost jumping out of my seat when this gorgeous piece of burgundy, almost dark purple, meat got to the plate, surrounded by deep, rich red and orange, which were in turn offset by the lighter greens and whites of the bok choy and taro root. It was a beautiful plate (and this coming from the guy who doesn't really give a flying fig about food presentation).

What was even more beautiful was how tender the bison. I could damn near cut through the 2 inch thick striploin cut with my fork. But I stopped myself for fear of making a racket and a mess. I do, on occasion, stop my clumsiness from going too far... The meat was delicious, lean, and surprisingly un-gamey. It tasted like beef that had infused with, I don't know, faerie dust? It's hard to describe the first time you taste something!

The Taro Root Robuchon was basically a mash (apparently "Robuchon" refers to a method of cooking based on the name of a French chef. Here's the loop, and then here's me, about 5 light years away) with a nutty, subtle parsnip flavour. Very nice.

The "Tame" Mushrooms simply meant that the mushrooms weren't wild. Um, OK... They were mushrooms, so what can I say other than mushrooms are awesome? These were as well!

The bok choy was prepared simply, lightly steamed with some butter (and lemon?) while the cabbage was, I believe, raw. But all elements worked well in concert, with one slight exception based on my own tastes. The ponzu (a Japanese style citrus reduction) was actually quite tasty, but the soy element was just too damned salty. When combined with the accumulated salt of all the preceding dishes, it seemed a bit much. Unfortunately, it took away more than it added to the dish. Oh well...

Can't really say much about the wine. It was a big, bold California Cab, ideal for red meat. It was definitely playing Robin to the bison's Batman. In other cases, like the Eggs Benedict, the wine almost overshadowed the plate. Totally not the case here, which is good. I can't imagine having a wine so bold as to overpower a bison steak would be a wise idea.

Around this point, Kari had already been gripping the table in joy, but she was starting to feel a bit full. She wasn't sure about going for the cheese plate. So, we decided after they cleared our table of the bison plate, to just chill and finish our wine. And then those sneaky bastards took the cheese for a walk to another table, right in plain sight! When Kari saw those pretty veins of blue cheese, she didn't need any further convincing.


Cheese plate

- Prestiche de Bourgogne (super creamy Brie)
- Niagara Gold (strong cow's milk)
- Sainte Maure de Touraine (goat's milk)
- Smokin' Back Forty (hard sheep's milk)
- Peau Rouge (hard tangy)
- Celtic Blue (smooth blue)
- Wine pairing: Madeira "Fine Old" 5-year, Casa dos Vinhos, Portugal

So, this was a veritable "world tour" of cheese, with some from France, Ireland and here at home (OK, so more like a Euro-Canadian tour).

The Prestiche de Bourgogne was one of the creamiest Brie/Camembert-style cheeses I've ever had. It was almost buttery, and richly flavoured without being overpowering the way, say, a Boursin can be. Thoroughly enjoyable.

Next was the Niagara Gold, a cheese with a cheddar-like texture which got met with mixed reactions. It had a very strong "barn" smell and flavour. Kari thought it was icky, I found it intriguing. But not really delicious. Definitely last on the list.

The Sainte Maure de Touraine was a goat's milk cheese out of Quebec with a remarkably subtle flavour. Kind of a welcome change from the standard over-the-top sharpness of most "chèvre".

The Smokin' Back Forty was a Beckta exclusive (oooooh, fancy!), made in nearby Lanark County, then shipped to the resto where they smoke it with rosemary. Yeah, guess which cheese was my favourite? This had a wonderful light smoky flavour (they used apple wood, I think) that didn't overpower the natural fresh flavour of the cheese itself. I need more! Maybe Beckta will cut me a side deal? Would ya? Guys? Pleeeeeeeease?! I'll totally be your friend forever and ever!

The Peau Rouge comes out of Quebec (I think) and had a strong sharp flavour that is nestled somewhere between an extra-old cheddar and a Parmesan. Very salty, but in this case the saltiness worked well, especially when cut by the Madeira. And the cheese itself did this fun little dissolving act on the tongue that was quite enjoyable.

Last but not least was the Celtic Blue (from Ireland, I assume?). This was a very mild blue cheese, which was rather welcome at the end of the night. My taste buds were getting a little overwhelmed! Not really much to comment about it. It's blue cheese, it's delicious!

The Madeira pairing served as kind of a catch-all to cover the sheer variety of all these cheeses. It worked well, having an almost maply flavour and richness, but without so much sugar. It had a velvety finish that gave an exquisite mouth feel when matched with the creamier cheeses.

5th course

- Dessert - "Tropical Cubist Movement": Grilled Pineapple Polenta Cake, White Chocolate Bavarois, Cinnamon Date Semi Freddo, Citrus-Cured Papaya with Espellette Pepper
- Wine pairing: Riesling "Indian Summer" Cave Spring, VQA Niagara Peninsula 2007

Before I comment on how good things were in the dessert course, let me just say that by the time we got around to dessert, we'd been in the restaurant for about 3 and a half hours and were near bursting. So if I don't do justice to these wonderful examples of the art of sweet, I apologize in advance, my sinuses were packed with meat. And cheese. And wine...

So, the desserts were a series of little squares (hence "Cubist" - Oh you witty chefs!) served with the usual artistic flair that I have yet to master.

First, the Grilled Pineapple Polenta Cake. The flavour was reminiscent of pineapple upside-down cake, albeit better (naturally). What made this dish unique was the interesting exercise in texture it presented. On its own, when first biting a piece of the cake, it was tough and chewy, but as you chewed it with the pineapple, the acidity of the fruit helped to soften the cake into a perfect bite. It was like a chemistry class in my mouth!

Next was the White Chocolate Bavarois (aka Bavarian cream). This one was sort of neutral to me in the sense that the flavours didn't smack me upside the head and scream "I'M NEW! LOVE ME!" It was creamy white chocolate goodness. Not much else I can say about it.

What's a Semi Freddo? Half of a wimpy Corleone? The Italian name for a pair of ambiguously gay hobbits? In fact, it's an Italian term for a "half frozen" dessert. Basically, a frozen kind of mousse. Not sure how "freddo" this Cinnamon Date Semi Freddo was, but man was it molto bene! I'm a big fan of cinnamon when used correctly, and it was here, blending superbly with the mousse. The flavour of date (which must have been ground in this case) played more of a support role, which I enjoyed. Too much date is cloying. Not what I needed from dessert, especially since the Riesling had a honey-like palette. Both together would have been way too much.

But the pièce de résistance (and likely the easiest to prepare) was the Citrus-Cured Papaya. So fresh and tasty and bursting with goodness, it was exactly the way to relieve the tongue of all those flavours. The Esplenette Pepper was this lovely melange of spicy and sweet (peppers and sugar) and the whole of it came together in a perfect end note to the evening.

The Reisling was a surprisingly good match, especially considering how much I normally dislike sweeter wines. But in this case, it complimented with the Semi Freddo and Bavarois and was deliciously subdued by the acidity of the pineapple and papaya.

So, friends, there's my tale of culinary extravagance told. Finishing touches came from Bill as he brought us the print-out of our menus as a souvenir, and Alex suggesting that if I needed the recipe for Lamb Pancetta, to maybe ask for it on the Beckta Web site (http://www.beckta.com/).

In the end, this was an unforgettable experience, one I hope to recreate when my pockets are once again obese.

To the servers and cooks at Beckta, I salute you for being the artists that make life so much better for Hedonists like me. Maybe some day I'll repay the favour!

And to anyone watching who's in the know or happens to work at (or own) Beckta, I hope you like what I have to say. I welcome any clarifications about the meal and suggestions for future dining experiences.

Cheers!

Saturday, March 19, 2011

Mad Scientist Day!

Hello my pretties!

Sometimes you can come up with things in the kitchen that make you laugh with an "M" at your own evil creative genius... MWAHAHAAHHAHAHAHAHAHAHAHAHAAHHAAAAAAAA!!!!!!

I'll give my girl Kari credit, she can push the recipe envelope into the realm of insanity better than anyone I know. Example: We were having leftover "Chocolate Goop" (a melty chocolate pudding my mother makes, more on her food awesomeness to come soon!) when she's like, 'hey, let's add a scoop of that Butter Tart Ice Cream! And then chop up some Turtles and sprinkle them on top! Yeah! And then add Sucre à la crème, and whipped cream, and berries! And maybe peanut butter!' Luckily we stopped at the Turtles...

It's pretty easy to let your imagination run wild when you have a basic concept of how some foods go with others. But sometimes we can go too far and throw in that one ingredient that either overpowers the whole dish (e.g. cardamom) or we pair ingredients that, if done wrong, spoils the whole damn thing. A good example is mixing citrus, like lemon, with dairy. Can we say curdle? (it is possible to mix the two correctly, but it takes special attention and care)

But sometimes it can work to mix unlikely ingredients into interesting pieces of culinary fusion. It also helps you clear out the fridge and freezer!

Just recently I found myself unsure of what to make for dinner. So, head to the supermarket, right? Well, the local supermarket was closed, leaving me to have to go to the nearby organic veggie market, which is somewhat more expensive. But, red cabbage was fairly cheap, and their avocados were about the same price as the supermarket, and nice and ripe! So, with unconventional fusional recipes inventing themselves in my mind, I bought the produce and went home to see what I could bash together. What I came up with was something I've named Mad Scientist Stew. It's basically a fusion of flavours from Eastern and Northern Europe, basically a Slav-Scandinavian fusion, with a touch of Mexico (the avocado) and East Asia (ginger). I made it pretty spicy too. The reason I thought this might work is that sour cream is part of European cooking as well as Mexican, and that the buttery texture of avocado would be an interesting counterpoint to the sweet/sour flavouring of the stew.

The amounts I used were determined on the spot, so bear with me.

Mad Scientist Stew

Ingredients

- Olive oil
- 1 1/2 inch piece of ginger, peeled and minced
- 4 cloves garlic, minced
- 1 small head red cabbage, chopped coarsely
- 1 small onion, chopped coarsely
- 1 large carrot, peeled and sliced
- 1 tsp smoked paprika
- pinch cayenne pepper
- 1/2 cup liquid from jar of pickled herring
- 1/2 cup pickled herring filets
- 1 cup vegetable cocktail
- 2 pickled hot peppers (banana or jalapeno), roughly chopped
- 1 cup red wine
- 1 can tomato paste
- Salt and pepper to taste
- 2-4 tsp caraway seeds
- 1 ripe Haas avocado, roughly diced into chunks
- Sour cream for serving

Directions

- Sauté ginger and garlic in olive oil, until garlic begins to turn golden
- Add cabbage, onion, carrot, paprika and cayenne sauté for 2-3 minutes
- Add pickled herring juice, vegetable cocktail, hot peppers and wine, bring to a boil
- Reduce heat to medium, stir in tomato paste and 1 tbsp of caraway seeds
- Season with salt and pepper (salt may not be needed as there is a fair bit of salt in the paste, veggie cocktail and herring)
- Reduce heat to medium-low (3) and simmer for 30-40 minutes
- Once stew has thickened, stir in another 1 tbsp caraway seeds (or more if you're like me and really like the flavour they impart) and avocado chunks
- Serve in bowls, stir in sour cream to taste

I found this was really good with a cold beer, but I bet a nice dry white wine would work well too. Yes, I realize there's red wine in the recipe, but there's also white fish, so I figure white wine.

This next recipe is more 'goat' than 'mad scientist'. I had a few ingredients in the fridge one night that I knew needed to be used up soon or they'd go bad, but I didn't really have a clear recipe in mind. I'd recently made some sort of Thai curry and had a bunch of leftovers as well as lots of veggies. So, feeling bold, I decided to try and a wacky mix of Mediterranean and Thai flavours together. The result was surprisingly good. I'd give it a 3 out of 4.

So, if you want to try a semi-traditional pasta sauce with Thai and Ethiopian elements, here you go!

Fusion Sauce for Pasta

Ingredients

- 3 cloves garlic, minced
- 1 sweet (vidalia) onion, diced
- 2 tbsp olive oil
- 4 ripe tomatoes, finely diced (or 1 can tomatoes)
- 1 can tomato paste
- 2 tbsp red Thai curry paste
- 400 g steak cut into strips (or use whatever meat you like, or none)
- 2 tbsp Berbere spice (if you don't know the recipe by now, for shame!)
- 1 tsp fresh ground black pepper
- 1 red pepper and 1 yellow pepper, cut into strips
- 1/4 cup Kalamata olives, pitted and sliced
- 3-4 kaffir lime leaves
- 1/2 can coconut milk (about 1 cup)
- juice of 1/4 lime
- fresh basil leaves (Thai basil or regular basil or both)
- fresh cilantro

Directions

- Sauté garlic and onions in olive oil for about 4 minutes, ensuring the garlic doesn't overcook.
- Add tomatoes, beef or chicken (if using) and cook for another 6-7 minutes.
- Add tomato paste, curry paste, Berbere spice and pepper. Stir until pastes are well dissolved into sauce.
- Add peppers and simmer at medium-low for about 10 minutes until peppers are somewhat cooked.
- Add lime leaves, olives, lime juice and coconut milk, turn heat up to medium high until coconut milk reduces (about 10 minutes)
- Pick out lime leaves
- Sauce is ready to serve over cooked pasta (or toss pasta with sauce in pan)
- Garnish with basil and cilantro

I was surprised at the interesting mix of flavours. Definitely not for the faint of palette!

So, there you go! Sometimes it's more fun to say "Frak the rules" and go a little crazy in the kitchen. You never know what the result might be! Just remember this: the Caesar Salad was invented as a "mad scientist" kind of recipe. And who doesn't like Caesar Salad?

Cheers! Enjoy! Feast! Create! Experiment!

Thursday, February 3, 2011

If I were a chef

It's Imagination Day! Like on the Polka-Dot-Door!

It's no secret that I have some aspirations of making a living of cooking, but the last thing I want to do is work in a big bustling restaurant, whether it be as line cook or executive chef. I was a line/prep cook for 5 years in my late teens/early 20s and, unless you have aspirations of chefdom, that's more than long enough. There is nothing quite so exhausting as being completely overwhelmed by food orders as you hemorrhage sweat surrounded by people you often don't like, with servers barking at you the whole while. All for minimum wage. Good times.

No, I don't ever want to relive those days. But to run a small café in the backwoods of Ontario's cottage country or Quebec's Laurentians (where the skiing happens) would be a dream come true, as long as there was only seating for, say, 20 people. I kid you not. So, I don't have a particularly profitable vision of life as a restauranteur.

That being said, I do still wonder what I'd serve if I had my own place. So, this post will examine some of those items and I may toss a recipe or two your way to reflect this.

Well, first of all, I'm a BIIIIIG fan of smoking food, as demonstrated in recent posts (January 3 and January 22), so that would be a big part of the menu.

So, here's the sample menu for sh**s and giggles:


Small plates/Soup/Salad

- Cold Fish Two Ways (smoked tilapia and salmon gravlax)
- Lobster Bisque
- African-style Sweet Potato Soup (vegan)
- Chicken Burrito (fancied up)
- Smokeshow Special (smoked meat sampler)
- Pasta Salad Still Rules (with olives, red pepper and dill) (vegan) - available with grilled or smoked shrimp for a few bucks extra (thus less vegan)
- Salad of the Day

Large plates

- Smoked Pork Tenderloin w.seasonal sauces (wild garlic and fiddleheads sauteed in white wine in Spring, blueberry reduction in Summer, apple compote in Fall, maple-cognac in Winter) served w. root veg. mash
- Gourmet Chili - served with home-baked bun and extra-old cheddar
- Beef Curry (w. smoked beef brisket?) - served with home-baked naan
- Smoked Chicken Thighs - w. root veg. mash
- The Hippie Silencer: Grilled Veggie Medley (vegan) - served with gluten-free home-baked wraps
- Smoked Ribs w. blue cheese cabbage slaw and home-baked cornbread
- Seafood medley (King crab legs or lobster *in season*, hot-smoked tiger shrimp, grilled calamari, poached or smoked fish) served w. lemon-steamed broccoli
- Steak My Way (8 oz. Filet mignon cooked either grilled, pan-seared w.mushroom and brandy reduction or blackened) served with grilled potato slices and Salad of the Day


Not sure what I'd do with desserts, I guess I'll leave that to either the person I hire to be a pastry chef, or the woman I marry. Let's hope she can bake!

So, any jerks out there who are out to steal my idea, I'm going to give you even MORE fuel for that fire. I've got recipes! Mind you, quite a few are in other posts. Any excuse to get y'all to read my stuff! Mwahahaahahaha!

Let's break down this proposed menu, shall we? Who knows, maybe you'll have fun putting one of these together!

1 - SMALL PLATES


COLD FISH TWO WAYS

So, for the small plates, we start with Cold Fish Two Ways. This would include my smoked tilapia and salmon gravlax.

Gravlax is a Scandinavian recipe for salt/sugar-curing various types of fish, usually salmon. The process of curing helps remove moisture from the meat, allowing it to keep longer. It's also damned tasty!
Here's the recipe I used. I got it out of the paper many years ago, I believe. (WARNING: This is for true piscophiles. If the look and texture of raw fish gives you the heebie-jeebies, don't try this. While it's cured and therefore not exactly raw, the fish's texture doesn't really change much in gravlax.)

Irish Gravlax

2 pounds fresh salmon, skin on, with pin bones and scales removed
Cracked black pepper
1/2 cup brown sugar
3 tbsp chopped fresh dill
2 cups kosher salt
1 ounce Irish whiskey (Jameson's or Bushmills)

- Season salmon with a thick coating of pepper, brown sugar and dill. Put a 1/2-inch layer of salt in a dish, and lay salmon skin-side down on salt. Drizzle whiskey over salmon.
- Top salmon with a thick layer of salt, making sure it is completely covered. Tightly wrap in plastic wrap and weigh it down with a 1-pound can or weight. Refrigerate for 2 to 3 days.
- Remove salmon from salt crust and rinse off. With a very sharp knife, slice salmon on the bias as thinly as possible.
- Serve as an appetizer. Gravlax can be stored, tightly wrapped, in refrigerator for up to a week. Yield: 2 pounds, or about 16 2-ounce servings.

Essentially the plate would consist of 2-3 oz. servings of each kind of fish, slice thin, and served with toasted pumpernickel rounds and dill crème fraiche. I'd also sprinkle a bit of maple sugar on top.

LOBSTER BISQUE

Lobster bisque is a delicious soup, rich and filling. I can't even remember where or how I got the recipe.

I think I used this one from epicurious.com, but it was over a year ago and I'm old.


2-3 pounds whole lobster - I used frozen 'canners' - which are smallish lobsters of a pound or so. As you'll see in the recipe, you'll want the shells intact.
1 medium onion
1 celery rib
1 carrot
1 vine-ripened tomato
1 head garlic
2 tablespoons olive oil
2 tablespoons chopped fresh tarragon leaves
2 tablespoons chopped fresh thyme leaves
1 bay leaf
8 black peppercorns
1/2 cup brandy
1/2 cup dry Sherry
4 cups fish stock (available powdered at your local fishmonger's)
1/4 cup tomato paste
1/2 cup heavy cream
1 1/2 tablespoons cornstarch
2 tablespoons water

Fill a 6-quart kettle three fourths full with salted water and bring to a boil. Plunge lobster headfirst into water and cook, covered, over high heat 8 minutes. Transfer lobster with tongs to a large bowl and in a measuring cup reserve 2 cups cooking liquid. Let lobster stand until cool enough to handle. Working over a bowl to catch the juices, twist off tail and claws and reserve juices. Reserve tomalley and discard head sacs and any roe. Remove meat from claws and tail, reserving shells and lobster body. (Lobster meat will not be cooked through.) Coarsely chop meat and transfer to a bowl. Chill lobster meat, covered.

Chop onion, celery, carrot, and tomato and halve garlic head crosswise. In a 6-quart heavy kettle heat oil over moderately high heat until hot but not smoking and sauté reserved lobster shells and body, stirring occasionally, 8 minutes. Add vegetables, garlic, herbs, peppercorns, brandy, and Sherry and simmer, stirring, until almost all liquid is evaporated, about 5 minutes. Add stock and reserved tomalley and cooking liquid. Simmer mixture, uncovered, stirring occasionally, 1 hour.

Pour mixture through a fine sieve into a large saucepan, pressing on and discarding solids. Whisk in tomato paste and simmer until reduced to about 3 cups, about 10 minutes. Add cream and simmer bisque 5 minutes. In a small bowl stir together cornstarch and water and whisk into bisque. Simmer bisque, stirring, 2 minutes. (Bisque will thicken slightly.) Add lobster meat with any reserved juices and simmer bisque 1 minute, or until lobster meat is just cooked through. Season bisque with salt and pepper.

AFRICAN-STYLE SWEET POTATO SOUP

I just made up the name, I'll probably do the same with the recipe! I imagine there'll be nuts and spice. I promise a recipe in the near future, as soon as I figure it out.

CHICKEN BURRITO

I'd use the recipe from this post but adapt it a little. Maybe use smoked chicken and phyllo pastry? I'd definitely add some kind of super tasty home made salsa.

SMOKESHOW SPECIAL

This will be a sampler of all the meats that I smoke in the restaurant. So, some pork tenderloin, a couple of ribs, some beef brisket, and a chicken leg. Served with a sauce sampler and lots of freshly baked bread. Ideal for sharing!

PASTA SALAD STILL RULES

Not many places do pasta salad and I'm not sure why. I personally have always been a fan and I would love to  make a very high end gourmet pasta salad, which isn't too hard.

SALAD OF THE DAY

Fairly self-explanatory.


2 - LARGE PLATES

I must admit that the more artistic, presentation-oriented large plates at a place like Whalesbone or Town kind of make the need for a "meat-veg-starch" a little irrelevant. That being said, I am still a fan of there being a focal point to a plate and since I am an avid carnivore, that's usually the meat. I'm adding a vegan option because, well, why not? Best not to alienate customers.

SMOKED PORK TENDERLOIN

I love pork tenderloin. It's delicious, tender (duh) and easy to cook. I've already covered what's involved in smoking pork tenderloin, so I figure I'd have it on the menu and switch it up seasonally based on available ingredients. Springtime in Ottawa means fiddleheads, and I think a simple wine sauteed sauce with fiddleheads and wild garlic would go very well with tenderloin. Not sure how I'd rub the pork in that case though...

Summer means blueberries and I think I'd rub the pork with a bit of cocoa and coffee to give it a richness to offset the tangy sweetness of a blueberry sauce.

In Fall, it's apples, so I'd make a fairly simple apple compote, or possibly try to evoke Thanksgiving flavours (sage, cranberries, etc.)

Winter would have me go back to an old favourite, my Maple-Cognac glaze, as described in my January 30 2010 post.

All of these would be served with a mash of root veggies (carrot, turnip, parsnip, potato, and so forth), depending on the season. In Spring and Summer, I might go with a simple side of sautéed veggies.


GOURMET CHILI

Alright, everyone and their dog can make chili and it's kind of odd to think of serving it in a nice resto, but in the colder months, a hearty bowl of chili can be exactly what the doctor ordered. Now the question that comes up is, how do you fancy up something like chili? Well, maybe the idea is not to. Although, the idea of using a mix of Sirloin steak pieces, pulled pork, chorizo sausage and LOTS of beer is starting to appeal to me.

BEEF CURRY

One of the first recipes I ever successfully "invented" was the Beef Sweet-Potato Curry mentioned in a September 19 post. Since I like the idea of serving gourmet comfort food alongside smoked goodness,  I think I could meld the two successfully in this recipe. Use the best quality stuff in the base (organic, high end tomatoes, garlic, etc.) and instead of normal stewing beef, use pieces of smoked beef brisket to add that much more flavour. I'm still debating if I'd go with sweet potato in this one, I'm not sure how it would pair up with the smoked meat.

SMOKED CHICKEN

This is my next experiment in smoking. Most folks think of chicken breast when they think of chicken served in a restaurant, but I find that chicken thighs and legs have so much more flavour and are a lot harder to dry out. So, I think using bone-in, skin-on chicken thighs and legs would also do the trick, giving it a kind of rustic look. Seriously, remember when you were a kid; did your mom ever go through all the trouble of buying boneless chicken breast? Methinks not. Of course, that might just be a sign that I'm really old.

I'd probably use mesquite wood for the smoking and use something like the following rub:

- 3 tbsp brown sugar
- 1 tbsp smoked paprika
- 1 tsp cayenne pepper
- 1/2 tsp crushed fennel seeds
- 1/2 crushed black pepper
- 1 tsp salt
- 1 tsp onion powder
- 1/2 tsp ground allspice

Smoke at 250 degrees for about 2 hours, tent (wrap in foil), splash with apple juice, and smoke for another hour, unwrap and smoke for another 30 mins., finish in oven before serving.

The whole thing would be served on a bed of wild rice with a side of the same root veg mash/sauteed veg mentioned with the pork tenderloin.

THE HIPPIE SILENCER

I have more than a few friends who have the craziest food allergies, especially as it relates to gluten. On top of that, a lot of the most vulnerable people I know are amongst the tree-hugging ilk. OK, slight tangent time. Is it me or are there two kinds of hippie as it relates to food? There's either the "must be organic, macro-biotic, unsullied, level 7 vegan" hippies or the "feed me something dead, preferably fresh from the forest, RIGHT NOW!" hippies. I find myself gravitating to the latter group, go figure. Right, tangent over.

Anyway, with vegetariansim/veganism being as much trend as lifestyle choice and a lot of people being real sticklers for the no-meat thing, I figure I need to serve something meatless as a main course. Now, that shows how nice a guy I am.

But time for tangent no.2. Dear vegetarians, expecting ANY food establishment that doesn't advertise itself as vegetarian-friendly to NOT include animal products shows a kind of cultural arrogance that makes me Hulk-angry. Case study: I was picking up the usual pre-D&D Banh mi pig-out and as we're waiting for them to be prepared, in walk the poster boy-and-girl for hipster douchebaggery (seriously, they had interchangeable all-denim wardrobes AND ironic eyewear. Kari and I had to cover our mouths to not let the chortles come out too loudly). Quote the dude with his girlfriend's half-eaten sub "Umm, does this have MEAT on it? My partner doesn't eat meat."

Now, maybe it's de rigueur for hipsters to have the speech patterns of a disgruntled teenage girl or something, but the disdain in this guy's voice (and the fact that he did the talking for his girlfriend AND called her his 'partner') made me want to punch. If you want to eat vegetarian, what in God's name are you doing in a Vietnamese sub shop where they slather paté on every sandwich? And why weren't you asking what goes on the sandwich? Way to do your research there, buddy!

Sorry, but omnivorism is the NATURAL human state of eating. To be exclusively anything means YOU are responsible for ensuring that the place serving you conforms to your culinary choices. Assume nothing about what goes in food. Want proof? Just read the "vegetarian" section of any Chinese menu. Notice all the pork included? Yeah...

OK, now that the rant is out of the way, I can proceed with serving the Hippie Silencer. Essentially, it'll be a medley of marinated and seasonal grilled veggies served with vegan and gluten free wraps. I'll leave the conceptualization and baking of said wraps to the baker (apparently teff flour works, so perhaps it could have an Ethiopian vibe and be served on injera?). On the side, a simple chickpea and black bean salad (gotta have protein somewhere!).

Like with most vegetarian dishes, it's easy to be creative and switch it up on a regular basis. So, the marinade would change fairly regularly. As long as it's good, I imagine building a decent vege-foodie following. This one's a work in progress either way. Just gotta remind myself that honey is a no-no for vegans.

SMOKED RIBS (w. blue cheese cabbage slaw and home-baked cornbread)

Well, this one's easy.

A rack of hickory-cherry smoked ribs, as demoed in my January 3rd post, served with homemade BBQ sauce. On the side, some of Kari's homemade cornbread and the following coleslaw (from epicurious.com, turned out great!):

Blue Cheese Coleslaw

- 1/2 cup blue cheese, crumbled
- 1/2 cup buttermilk
- 3 tablespoons apple cider vinegar
- 2 tablespoons organic cane sugar
- 12 cups shredded green and red cabbage
- 1 cup shredded carrot

Place first 4 ingredients in processor; blend until smooth, about 30 seconds. Place cabbage and carrot in large bowl. Add dressing; toss. Season with salt and pepper. Cover; chill at least 1 hour.

I foresee great things from this one!

SEAFOOD MEDLEY

In case you hadn't noticed, I freaking LOVE seafood. At the top of that list is a running battle between lobster and king crab. Both have such rich sweetness that just makes my taste buds dance the Snoopy Jig. So, what kind of chef would I be if I didn't serve my favourite food?

Luckily, Alaskan king crab is a sustainable catch, and lobster can be if you find the right supplier.

Now, I'm a big fan of the old school Fisherman's Platter you find at more 'homey' fish restos. Usually they consist of a combination of deep-fried scallops and shrimp, with a piece of fish and some crab. But, since I'm Joe Smoke these days, I'd have to throw my spin on this kind of plate. Hence, the aformentioned medley. So, depending on availability and season, it would consist of a few crab legs or a lobster tail/claw combo.

Add to that some hot-smoked shrimp (see my January 22 post for the 'how-to') and grilled calamari (essentially marinated squid rings thrown on the grill for a few minutes). If I ever figure out how to smoke scallops, you can bet they'll be in there too!

And then, on top of that, whatever is on the "catch of the day" radar, either smoked or poached. Then the lemon-steamed broccoli (which is simply broccoli florets steamed in water with a few squeezes of lemon and some seasoning).

Add a whack of garlic butter and there you go!

STEAK MY WAY

This is basically my way of saying "Oi, trust your cook with your meat!" Once upon a time I worked at a somewhat 'middle of the road' restaurant called Big Daddy's Crab Shack and Oyster Bar. It was one of the first Cajun places in Canada, but was run with a chain mentality. As a result, the food was fairly decent, but a bit "lowest common denominator". Now, as with any halfway decent restaurant that aspires to the American tourist concept of 'gourmet', there had to be steak on the menu (as well as surf and turf since there was a strong seafood presence on the menu). There we had two kinds: the 12 oz. New York striploin and the 8 oz. filet mignon. It was one night preparing a filet where I had my first encounter with the truth that sometimes, especially when it comes to food, the customer is WRONG!!!!!!

The customer in question ordered a filet mignon well done. This in and of itself is an oxymoron, but the sous chef did his best. We cooked it until the meat was a uniform shade of regrettable grey-brown (which is not to criticize the restaurant or the steak, that's simply what 'well done' does to a beautiful piece of meat). With heavy hearts, we sent it out. Back it came with the complaint that it wasn't done enough, there was still blood. Now, if you've ever had a filet mignon, you'll know that it is pretty much impossible to get rid of all the blood. So, we put it in the oven to cook it through even more. Back out it went, back to the kitchen it came. In a fit of exasperation, the sous chef took his tongs and started squeezing the blood out while holding it over the flame of the range, basically scorching this unfortunate piece of beef. Finally this finally did the trick.

But since then, I've decided that sometimes people need to realize that you can't ask someone to try and cook against nature! A filet mignon should never be more than medium rare, medium if you bribe the chef enough. So, in my restaurant, the steak is cooked to MY specifications.

So, there it is, a fledgling menu for a restaurant that may never exist. But at least I can dream about it, and experiment with the menu items over and over and again!

And you, out there in blog-land, what would your dream menu have on it?

Monday, January 24, 2011

Chicken Burritos!

Good day yet again!

Alright, I've been at this blogging business for a while now. I still don't know if anyone out there in Internet-land is reading, but that's ok because I started this mostly as a means of killing time at work. Now hopefully the original purpose of "Dude, Cook!" has not been lost on all of you and a few of you have tried your hand(s) at cooking up something delicious. Even better, I'm hoping at least some of you have grown to enjoy it!

Now, ask any semi-accomplished cook and they'll tell you they have at least one 'favourite' recipe that they've invented/adapted. Me, I have a few, but I think I like the following recipe the best because it's so easy, prolific and, I imagine, healthy!

Way back when, I was a pretty domesticated fellow; I lived with my fiancée and she was a pretty darn good cook in her own right. One of her specialities was beef burritos. They were tasty, spicy, and one batch provided lunches for quite some time. Well, some time in 2006 I found myself having a craving for burritos, but for some reason I NEEDED chicken to be the meat. I know, weird.

So, I put together a quick recipe in my mind, confirmed some of the elements using the Internet, and went to town the next night. The results were so much better than I expected.

Since then, I've not made this recipe nearly as much as I should. Especially in this frozen season where nothing is quite as satisfying as this taste-filled, protein-packed, cheese-covered spicy treat. So, with that in mind, I give you my version of the Chicken Burrito:

Chicken Burritos

Ingredients


- 2 cloves garlic, minced
- 2 tbsp veg or olive oil
- 1 lb cooked chicken meat, shredded (skinless) - breast or thigh works well
- 1 can black beans, drained (reserve some liquid)
- 1-2 ripe tomato, minced
- 2 tbsp cumin
- 2 tbsp chili powder
- 2 tsp cayenne pepper
- 1 tsp salt
- 1 small red onion, finely diced
- 1 sweet red pepper, finely diced
- ½ cup salsa (use homemade or PC Black Bean and Corn Salsa)
- hot sauce to taste
- ¼ cup chopped fresh cilantro
- 6 large flour tortillas
- ½ cup grated cheddar and/or Monterey Jack (optional)

Preparation

- In large skillet or saucepan, fry garlic in oil
- Add chicken, beans, tomato and spices, ‘mashing’ together with a potato masher into a pasty consistency (use bean liquid if necessary)
- Cook for 10-15 mins.
- Add onion, pepper and salsa; cook for 10-15 more mins., or till water has been cooked out
- Stir in hot sauce and remove from heat; add cilantro once mixture is no longer hot
- Spoon mixture into tortillas and arrange into appropriate shape (this is something that I cannot teach you, I still suck at this part)
- Bake for 10-15 mins. at 350 F
- Top with grated cheddar or Monterey Jack if desired
- Wrap and freeze extra burritos


And that's that! Try it, I bet you'll enjoy it!

Cheers!

Saturday, January 22, 2011

Smoking - Part 2 - Pork Tenderloin and Seafood


Hey kids!

I'm back with more on my new favourite cooking activity: smoking. Now I started out with ribs, which is the meal that takes the longest of the ones I've tried so far. Some day I'm going to give pulled pork a shot, but that's at least 12 hours worth of smoking; not exactly a practical idea for the middle of Winter. So, the hardest recipe has already been accounted for, but the next ones require a little more finesse in flavouring. As I mentioned before, ribs are almost a blank canvass for flavouring. Pork tenderloin also has a certain neutrality of flavour, but it's important to keep an eye out for the danger of oversmoking the pork, thus drying it out. Fish, on the other hand, is very distinctive in its flavour and, while I've not screwed it up yet, could easily be ruined with the wrong kind of wood or too much time in the smoker.


Smoking's easy, even in Winter!

SMOKING PORK TENDERLOIN

Alright, let's start with the pork tenderloin. The first time I made it, in the Summer of 2009, I used a similar rub to my ribs, about 3 to 1 parts brown sugar to berbere spice. The second time was for a "holiday" party this past December (what my friend, the hostess, calls Chrismakuh) and I wanted to go with a more seasonal flavouring. Here's the rub recipe (as extrapolated from my brain, it might not be exactly what I used):

Pork Tenderloin 'Festive' Rub

- 1/2 cup brown sugar
- 1/2 tsp cinnamon
- 3 green cardamom pods, ground
- 2 cloves, ground
- 1/2 tsp ground nutmeg
- 1 tsp ground black pepper
- 1 tsp salt
- 2 tsp rosemary, crushed or ground

Rub the meat with this mix, wrap in plastic and refrigerate for about 3-4 hours. Remove from fridge and let warm up a little.

Prep fire in the smokebox and soak wood chips. The great thing about pork is that it tastes good with almost any kind of smoke flavouring it. In the case of a tenderloin, I would avoid using just hickory or mesquite, the smoke flavour would be too strong. Now, I use maple lump charcoal for everything on my BBQ and just on its own imbues a tasty smoke flavour, but it's a bit one-dimensional. For pork tenderloin, I've used either a mix of hickory and cherry (the first time, which nicely complimented the spicy rub), or apple (for the 'festive' meal). I think apple is my favourite flavouring wood when avoiding the spicy route (you know, the one Columbus was looking for); it adds a distinct yet subtle flavour and sweetness.

Once your fire is going and you reach a cooking temperature of around 225-250 degrees Fahrenheit, place the tenderloin(s) inside the the grill and smoke for 1.5 to 2 hours. Wrap the tenderloin in foil, spray with a bit of apple juice, and return to smoker for another hour. Unwrap and smoke for another 30 minutes to finish. You may need to put it in the oven for 10 minutes at 350 to ensure it's done, but it should be OK. The thing about tenderloin is that it stays a little more pink than other cuts of pork even when it's overcooked. So, don't think that it isn't done just it's a bit pink. If the meat is no longer translucent and juices run clear when you cut it, it's done. Basically that's the rule for all pork and chicken.

Slice pork into medallions and serve any which way you like! The first time, I served the pork as is with some gorgeously roasted sweet potatoes my friend made. For the Christmakuh meal, I made an apple-cranberry compote, but it didn't turn out quite as I wanted, so I won't reprint the recipe here. But if your Aunt Betty or Matante Lise makes a good homemade relish, give it a try with this!

SMOKING SHRIMP

Next up, shrimp. Because they're so small, shrimp don't require much time in the smoker. The only time I ever tried this, most of the space was taken up by the fish I was smoking at the same time (more on that later), but I was easily able to fit a pound worth of shrimp in the gaps between the pieces of fish and they turned out fine.

First step is to marinate the shrimp for an hour or two. This adds a lot of flavour, but also adds a great deal of moisture that will mess up the texture a little bit, but there's a way to fix that. It's up to you if you want to peel the shrimp or not, I don't.

Basically, thaw out a pound of medium shrimp and place in the marinade outlined below.

 Shrimp Marinade


- juice of 1/4 lime
- 1/2 cup olive oil
- 2 tbsp minced fresh ginger
- 2 crushed garlic cloves
- 2 cardamom pods, crushed
- 8-10 coriander seeds, crushed
- 4 tbsp brown sugar
- 1 tsp salt
- 1 tsp cracked black pepper


Start your fire and prepare shrimp for smoking. I imagine just about any kind of wood will work here since shrimp is such a versatile meat. I used a mix of Apple and Alder wood chips, soaked for a half hour, as always. You'll want your temperature to sit at around 225 degrees Fahrenheit and the smoking process will only be an hour or so.

Now, when I first tasted the shrimp, it was cooked, but a little mushy. That's probably due to trapped moisture. No problem, the magic "10 minutes in the oven at 350" solution works in this case as well.

Peel shrimp for guests or let them do it themselves! Serve with some kind of dipping goodness, even good old fashioned cocktail sauce if you wish!

SMOKING FISH

OK, now we get into what I think is my favourite exercise in smoking: FISH!!!!

Now I'll be the first to admit that fish isn't to everyone's taste, but it's interesting to note that many folks who would normally avoid fish like the plague get their taste buds in a tizzy when you serve up a gorgeous slab of smoked salmon.

Now, I've never done salmon on the smoker. Mostly because I know what it tastes like and it wouldn't be terribly original. So, back in the early Fall, I was on a mission to find a kind of fish that wouldn't be like the all too familiar smoked salmon or trout. Enter tilapia. Tilapia is a firm fleshed and sweet white fish that isn't chock full of that 'fishy' taste that makes other kinds of smoked fish so distinctive. I gave it a shot after some online research on how to cure or brine the meat. I found a good brine recipe, but cut down the amounts of salt.

The second time I smoked tilapia for a family get-together, I made sure to reduce salt amounts even further and add a few nuances to the brine for flavouring. Here's what I came up with:

Tilipia Brine (for approx. 1-2 lb. of fillets)

- 4 cups water
- 1/2 cup salt
- 1/2 cup (white) sugar
- juice of 1/4 orange
- juice of 1/4 lime
- 2 crushed garlic cloves
- 3 bay leaves, crushed
- 1 tsp cracked black pepper
- 2 cardamom pods, crushed
- pinch cayenne pepper


As you can see, I'm fairly low-tech when it comes to writing down recipes. I bashed the brine/marinade recipes for shrimp, tilapia and Arctic char while at work.


Here is the tilapia brining away. Important to note about brining: NEVER use a metal container. The acidic elements in the brine will react with the metal and leech god-knows-what into the meat. Glass or ceramic are best, but plastic is OK for short term brining.


Brine the fish for about 2 hours. Once ready, ensure you rinse the fish well to get rid of some of the salt, and pat as dry as possible before putting in the smoker.

Start your fire and aim for a steady 210-225 degrees. Use Alder or Apple or both. It'll take about 2 hours to smoke for 2 pounds of tilapia fillets. Once done, I found that the flavour was delicious and unique, but the texture was a bit rubbery. So once again I went to the 15 minutes in the oven fix-all. Not sure why it works so well, but it does! I guess it's because it cooks off any excess moisture that might mess with the texture of the meat.

So, when I committed to smoking a bunch of fish for a family gathering, I had originally thought I was going to do trout as well as tilapia, but when I got to the fish section of the supermarket, the Arctic char was practically leaping out at me. Arctic char is similar to salmon, but with a more distinctive flavour and lighter texture. I couldn't pass up the opportunity to give it a shot.

First was coming up with a good brine. I thought a dose of orange and maple would be good, but I wanted to keep the flavours subtle. Char is so good on its own that trying to do too much with it would be like dousing filet mignon in ketchup. So here's what I came up with:

Arctic Char Brine (for up to 1 lb. fillet)

- 2 cups water
- 1/4 cup salt
- 1/4 cup brown sugar
- juice of 1/8 orange
- 1 tsp maple syrup
- 1 crushed garlic clove
- black pepper to taste
- 1 tbsp chopped fresh dill


I smoked the char at the same time as the tilapia and it all turned out in the end. Again, 15 minutes in the oven was the finishing touch. It was sooooo delicious. I'd gladly do that one again!

So, that's about it. Smoking fish is easy and tasty. Don't fear the fish! Next on the "To Smoke" list: chicken, beef brisket and pulled pork!

And, as an added bonus, here are some pictures of fish smoking process before the big family Xmas gathering on December 30, 2010.


The whole shebang marinating/brining.

Fish on the smoker. The shrimp would go on later. As you can see, the one design flaw with my smoker is that the meat on the left, which is closer to the fire, cooks faster. So, you have to rotate your pieces of meat as you go.


The finished product! I whipped together some whipping cream and sour cream for a makeshift crème fraiche. Worked great!


My brother being grabby! Too bad I didn't have a wooden spoon handy to give his knuckles a well-deserved rap!


I also whipped up some crostini-type dealies for an added bonus.

Monday, January 3, 2011

Smoking - Part 1 - Overview and Ribs

-
Happy New Year, fellow foodophiles!

Here's a tale that has no business being told in the middle of Winter, but I did promise to blog about smoking food a while back and I wouldn't want anyone accusing me of blogular reneging.

Back in Summer of 2007, I moved into a one-bedroom apartment on my own. This was the first time I'd done so since 2003 and I found myself needing a lot of stuff, namely a barbecue to go on my awesome deck, which was the main reason why I took this apartment in the first place! Now, where I'm from, there are laws prohibiting gas barbecues in apartments. The reason for this? There's a safety risk in having a potentially explosive propane tank inside. Now I know that many people flout this law, but it got me thinking that perhaps I should explore the idea of a charcoal barbecue instead, which is completely legal. I know I covered this in my April post about BBQ season, but it's part of the narrative, so stick with me here.

Anyhoo, off I went to Canadian Tire with my girlfriend and picked out a very affordable BBQ with an offset smoker box. I didn't really think I'd use the smoker much, but it was about a 20 dollar difference from the model that didn't have the box, so I figured "you never know" and bought it. Here's a picture of my baby (the smokebox is the smaller compartment on the left)!


I went a couple of years before even trying out the smoker, but finally gave it a go in the Summer of 2009. I figured the first thing to try was ribs. After all, ribs are one of the best "blank canvasses" when it comes to cooking, and it's not difficult to cover up your mistakes with lots of BBQ sauce. But before you can smoke anything, you need fuel!

CHOOSING YOUR WOOD

I prefer using lump charcoal. It provides a more natural flavour and ignites faster. Lump charcoal burns a lot faster than briquettes, but that's OK when smoking, because you usually smoke food at low temperatures and something that burns fast will allow you to regulate your heat better. In addition to charcoal, you'll need some kind of wood to help flavour the smoke. I've acquired lots of different types of wood from Home Hardware and Canadian Tire. I imagine Wal-Mart, Rona, Lowe's and many others also carry wood for BBQ/smoking. Right now, I've gathered a supply including Maple, Cherry, Apple, Alder, Hickory, Mesquite and Cedar. I'd like to get some Pecan and Peach as well, if only to see how different a flavour they impart. I read a story online from an expat in Thailand mentioning how the locals use Mango wood to smoke their food. How awesome would that be!?!?

Now, you may ask yourself, which wood should I be using? Well, that all depends on what you're smoking. I've only done pork, fish and shrimp so far, so I haven't used all the types available. But here's a basic guide to what woods match well to what foods:

- Alder: mild and slightly sweet. Best with fish, pork and poultry

- Apple: fruity and sweet, especially good with pork. I like to use it with fish as well, but that might not be considered "normal"

- Cherry: rich, fruity, slightly sweet. Goes well with any meat. I like to smoke pork tenderloin with a mix of cherry and hickory.

- Hickory: rich, strong smoky flavour. Probably the most common wood used in smoking and good for anything except possibly fish (Hickory would overpower the natural flavour of any white fish and maybe even salmon). A mix of Hickory and Mesquite is good for spicy or peppery meats like ribs and beef brisket.

- Mesquite: strong but slightly sweet. Good for poultry, beef and pork. As with hickory, too strong for fish.

- Cedar: VERY strong flavour, probably too strong for most meats. Since cedar has a very distinctive pine taste, it would overpower just about everything if used in more than the tiniest amounts. And apparently it might be toxic. Makes we wonder why the heck Home Hardware sells it! grumblegrumblegrumble...

- Maple: strong and sweet. Maple could realistically be used with any meat, but the amounts have to be regulated. Also, since most lump charcoal you get in this part of the wood is made of maple, you'll get a maple smoke flavour from that.

Of course, most of this was figured out through a combination of trial and error and Internet research. But, to sum up what I've done and used so far:

- Ribs (made three times): Hickory and Mesquite (and a handful or two of Cherry and/or Apple)
- Pork Tenderloin (made twice): Cherry and/or Hickory
- Tilapia (made twice): Apple and/or Alder
- Arctic Char (made once): Apple and Alder
- Shrimp (made once): Apple and Alder

Alright, let's go on to the first thing I ever smoked: RIBS!

SMOKING RIBS

During a slow day at the office, I took to the Internet for advice on how to pull off smoked ribs. I'd previously done slow cooker ribs and baked/grilled ribs with varying results, but all being tasty (more on that process in this post). One piece of advice though, if you're going to slow cook ribs, remember to skim the fat off the top! I forgot to do so and my ribs were pretty much too fatty to be edible.

Anyhoo, as with just about everything else, the 'Net was chock full of helpful advice. I compiled a bunch of info from a variety of sites, and I've tried a few different ideas. Now, the whole "fall off the bone" concept is one I haven't quite mastered yet, but I've gotten pretty good at the "damn that's tasty" side of it. So, let's get into the "how-to" of smoking ribs. I'm assuming you rushed out and bought an offset smoker or Big Green Egg or something like it and are ready to get on with it!

Right, first things first. What kind of ribs are you going to use? Well, smoking involves a certain amount of drying out of the meat, so I'd go for the more tender cut: back ribs. Side ribs are better for the oven or slow cooker. I've also heard that short ribs work well for smoking, but I haven't given it a try.

For now, let's stick to back ribs. So, how do you smoke a tasty rack of ribs? Well, I'll be the first to admit that I haven't quite gotten the whole 'tenderness' aspect of it figured out, but I'm getting close. So, don't get frustrated, all cooking is a journey towards perfection, but rarely does one arrive.

So, you'll need to prep your rack(s) of ribs before they can be smoked. You'll want to give yourself a day to either brine, marinate or rub your ribs. I've only used the rubbed method, but I'm quite curious to try brining ribs. It's done wonders for my smoked fish recipes (more on those in a bit).

Before you can rub/brine/marinate your ribs, you'll need to remove the membrane, found on the underside of the rack (concave rather than convex); otherwise your ribs will be rather tough. Now removing this thing is somewhat difficult, and is best done with a sharp knife, pliers, possibly even gloves, and great care and patience. I tell you what, let's let the Internet take care of this lesson:

http://www.ehow.com/video_2339996_pork-rib-membrane-removal-tips.html

Alright, now that your membrane is removed, it's time to have some fun! It's rub time! Now, there are rib rubs all over the place. Just pop into any store that sells BBQ equipment and you'll see many brands of rub for sale. Same applies to the supermarket.

Now, being the self-reliant fella that I am, I make my own rub very simply out of a mix of brown sugar and berbere spice, with about a 2-to-1 ratio of sugar to spice.

Here's the berbere spice recipe from the May 27th post:

Berbere spice

1 teaspoon fenugreek seeds
1/2 cup ground dried serrano chili peppers or other ground dried chili peppers
1/2 cup sweet paprika
2 tablespoons salt
2 teaspoons ground ginger
2 teaspoons onion powder
1 teaspoon ground cardamom (preferably freshly ground)
1 teaspoon freshly grated nutmeg
1/2 teaspoon garlic powder
1/4 teaspoon ground cloves
1/4 teaspoon ground cinnamon
1/4 teaspoon ground allspice

Finely grind the fenugreek seeds with a mortar and pestle or in an electric spice or coffee grinder. Combine the remaining ingredients and add the ground fenugreek seeds, mixing well. Refrigerate in an airtight container for up to 3 months (although I've had batches last 6 to 9 months in the fridge and be fine).

Now, the berbere spice is pretty fiery and makes for a rather spicy rib. If you prefer things a bit more tame, there are numerous recipes on the 'Net. For example, here's one from About.com:

Kansas City Rib Rub

Ingredients:

1/2 cup brown sugar
1/4 cup paprika
1 tablespoon black pepper
1 tablespoon salt
1 tablespoon chili powder
1 tablespoon garlic powder
1 tablespoon onion powder
1 teaspoon cayenne

Preparation:

Combine all ingredients together and transfer to an air tight container. Maybe stored up to six months.

Nick's note: You could omit the cayenne if you want barely any heat at all.

Now, once you have your rub all mixed together, I suggest getting a glass/pyrex lasagna pan, place a rack at a time in the pan and generously apply the rub all over, pressing it firmly into the meat to ensure it is absorbed. You might even want to score (slice small cuts on the surface) the meat a bit for maximum absorption.

Once the meat has been coated with the rub, wrap it in plastic wrap, pressing all air out, and store in the fridge for 12-24 hours and dream of smoke and pork and joy.

Next day...

Let's hope you picked a nice sunny day and have an empty calendar for the day, because you're about to embark in a 6-7 hour smoking bonanza. It might be time-consuming, but MAN is it therapeutic! Having a case of cold beer around doesn't hurt either...

So, take your ribs out of the fridge and unwrap them. Let them warm up a little bit, for say 30 minutes. Here's what they look like out of the fridge:

While the ribs are getting closer to room temperature, you're going to want to get a large container of some sort and fill it halfway full with water. Take handfuls of whatever wood chips you would like to use and soak them in water for at least 30 minutes. That allows the wood chips to burn slowly in the smoker and produce lots of delicious smoke.

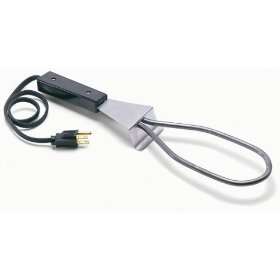
Next we start the fire. Let's be clear off the bat: AVOID any kind of chemical fire starter, especially when smoking. It ruins the flavour and is probably not too healthy. So how do you start a fire without lighter fluid? Well, a lot of people swear by the chimney starter, but I have my own method of starting a fire that works pretty well. I use an electric starter like this one:


You can find it at the same stores you find all your other BBQ supplies. Just plug it into an extension cord or outdoor outlet. The element heats up quickly and becomes red-hot. Find a way to keep the starter fixed in a position that allows you to pile charcoal on top in a pyramid-type formation as best as possible. Once this is done, leave it for about 10-15 minutes and let the element do its job. You'll hear the fire starting as the charcoal begins to crackle. At this point, unplug the starter and gently remove it from the pile of now-smoldering coals, trying your best not to disturb the coal bed, and put it aside somewhere fireproof as it cools down.

You're not looking for a huge fire here, because we don't want the temperature going over 225-250 degrees Fahrenheit. Keep the pile under about half a foot in diameter and no more than 3-4 inches high. If it isn't hot enough, you can always add more charcoal. If it's too hot, it's a lot harder to remove lit coals! If the fire needs a bit of a boost to get it going, there's always blowing on it, but I find fanning it with a fairly large piece of box board works perfectly.

So now our fire's going and the wood chips are soaking, so it's time to get the meat on the smoker! Place the meat directly on the racks of your main grill area if you're using an offset barrel smoker like mine. Otherwise, follow the instructions on the box!


Don't worry about the bright patch on the front rack, that's sunlight!

So, now all you have to do is shut the lid and let the smoke do the work! We'll call this Step 1 of what some nice person on the Internet called the "3-2-1 method" of smoking, which consists of 2.5 to 3 hours of smoking the meat as is, followed by 2 hours of smoking the ribs "tented" (wrapped in foil and moistened with some sort of liquid, I use apple juice), and finally 1 hour smoking unwrapped to finish.

Now, I have a little confession to make: I usually cheat and put anything I've smoked in the oven at 350 degrees for 10-15 minutes. It just seems to make everything right in the end. Not entirely sure why...

So, as you're going through Step 1, ensure you have a steady stream of smoke flowing through the smoker to the meat, add handfuls of wood chips to the fire as you go to keep the smoke going. Also, try to keep the temperature between 225 and 250 degrees. Any smoker should come with a thermometer built in. As for the meat, you don't need to do a thing to it during Step 1.

Now, it's best not to open the lid to the BBQ too much because the smoke can escape, but if you're like me, you occasionally want to look in, just to see how it's coming along.

And because you like to take pictures:


As you can see below, the meat is definitely cooking.


This is about what the ribs are going to look like at the end of Step 1. After 2.5 to 3 hours have passed, it;'s time for Step 2. Remove the ribs from the grill using tongs and place each rack on a piece of heavy-duty aluminium foil large enough to completely wrap up the ribs. Spray a good amount of apple juice or other liquid (but not alcohol or vinegar, as these may dry out the meat) on each rack of ribs, on both the top and bottom. This is going to help steam the ribs and make them more tender. Wrap up the ribs tightly, containing all the juice, and return them to the smoker for another 2-2.5 hours.

At this point, you might want to get started on the finishing sauce, if you're making one. I posted the recipe for my homemade BBQ sauce back in July, but you can make variations if you want or even use a high-quality store-bought sauce. To be honest though, the ribs will be tasty with or without sauce. It's up to you how you want to serve and/or eat them.

So after Step 2 has passed, unwrap the ribs again and place them back on the grill for another hour. Spray them again with apple juice to keep tender. If there any woods you want to experiment with, now's the time. The smoke won't penetrate right into the meat, but it will flavour the surface of it. 

This is what your ribs will look like after being wrapped. GORGEOUS!


Smoke for another hour. Once done, place onto a baking sheet and cook in the oven for another 10-15 minutes. You can choose to cut them into segments before or after baking them. I did cut them up before baking last time and it worked well.

Pull them out of the oven, serve with whatever you're having on the side and chow down!


Is there anything classier than serving a meal on cooler?

Till next time, enjoy!