Tuesday, February 18, 2014

On the Move! - Part 1

Hi there!

January 15, 2014 marks the second time I've moved since I started the blog. Back in 2011 I wrote a post about how cooking right after a move. Last time, we made quesadillas with just a knife and frying pan... and, y'know, cheese, sausage, tortillas and so on... This time, I kicked things up a bit more, using a few more tools and ingredients, but the point is the same: just because you're living out of boxes doesn't mean you have to eat crap or contant takeout. What's even better is when you move to a neighbourhood that has a number of amazing food shops. We moved right close to Wellington Street and are just a few blocks away from the corner of Wellington and Clarendon, which houses several wonderful shops, including Herb and Spice for produce (although they can be hit and miss), Saslove's for meat, Parma Ravioli for pasta, other Italian goodies and remarkably tasty pies, Three Tarts bakery for treats and the Ottawa Bagelshop and Deli for bagels as well as all kinds of fun gourmet foodstuffs. Needless to say, we've been eating well. But, for the first few days, we were pretty damn low on cooking implements and cobbling together a decent meal when you only can find a single frying pan and a spatula, if you're lucky, can be kind of difficult. So, with that in mind, we're going to take a look at the first week of eating at Novo Casa del Unicorn over the next couple of posts.

- Wednesday: Moving Day! OK, no one should have to cook on Moving Day. With luck, you have access to a good restaurant in the nearby vicinity and can toddle off there, but if you're like me and have a little one, you can't just head out. Luckily we had Kari's mom who brought us a  delicious lasagna and Caesar Salad.

- Thursday: This was day one of living in the new neighbourhood and we found ourselves wandering to the local foodjobbers. We wanted to put together something simple and filling, so we made our way first to Saslove's to figure out some kind of meat. We settled on their sausages made with Beau's beer, but we didn't know where to find hot dog buns, so I thought "Well, we'll just cut the sausages in half and just serve 'em on kaisers." Turns out that cutting a sausage in half kind of ruins the casing and makes it more like a pile of ground beef. So, I came up with what I call "Sloppy Beau's": Basically it was a mix of sausage meat, beer, onions, chopped tomatoes, cheese and other stuff cooked in a frying pan and served on buns... I honestly don't remember how it came together, but it was easy and tasty!

- Friday: Salmon w. Spicy Orange Sauce with Sweet Potato and Edamame Salad

Alright, this is the first true "recipe" that I wanted to post. After two days of pretty heavy meals, I wanted to make something a lot lighter. After taking a stroll west to find foodstuffs, we now ventured eastwards to see what there was to find. We found a small fishmonger in our travels and I picked up a nice hunk of sockeye salmon.

By this time we'd managed to uncover our box of oils, vinegars, cooking booze and whatnot. We were still missing most of our spices, but was able to uncover a shaker of Chinese 5-Spice Powder. Also, in preparation for cooking future meals, we'd brought all our fridge items in a couple of coolers on moving day, so at least we had juice and sauces and other fridge items with which to work.

So, I put together a quick recipe for a sauce and decided to pan fry the fish while the sauce was cooking up on the side of the pan. We also happened to have a sweet potato and some edamame in the fridge and a bit of cilantro. It all came together on the fly, but that's how it goes a lot of the time.

Salmon:

Ingredients

- 1 lb. salmon, cut into 2 equal portions
- 1/2 tsp sesame oil
- 2 cloves garlic, minced or crushed
- 1 cup orange juice, more as needed
- 1/2 cup cooking wine (Shaoxing wine or dry sherry)
- 2 tsp fish sauce
- 1 tsp soy sauce
- 2 tbsp maple syrup
- 1 tbsp sriracha
- 1 tsp Chinese 5-Spice Powder

Directions

- Heat oil in large pan at about 6-7, add garlic and sauté for a minute or two, stirring frequently.
- Add orange juice, wine, fish sauce, soy sauce, syrup, sriracha and 5-spice powder
- Place fish in the middle of the pan. This should displace the sauce to the side of the pan; this is a good thing!
- Get the sauce boiling on the side, while occasionally spooning some onto the fish. Cook the fish skin side down for about 7-8 minutes. The fish will partly pan fry, partly steam from the sauce.
- Carefully flip the fish over with a spatula and cook again for about 5 minutes. Flip back over and serve. You may want to discard the skin. I personally like the skin, but not everyone does. Top the fish with the rest of the sauce and serve with salad.
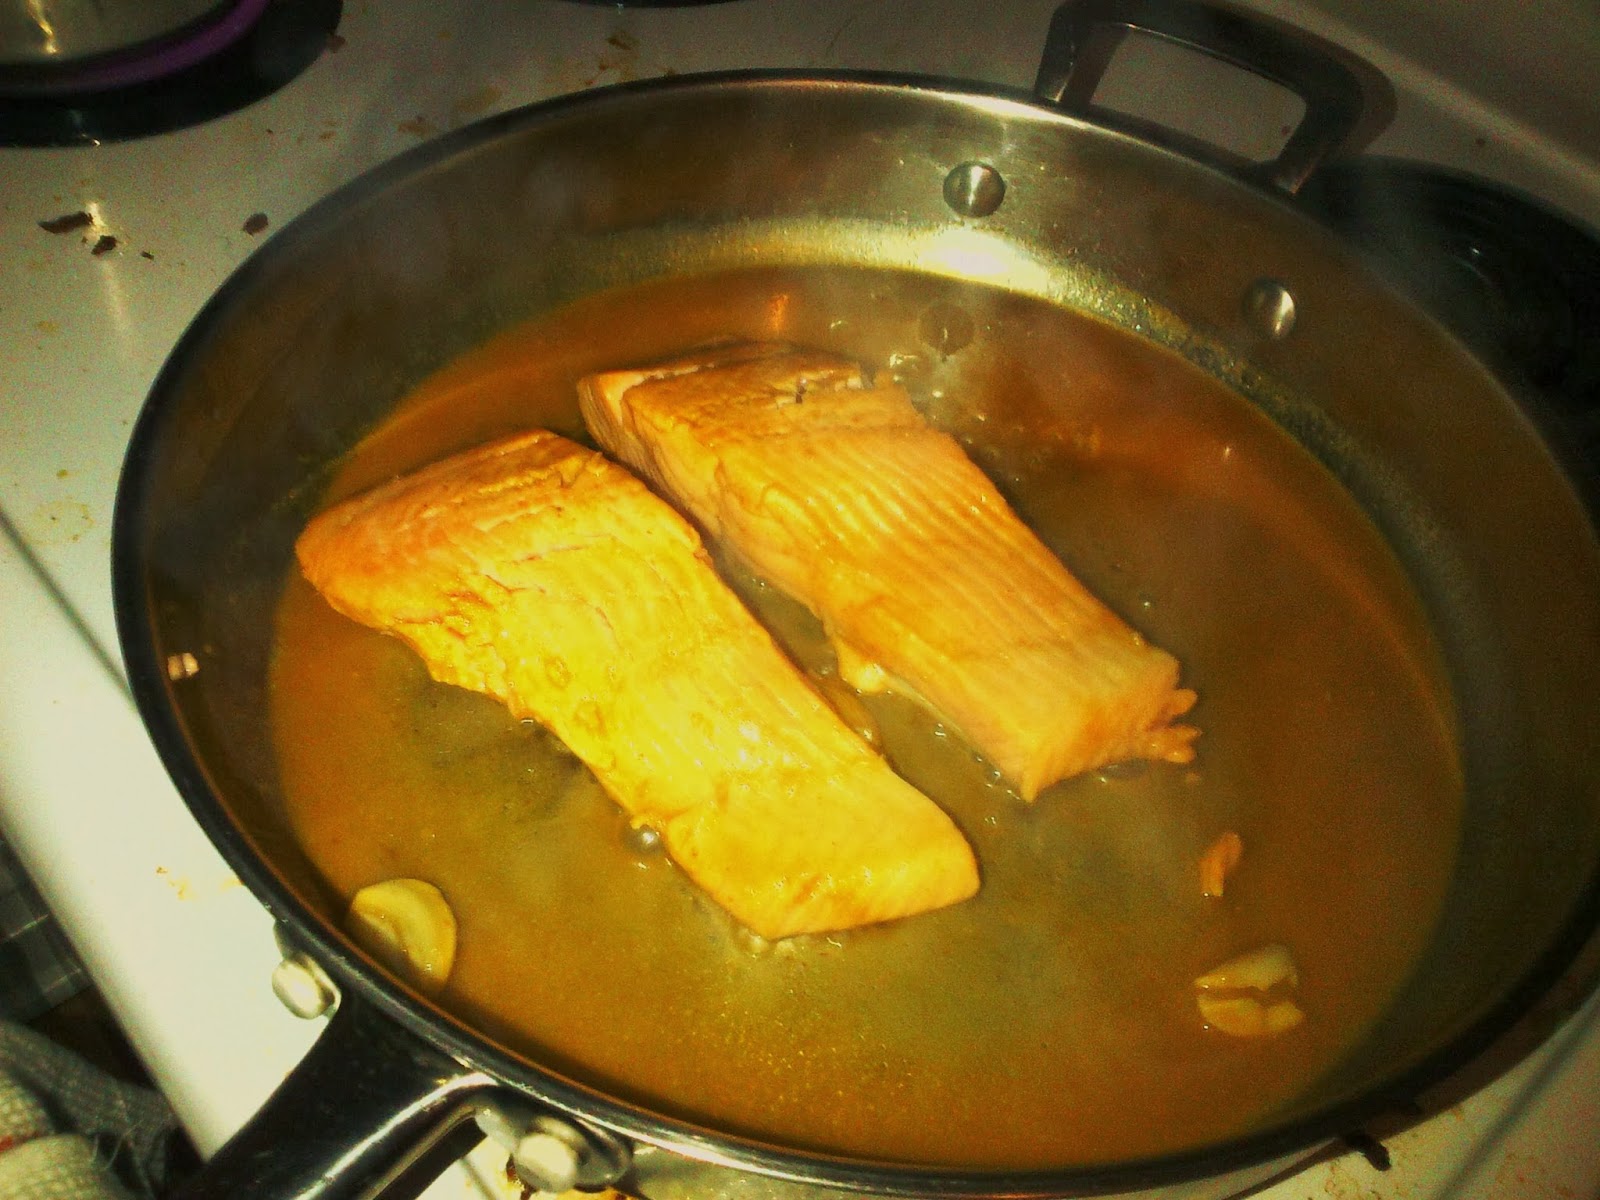

Equal parts braising, pan frying and steaming - bryming?

Salad:

Ingredients

- 1 large sweet potato, cubed
- 1/2 cup edamame (peeled) or 1 cup edamame (unpeeled)
- 1/2 cup cilantro, chopped

Directions

- Boil sweet potato until fork tender, but not mushy (about 10-15 minutes). Drain in a colander and cool with water. Drain well.
- Peel edamame if necessary.
- Combine sweet potato, edamame and cilantro in a large bowl.

Dressing:        

Ingredients             

- 2 tbsp sesame oil
- 1 tbsp sriracha
- 1 clove garlic, minced
- 1 tsp soy sauce
- 1 tsp rice wine vinegar
- 1 tsp maple syrup

Directions

- Whisk everything together and toss with salad and serve.


Orange and tasty!


The result was pretty darn tasty and very bright, not surprising considering how prominent the orange juice was in the sauce, spicy but not overpowering. The fish was a little bit overdone for my taste (salmon is supposed to rare in the middle), but that was mainly for Kari's benefit since she isn't a big fish eater, and really, even then it was tender and delicious. The salad also added a bit of richness to cut the acidity of the sauce, rounding out the dish very nicely. All in all, it was a great way to brighten up a cold winter's night and have a nice post-move dinner that isn't too difficult.  
 
We'll pick this up next time with meatballs, pizza and pot roast!

Cheers!

Saturday, February 8, 2014

From Russia With Beets

Hey there!

It's wintertime in Canada, and in case you haven't heard, it's been pretty damn chilly since the end of November. And it's at this time of year that we pretty much NEED the kind of food that sticks to one's insides like tasty, edible spackle. Now, there are numerous cuisines that come from Northern climes and aren't always well-known or given their due in popular culture and food trends. I already blogged about one Czech comfort dish many moons ago, now I want to move to the northeast, to our friends in Russia. Russian (and by extension Ukranian, Lithuanian and some aspects of Polish) cuisine isn't exactly en vogue (has it ever been?) and yet it features utterly delicious, hearty and nourishing fare, well-suited for the climate in which it originates and in which the mighty Canuck lives.

Now, this post happens to coincide with the Winter Olympics in Sochi, Russia, even though we made the meal back in late November (Xmas and moving were in between then and now, don't judge me!). This post is by no means a plug for the Olympics or for Russia itself, because they're a freakin' sh*tshow this year and should never have been awarded to such a repressive country as Russia. OK, getting back off my soapbox and back to the food. Because they do have tasty food.

One of the stalwarts of Russian cuisine is Borscht. Borscht is a stew and/or soup (or "stoup" as my wife likes to call it) that is pretty much always based on beets. It comes in both hot and cold forms, and both are fairly well known. Now, root vegetables are always a favourite in the colder months. They keep for a fairly long time, they're hearty and they do a great job at thickening stews and soups, allowing you to make the "stick-to-your-ribs" goodness a body craves at this time of year. Beets have the added bonus of being delicious with a unique flavour profile no other vegetable can match. They're sweet, earthy and rich, not to mention versatile; you can use them as the base of a salad, slice and fry them into chips, pickle them, and so on. And, of course, make a whack of Borscht!

 I found this recipe for Borscht on the Internet thanks to Martha Stewart (don't judge me) and adapted it to my tastes and desires.

Add caption


Hot Borscht

Ingredients

- vegetable or olive oil
- 3 large beets
- 1 tbsp butter
- 2 potatoes, peeled and diced
- 1 onion, peeled and chopped
- 2 cloves garlic, minced
- 1/4 cup dried mushrooms (see note below), or 1/2 cup fresh mushrooms, sliced or roughly chopped
- 2 stalks celery with leaves
- 1 apple, cored
- 1 cup beef stock (or vegetable stock if you want it to be vegetarian), keep some extra in case you need it
- 2 tbsp maple syrup
- 1/4 of one lemon
- fresh dill, chopped
- sour cream or yogurt

Directions

- Preheat oven to 400 degrees Fahrenheit.
- Soak dried mushrooms for 5-10 minutes. Once done, chop mushrooms, reserving the liq
- Coat beets in vegetable oil and wrap tightly in foil. Please on baking sheet and roast for about an hour, until beets are tender (simply prick with a toothpick, if it goes through beets easily, they're done). Set aside until cool enough to handle.


- Peel skins off beets (they should just slide off) and chop roughly.


- While beets are cooling, in a large pot, heat 2 tbsp of oil.
- Sauté potatoes, onions, garlic, mushrooms, apples and celery.
- Stir in stock and beets, bring to a boil and reduce heat to simmer.


From boring ol' whitish-brown...


... to delicious silky red! Just add beets!


- Simmer the soup for 20-30 minutes. Stir in maple syrup and squeeze in lemon juice.
- Simmer for another 10 minutes.
- Using an immersion blender, blend soup until smooth.
- Serve soup garnished with fresh dill and a dollop of sour cream/yogurt.

For the other part of the meal, we had Beef Stroganoff, but I wasn't as impressed with that as I expected to be. Regardless, here's the basic recipe I used/adapted (went with sirloin instead of tenderloin). My suggestion is to get a big ol' loaf of your favourite crusty bread or maybe pumpernickel and eat the soup with that. Probably less likely to cause a food coma as well.

Preparing for hibernation? Here's your meal!

Dos vedanya Tovarisch!

PS: If a 5-month old likes it, you know it's good!


Agog at the goodness!

Saturday, December 28, 2013

"I was working in the Laab late one night..."

Moi encore,

If you've been reading my contributions for any significant stretch of time, you'll know that I don't usually subscribe to the concept that "simplest is best". I like to complicate things and throw more stuff into a recipe than might make sense. But sometimes I come across a dish whose strength lies in its (relative) simplicity. One such case is a Loatian/Thai staple called "Laab" (or "Larb"). Laab is, essentially, a salad of ground pork or beef mixed with shallots, fish sauce, lime juice, herbs and a couple of other ingredients. I first tried it at Play where it was served on lettuce wraps, and I was hooked. It can be served hot or cold, raw or cooked (I recommend the latter) and presented pretty much any way you like. As I said: simple.

The flavour profile highlights a few of the cornerstones of Southeast Asian cooking, namely the uniquely funky saltiness of fish sauce, the tart sweetness of lime juice and the herbal notes of mint, cilantro and/or Thai basil. And that's just the basic model.

So, today I'll be walking you through the how-to on this delicious and easy bit of gastronomy!

Laab

Ingredients

- 1 lb. ground beef or pork
- 2 shallots, minced or thinly sliced
- 3-4 cloves garlic, minced
- 1 inch piece of fresh ginger or galangal, minced OR 1 tsp dried ginger or galangal
- 1 lime, cut in half
- 2 tbsp fish sauce + 1 tsp on the side
- 1 tsp brown sugar
- 1/2 tsp sesame oil
- 1 tsp sriracha (optional)
- 2-3 tbsp jasmine rice

Plus, choice of any or all of the following:

- 2 tbsp mint leaves, chopped
- 2 tbsp cilantro, chopped
- 2 tbsp Thai basil, chopped
- 2 tbsp green onion, sliced
- 1/2 cup grated carrot
- 1/2 cup grated red cabbage


Putting things together


Directions

- Mix meat well with shallots, garlic, ginger, juice and zest of half a lime, 2 tbsp of fish sauce, brown sugar, sesame oil, and sriracha. Let stand in fridge for at least an hour to let flavours mix.
- Toast the rice in a frying pan for about 5 minutes until golden brown. Grind rice into a coarse powder in a mortar and pestle or in a spice grinder. Set aside to cool.
- In a large frying pan, cook meat for 10 minutes until well cooked through. Set aside to cool for a little bit until it's warm, but not hot.
-  Stir in whatever herbs and veggies you like (I went with mint, cilantro and carrot the last time I made it), along with the remaining lime juice and fish sauce.
- Serve on lettuce wraps or in a bowl or whatever you like!


Getting closer to deliciousness

I love Laab so very much. It combines meaty richness with all the freshness of lime juice and herbs and veggies, with a little bit of an exotic crunch from the toasted rice. It's a fairly light meal, but still satisfying. I highly recommend you try your hand making it or at least finding a restaurant that serves it.


The finished product, except not the one I made, because I forgot to take a picture of it... oops...


Sunday, December 15, 2013

Which Brisket Is Best? - Pt. 2 - Montreal

Bonjour!!

I'm back with the second part of my examination of the art of smoking brisket. Last time we went to Texas, where slow-smoked brisket is the cornerstone of BBQ. This time our travels take us a bit closer to home, to la belle ville de Montréal where brisket has become one of the city's most recognizable culinary hallmarks in the form of Montreal Smoked Meat. Smoked Meat is to be found any of the dozens of kosher delis spread across the city and is renowned the world over. There's a bit of discussion on who invented the process, more than I have the time or inclination to get into (clearly!), but currently most opinions point to Schwartz's as the best Smoked Meat, and I agree. Either way, Smoked Meat is pretty much one of the best, if not the greatest, of Canada's contributions to the global palette.

Being a convert to the Church of Smoke, the idea of making Smoked Meat was in the back of my mind as a kind of "holy grail" for years, but:


Heed the words of Boromir


As mentioned in a recent post, a good hunk of brisket is at least 40 bucks and you don't want to screw around with that much meat and ruin it. If you're like me, you take to the Internet for inspiration and guidance and then try to make the recipe your own. With the Texas Brisket, the instructions were fairly straight-forward, but flexible; with Smoked Meat, I wanted precision, I wanted to know how they do it at Schwartz's. Remarkably, a recipe from the deli itself was made available on the Food Network Web site, sort of. Those instructions were a bit over-simplified for my taste, so I kept looking around and was able to find a bit more information on a Big Green Egg forum. This gave me a bit more info on the actual procedure, but I had to come up with my own ideas on what to use to actually cure the meat.

So, come with me as I get into this nigh two-week process of transforming a hunk of brisket into deliciousness.

Montreal Smoked Meat Step-by-step

- 5 lb. piece of brisket, trimmed of excess bits of connective tissue (you'll want to keep fat to help keep the meat moist, but the tougher bits of membrane and connective tissue you can try to remove as best as possible)

Smoked Meat Cure

- 1/2 cup kosher salt
- 1/2 cup brown sugar
- 1 tsp. garlic powder
- 1 tsp. onion powder
- 1 tsp. mustard seed
- 1/2 tsp. allspice (ground)
- 1/2 tsp. smoked paprika
- 1 tsp coriander seed
- 1/2 tsp cardamom seed
- 1 tsp. fennel seed
- 1 star anise pod, roughly ground
- 2 cloves, ground
- 1 tsp. juniper berries, roughly ground
- 1 tsp. caraway seed

NOTE: Most restaurants and industrial producers use "pink salt" (sodium nitrate or nitrite) which gives the meat the uniform deep red/pink colour. I didn't, so the result had a colour more like roast beef, although the smoking process did impart a pinkish smoke ring which is to be expected.

- Mix all ingredients together well.

- Brush a thin layer of yellow mustard on the brisket, than apply the cure to the top and bottom of the meat, pressing a little bit to ensure it stays on.

- Place the meat in a large Ziploc bag and put in the fridge for 9 to 10 days, flipping over twice a day.

- Once the meat's been cured, remove from bag.

Hallelujah, I'm cured!
- Rinse meat quickly then soak in cold water for about 3 hours, changing the water every 30 minutes. This step removes a lot of excess salt, which is important in the process of making Smoked Meat rather than Salt Lick. Pat meat dry.

- Coat with a layer of peppercorns, coriander seed, mustard seed, fennel seed and caraway seed, slightly cracked with a mortar and pestle or roughly ground in a spice grinder. I spread a thin layer of maple syrup over the meat to hold the spices in place, but it didn't really do anything to the flavour. Return meat to bag and leave in fridge overnight

- The next day, remove meat from fridge and leave out while you prep the smoker.

- Soak 2 cups of mesquite chips in water for about 30 minutes. Light your fire using lump charcoal or wood chunks (I suggest either apple or maple) and get a temperature of 250 Fahrenheit going.

- Smoke brisket for 4 hours, adding small handfuls of apple or hickory wood chips every 30 minutes to produce more smoke (and more flavour).

- At the 4 hours mark, wrap meat in foil and continue to smoke for another 4-5 hours. Remove meat from smoker, unwrap and let stand for 30 minutes.

- Slice meat into portioned hunks depending on how much you want to eat at any given time.

Mission accomplished!

Now, you don't want to start digging in just yet, as the meat needs one more step before actually serving it. If that's now, then get at it!

- Steam hunk of meat for an hour. I used a bamboo steam basket over a pot of boiling water. Line the basket with a layer parchment paper and place meat on top, cover with lid and steam.

- Once steamed, remove with tongs, slice meat against the grain at desired thickness (I think about 1/4-1/2 cm is perfect) and serve on warmed slices of rye bread topped with mustard, with a side of pickles, fries and coleslaw.

NOTE: If you're lucky enough to have access to it, ALWAYS use Rideau Bakery rye bread. You just put all this love and care into making Smoked Meat, it's what it deserves.


The apex of sammichery, with pickles

As you might have noticed from the picture, I portioned this batch into three pieces, each one being enough for two satisfyingly meat-laden sandwiches. What was interesting about it was that the first serving, which I ate right after smoking and steaming the meat, didn't quite taste as much like Smoked Meat as I had hoped, there was a bit of a pot roast undertone to it. Buy the time I got to the last hunk about a week later, however, it had become a really good approximation of the Schwartz's flavour profile. So I think a bit of post-smoked aging for a few days to a week is your best bet. The steaming is an important step also, as it gives the meat the moisture it needs to be melt-in-your-mouth.
 
Now, with the Texas Brisket, I used it in all kinds of different ways, but the Smoked Meat was purely for sandwiches. That being said, I'm sure it would be spectacular in an omelette, or even spaghetti! Ah, who am I kidding? Make sandwiches with it, any other usage feels a bit like sacrilege.
 
All in all, I think I really nailed Smoked Meat (on my first try!). It wasn't as good as Schwartz's and I'd be a fool to expect it to be, but for something done up on my back balcony in a cheap-o smoker from Canadian Tire? Not too freakin' shabby...
 
And in the end, maybe because I followed directions better or maybe because I'm geographically biased, the Montreal Smoked Meat gets a 9 out of 10, edging out the Texas BBQ to win the "Battle of Brisket". Vive la Viande fumée!
 
Boy howdy did I have fun with this! Here's hoping you do too! 
 
Cheers!

Sunday, December 1, 2013

Which Brisket Is Best? - Pt. 1 - Texas

Well, this might be one of my most important posts yet...

As you well know, I've become a bit of nut about smoking meat over the past 4 years, ever since I first tried my hand at ribs. Since then I've done fish, pulled pork, shrimp, veggies and many, many more. But there's one particular staple of smoking and BBQ that I've been a little nervous about trying and that's beef brisket. First off, you can't do "just a little" brisket, you need to buy a pretty massive hunk of meat and it's hard to justify spending 40-50 bucks on a piece of meat you might screw up and turn into leather.

Another important element to my brisket cooking reticence has been the fact that I don't know the style in which to cook it! Being only 2 hours away from Montreal, my experience with eating brisket has come mainly in the form of the Hebraic staple simply called "smoked meat", probably made most famous in Canada by Schwartz's Deli . But over the years, I've had the chance to try the other most popular form of brisket, which is smoked barbecue style, most famously found in Texas. Both styles are absolutely over-the-top delicious if done well, but brisket's a risky piece of meat to work with. I've had Texas-style brisket that was the texture of sawdust and Montreal smoked meat that was like rubber.

Not one to ever be able to make a simple decision, I decided to treat myself to a 10+ pound (or so) brisket and try cooking both Texas-style and Montreal-style. I cut the 10 pound piece in half, so for each recipe I'll be dealing with 5 pounds of meat.

First step: cutting one giant piece of meat into two really big pieces of meat

Now, to be fair, there's really little difference in how one prepares the brisket initially. Both involve a rub/curing process, both involve smoking, both involve a certain measure of rehydration when serving and both are used in a variety of ways, although smoked meat is most often found piled high between slices of rye bread, where it belongs.

I scoured the Internet for recipes on both techniques; I've allowed myself to experiment willy-nilly with various smoked meatstuffs before, but this was a little more high-risk and I wanted to make sure I got off on the right foot. Today, I'm going to stick with the Texas Brisket, and cover the Smoked Meat in a later post.

For the Texas Brisket, I found a bunch of recipes and adapted things as I went. There was one recipe from Bobby Flay that helped me approximate the rub time and heat to use, and I perused a few more for some other tips. But as I did my research, I found that the information was like most information off the 'Net: mostly useful but maddeningly contradictory. In the end, I wound up ad libbing the rub, albeit not the cooking process.

So, here we go:

Texas Brisket Step-by-step

- 1 5 lb. piece of brisket, trimmed of excess bits of connective tissue (you'll want to keep fat to help keep the meat moist, but the tougher bits of membrane and connective tissue you can try to remove as best as possible)

Texas Rub

- 2 tsp cocoa powder
- 2 tsp chipotle pepper, powdered
- 2 tsp guajillo powder
- 2 tsp pasilla
- 1 tsp smoked paprika
- 1 tbsp garlic powder
- 1/2 cup brown sugar
- 1/2 cup kosher salt
- 1 tsp onion powder
- 2 tsp cumin powder

- Mix all ingredients thoroughly

- Pat meat dry, then liberally apply rub to meat and press on. Seal in a zipper bag and leave in fridge for at least 24 hours (48 is better). You can also apply a layer or mustard or syrup to help the rub stick to the meat. I never find it necessary, but many BBQ gurus swear by this.


Rubbed n' ready
- Two days later, remove meat from the fridge and let warm to room temperature. Next, there's a step that I took for the smoked meat that I didn't use for the Texas Brisket, which was to soak the meat in cold water for a couple of hours in order to remove a lot of the saltiness. I would recommend this step with the Texas Brisket, but only giving it a quick rinse or a 15-20 minute soak and then patting thoroughly dry.

Start a fire using lump charcoal or blocks of hardwood (oak or hickory or mesquite) and soak 2 cups of mesquite chips in water for about 30 minutes. You'll be looking to get the fire burning at a consistent heat of 225-250 degrees Fahrenheit for 8-9 hours. Once the fire is ready, smoke the meat for about 3-4 hours uncovered, adding a small handful of mesquite chips to the fire every 30 minutes or so to produce smoke. You'll also want to apply a "mop" to the meat as it smokes. A mop is a liquid sauce used to help keep the meat moist and add flavour. Because brisket is essentially a giant sponge for all kinds of tasty goodness, I used a lot of strong flavours in the mop. Often, mops are usually just apple juice or cider vinegar, but in this case I wanted to add even more:

Brisket Mop

- 1 cup Mill Street Coffee Porter (or other dark beer)
- 2 tsp prepared yellow mustard
- 2 tsp cider vinegar
- 2 tsp brown sugar

- Whisk everything together thoroughly and apply to meat with a basting brush every 30 minutes.

When you get 4.5-5 hours in, it's time to wrap the meat in foil, adding any remaining mop to the foil package. Smoke for another 3-3.5 hours at 225. Unwrap and smoke at 250 for 30-60 minutes. Let meat rest for at least 30 minutes once removed from smoker.

Now, you'll probably be chomping at the bit to chomp at the brisket, so slice off a piece and give it a taste. If it turned out the same way mine did, you might find it just a teeny bit tough. Delicious, but I wouldn't eat it dry. So, my technique is to chop or slice pieces of brisket (about 1/2 cm thick) and simmer them in sauce for about 10-15 minutes on medium-low heat. Once you've done that, you should have melty, meaty, saucy perfection.

Now, I'm a big fan of homemade BBQ sauce, I just find it is way more interesting (and tasty!) than store-bought stuff. In keeping with the "KA-POW! BRISKET!" flavour profile, I whipped together a sauce with lots of deep, rich-tasting ingredients like coffee porter, molasses and berries paired with high notes from ginger and lime juice.

Brisket Sauce

2 tsp olive oil
5-6 cloves garlic, minced
1 inch piece of ginger, minced
1/2 cup mixed frozen berries (blueberry, strawberry, raspberry and blackberry)
1/2 bottle coffee porter
1 tsp salt
1 tsp black pepper
1 tsp coriander, powdered
1 tsp cumin, powdered
1 tsp chili powder
1/2 guajillo chili, ground into powder
1/2 pasilla chili, ground into powder
1/2 tsp cayenne pepper
4-5 drops liquid smoke
1/2 cup ketchup (high-quality and/or homemade)
2 tbsp brown sugar
2 tsp molasses
1 tsp honey
juice of 1/2 lime

- Heat oil and saute garlic and ginger.
- Add all ingredients from berries to brown sugar and stir well together. Reduce heat to medium-low (4). Simmer sauce for 20-30 minutes, until it thickens (you may have to simmer longer).
- Stir in molasses, honey and lime juice and cook for another 5-10 minutes.
- Put chopped/sliced meat in sauce (ratio of sauce to meat is up to you, but you want that meat SAUCY!) and heat for 10-15 minutes on medium heat, allowing to sauce is bubble for a while.


Let the giant meatfesting begin!

Serve with whatever sides you think work, but a little research told me that potatoes and green beans are traditional sides in Texas, so that's how I served it in the first go, as you can see above.

Final verdict? REALLY tasty, but just a bit too salty. Hence why you should soak the meat a little in water before smoking. I had leftover brisket and gave it a soak before using it in a batch of chili. All I can say to that is YEAH! Brisket Chili, b*tches! 

So, all in all, an interesting experiment that mostly turned out the way I wanted it to. I give it an 8 out of 10. 

That's it for our brisket tour of Texas, next time we head to Montreal to find out which brisket is best! 

Cheers!

Monday, November 11, 2013

Three Sisters and a Bison (A Brief Exploration of Indigineous North American Food)

Hi there!

November is Native American Heritage Month in the U.S. and a friend of mine posted an item on her Facebook about the 3rd to the 9th being Indigenous Eating Week. This got me thinking about how little is generally known about the cuisine of the Indigenous peoples of Turtle Island (aka North America). So far as I know, there's only ever been one restaurant in Ottawa that specialized in Aboriginal food and that was Sweetgrass, which closed down many moons ago (but they did serve some pretty amazing grub when they were around). It's not like there's a ton of Aboriginal cookbooks out there either. All in all, it's a cooking culture that doesn't get nearly enough airtime, which is too bad, because the staples of many traditional First Nations diets are pretty damned tasty and versatile. 

Also consider this: the spice in Mexican cuisine didn't come from Spain, maple syrup wasn't invented by Europeans and blueberry pie would be pretty boring if Indigenous peoples didn't first cultivate that tasty little fruit. These are only a few of the culinary contributions from North America's Natives that are mainstays in modern eating, and yet we only tend to know about bannock, jerky and smoked salmon.

One of the dietary and agricultural mainstays across the North American continent is/are the "Three Sisters", which are squash, corn and beans. These crops would be grown together in a kind of symbiosis (the beans climb on corn stalks, the squash grows on the ground to keep weeds from growing, etc.) and eaten together would provide a balanced diet. 


So, upon learning of the existence of Indigenous Eating Week, I figured I should try my hand at putting together something tasty based on the Three Sisters. Now, it's me and I rarely do vegetarian, so I needed something in the meat department that was distinctly Aboriginal. The answer was pretty clear: it doesn't get much more Aboriginal than bison and luckily my butcher carries it on a regular basis (it ain't cheap, though). It being November, the logical choice was to throw everything together into a stew. 


Now, squash, corn and beans are pretty easy to put together in a pot, but that wasn't enough to complete the stew; I'd also need tomato, garlic and onion to round out the flavours. I thought including tomato would have been "breaking the rules" but it turns out tomatoes originated in Mexico long before Europeans showed up. Onions and garlic, not so much, but they're pretty much a staple in everything I cook. Wild garlic (ramps) are native to North America so far as I can tell, but their season is Spring, so no luck there. I also needed something in which to sauté the onions and garlic and went with olive oil as I usually do. So, I did cheat just a little.

As I was building the recipe, I thought of other ingredients that originated in North America that would help build flavour. I came up with maple syrup and wild rice, as well as jalapeno peppers for a bit of extra zip and heat. I also went with assertive seasonings, just to make sure it was tasty!


Three Sisters and a Bison Stew


Serves 6-8

Ingredients

- 1 tbsp olive oil (or canola oil)
- 1-2 small onions, chopped
- 2-3 cloves of garlic, minced
- 1 lb. bison meat cut into 1.5 cm/1/2 inch cubes (the package I bought said "stewing cubes" so I have no idea what cut it was from - maybe top round?)
- 1 tsp chili powder - 1 butternut squash, peeled and cubed (to prepare squash, cut in half, cut off tips, scoop out "guts", peel skin and cut into 3 cm/1-inch cubes) - 1 can corn (or slice kernels from 2-3 cobs of fresh corn)
- 1 can pinto beans, drained and rinsed (you can use dried beans, but it takes way longer. For instructions on how to cook dried pinto beans, here's a random web site)
- 1 can black beans, drained and rinsed (or, y'know, see above)
- 2 jalapeno peppers, either fresh or canned (I used canned), seeded and chopped
- 2 medium tomatoes, chopped
- 1 cup vegetable or beef stock (more if needed)
- 1/2 tsp nutmeg
- 1 tsp smoked paprika
- 1/2 tsp salt
- 1 tsp black pepper
- 1/4 cup wild rice
- 2 tbsp maple syrup


This had better work...


Directions

- In a large pot, heat oil on medium-high (6-7) and sauté onions and garlic for about 5 minutes.
- Add bison and chili powder and brown meat for another 5 minutes.
- Add squash, corn, beans, peppers, tomato and stock. Stir thoroughly and bring to a boil.
- Stir in wild rice and seasonings. Reduce heat to low (2-3) and cover.
- Simmer for 50-60 minutes. Stir in maple syrup.
- Simmer for another 10 minutes and serve.


Mission accomplished!


I skipped serving with bread or other starch since there was more than enough density and richness to this dish all on its own, what with two kinds of beans and super-lean yet super-dense and flavourful bison all playing together. The squash thickened it nicely, so it was definitely the right consistency, neither soup nor paste.

The flavour profile was subtle but really nice. The flavours of the corn, bison and wild rice stood out the most, with just a bit of heat from the jalapenos. There were also some understated southwestern flavours coming from the chili powder and smoked paprika, while the nutmeg, maple and squash evoked the familiar autumnal pumpkin pie flavour profile. All in all, I think it did a good job of showing off ingredients and flavours from all across Turtle Island.

So, here's hoping that you take the time to explore some of the most overlooked (and tastiest) food on/from this continent. I doubt you'll regret it!

Cheers and Miigwech!


Monday, November 4, 2013

The Food Trucks/Carts Are Here! pt. 2 - Urban Cowboy


As Ottawa's fledgling romance with food trucks and carts continues throughout 2013, I've had a chance to try a few more of them (although I end up back at Angry Dragonz a whole lot, it being 3 blocks from my house). One place that has stood out in my travels in food quality, and being a neat experience in general, was the Urban Cowboy "Texas Street Food" truck.

Urban Cowboy

Facebook: https://www.facebook.com/#!/UrbanCowboyEats
Twitter: https://twitter.com/Urbancowboyeats

Spiffy set o' wheels!

A long time ago, I worked at Big Daddy's Crab Shack and Oyster Bar, which was one of the first places to serve Cajun food in Canada. It was owned by former Ottawa Rough Rider (CFL football team) Val Belcher, who also started the Lone Star restaurant chain. Val unfortunately passed away in 2010, but his tradition of bringing the tastes of the South to Ottawa is being carried on by his son Layne and his business partner Matthew Hinds via the Urban Cowboy Food Truck. Located in Old Ottawa South at the corner of Bank St. and Glen Ave., they offer all kinds of tasty goodness like ribs, oyster po' boys, portabello sandwiches, sweet potato fries and more. But, having only had the chance to sample their wares once (so far), I had to go with the menu item dripping in tradition (and sauce): the Belcher Burger.

The Belcher Burger is about halfway in size between a slider and a full-on burger. At 6 bucks, it's an affordable and magnificent slice of Texas, comprised of a whack of saucy smoked beef brisket on a potato bun with a dill pickle spear on the side. It's simple, but sublime: the brisket is smokey and rich with just the right tangy counterbalance from the sauce and pickle, and is melt-in-your mouth tender (which is a feat to be proud of with brisket). The potato bun is a little more solid than your standard burger bun, which added a nice chewy quality to the bite. All in all, just freakin' awesome.


The Belcher Burger is just the beginning!
Also awesome was chatting Layne up to get the story behind the Belcher Burger: Back in the day when Val was a linebacker for the Riders in the late 70s/early 80s, he and his wife would whip up brisket burgers for the tailgate parties and later sell them at the games (apparently there was quite the demand, unsurprisingly). So, quite a fun little Ottawa tradition being kept alive at the Urban Cowboy truck. I can't wait til circumstances send me back their way!


A mittful o' delicious!

I'll be back soon with another truck or two!

Cheers!