Hey kids! It's time for more tales of the strange and unexpected in the kitchen!
OK, as I may have mentioned once or twice, I love cookbooks. But not for the reasons you might think. I love cookbooks for tips and methodologies of cooking, not usually for recipes as they're written. Why? Because most of the time I make something out of a cookbook and follow the recipe to the letter (or somewhat closely), it almost always turns out wayyyyy different than expected. Hence, why I tweak most recipes to my own techniques and understanding. But sometimes, especially when dealing with untried methods or ingredients, I have to follow the recipe as best as possible. Case and point: I was looking through Marcus Samuelsson's Soul of a New Cuisine (basically my favourite cookbook) and found a recipe for Coconut-Plantain Stew. It sounded pretty neat so I decided to give it a shot (I think Kari's jumping up and down going "Yes please, those are two of my favourite flavours!" also sealed the deal).
Now, I've never cooked with plantain before, so there was no way I was going to try winging it. For those of you who don't know what plantain is, it's a larger, starchier, less sweet form of banana. You'll often see it fried as a side dish with Caribbean fare. It's also prominent in dishes from different parts of Africa. Now, I'll reprint the recipe here (again, credit to Mr. Samuelsson for the recipe - I love your recipes, even if I get them wrong, please don't send your legal team after me!):
Coconut-Plantain Stew
4 to 6 servings
Ingredients:
- 1 medium Spanish onion, roughly chopped
- 2 red chili peppers, seeds and ribs removed, finely chopped (I was stuck using green chilies, but it had little impact on the flavour)
- 1 cup coconut milk (that's about 250 ml. Most cans are 400 ml. I ended up using the rest of it when stirring in the plantain, see below)
- juice of 2 limes
- 2 tablespoons white wine vinegar
- 1/2 cup peanut oil
- 5 plantains, peeled, quartered lengthwise and cut into 1-inch pieces (I used 4 larger plantains and it worked well)
- 2 teaspoons finely chopped cilantro
- 1/2 teaspoon ginger powder
- Salt and pepper
Directions:
- In a large saucepan over low heat, combine the onion, chili peppers, 1 cup of the coconut milk, lime juice and vinegar, stirring to mix well. Cook for 10 to 15 minutes, or until the onion has softened, then remove from the heat and set aside.
- Heat the oil in a large skillet over medium heat. Add the plantains and cook for 10 to 15 minutes, turning occasionally, until browned on all sides. Remove the plantains with a slotted spoon and drain on the prepared plate; blot them to remove excess oil.
- Add the plantains, cilantro and ginger to the onion mixture in the large saucepan and heat through over medium heat. Season with the salt and pepper to taste. Serve hot.
OK, so the part where it told me to fry up the plantain pieces is where it all went wrong. And yet there was a very happy ending.
Not ever having worked with plantain before, I had no idea that it bonds at the molecular level to the frying pan while cooking! Seriously! I thought I'd be partially float-cooking chunks of plantain, instead I spent 15 minutes scraping plantain off the sides of the pan, then stir-frying them, then scraping, adding oil, etc. etc. etc. In a fit of culinary panic (or genius?) I tossed a splash of coconut rum to loosen the fried pieces from the pan which may have helped the flavour.
In the end, instead of having little fried chunks of plantain, I had something that looked more like a fried potato mash (i.e. hash browns).
But, not wanting to waste food or energy, I was determined to make the stew with the plantain "mash". How different could it be? Well, I'm pretty sure Mr. Samuelsson didn't intend for the consistency to be more like batter than stew! Because that's exactly how it turned out. In fact, I had to stir in a splash of orange juice and the rest of the coconut milk to thin it out - something I wouldn't repeat with the OJ in the future because it overpowered the flavour (next time I'll use water or beer). Regardless, what I had was not really something I could serve as is. The taste was wonderful, but the consistency needed to be changed.
Looking at this thick mush, I got an idea: Why not form it into patties/croquettes, bread it a little and bake it?
So, with a quick crank of the oven to 350, and a bit of messy forming work, stew had become patty. I quickly breaded it in regular bread crumbs and laid them out on a cookie sheet lined with parchment paper.
Now, here's the real question: How'd it turn out? Remarkably well, in fact! The patties has good consistency, were nicely dried out in baking to go from mushy to flaky, and were easy enough to eat with our hands. But the true kicker? Well, as with any good cake/patty/croquette, it needed a side dip. So, I was thinking Sriracha Mayo, but that would have been a bit too rich with such a dense "batter" as this (and it was DENSE!)
Kari to the rescue!
She suggested adding a teaspoon or so of pesto into the mix. It worked perfectly! It also looked kinda neat in the bowl before mixing. Essentially I had a tablespoon of mayo, a teaspoon of pesto and about 1/3 a teaspoon of Sriracha in a small bowl. The juxtaposition of red, white and green reminded me of those "Mexican Flag" Enchilada specials you get at Mexican restaurants. Anyhoo, I stirred that all together and it worked perfectly!
So, there you go, another case of things not turning out as expected, but still being delicious! I leave it up to you, dear reader, to try stew or patty with this one. Good luck, regardless!
Cheers!
Saturday, August 13, 2011


Friday, July 15, 2011
Les mets d'chez nous! (2ième partie)
Bonjour encore!
My deepest apologies for straying from this topic for so long. So many new experiences and adventures in the culinary arts have distracted me from this cultural examination.
Mais là, ciboire, on va ben examiner d'la bouffe québecoise!
1 - Cipâte (Meat pot pie)
Imagine a massive pot pie with all kinds of meat and veggie goodness! Cipâte is one of the other French Canadian treats my mother would make when I was a kid, albeit occasionally. Like tourtière, it comes in as many variations as there are families. And in Quebec, that's a LOT!

Cipâte
Ingredients
1 ½ lbs chicken meat, cubed
½ lb sliced mushrooms
4 cups chicken stock (Mom uses her own, but for simplicity's sake, use store bought. Your local butcher probably has really good stuff for fairly cheap)
2 lbs boned pork shoulder
2 cups diced potatoes
2 lbs boneless stewing veal
2 tsp salt
1 lb boneless stewing beef
½ tsp pepper
2 cups chopped onion
½ tsp savory
1 ½ cups diced celery
1 recipe for double pie crust (see previous post)
1 cup thinly sliced carrots
Directions
- Remove fat from pork, dice finely and fry, until crisp, in fry pan coated with 1 tsp butter. Drain on paper towels and set aside.
- Cut pork, veal and beef in ¾ inch cubes and mix with chicken in bowl.
- Mix vegetables and seasonings in a large bowl.
- Scatter fried pork fat over bottom of large heavy casserole [18 cup] or Dutch oven. Fill dish with alternate layers of meat mixture and vegetable and seasoning mixture.
- Prepare pastry. Roll out to fit top of casserole. Seal pastry to edges of dish and cut several steam vents on top of pastry.
- Refrigerate dish overnight to blend flavors.
- Next day, pour in enough chicken stock through steam vents to fill pie.
- Cover dish and bake at 300 degrees until meat is tender, 4 ½ to 5 ½ hours.
- After 2 hours cooking, if pie seems dry, add a little more stock.
- Uncover dish for the last 30 mins to brown pastry.
- Remove from oven and cool for 15 mins.
- Serve with a home-made [or store bought] relish or chili sauce.
2 - Fèvres au lard (Baked Beans, literal translation: Beans au Fat)
Baked beans have never been a favourite of mine. In fact, I couldn't bring myself to eat them until the past couple of years and even then under very specific circumstances - those circumstances essentially being "when served with a metric frakton of maple syrup". But in the past couple of years, I've had samplings from various high-end restos and a sugar shack that made me change my opinion somewhat. The key is not to over or undercook the beans, because it's not the flavour that makes baked beans unpalatable, it's the texture. If they're underdone, they're this chalky mouth-torture that is the edible equivalent of a soap-beat. When they're overdone, it's more like oral waterboarding. Of course, all this can be solved (like most culinary problems) with a cup or so of maple syrup. Conversely, you can cook them well!

So, once again taking my Mother's culinary expertise in hand, here is another taste of quebecois cooking:
MY FAVORITE BAKED BEANS RECIPE
Ingredients
- 1 lb navy beans, dried
- ¼ cup brown sugar
- 5 cups water
- ¼ cup molasses
- 2 tsp dry mustard
- 2 tbs sweet pickle juice or 2 tbsp vinegar
- ¼ tsp pepper mixed with specks of ground cinnamon
- 1 tsp salt
- 1/2 tsp cloves
- 3 quartered onions
- ¼ lb piece of salt pork
- freshly ground pepper
Directions
- Pick over beans for dirt, etc. and wash. Place beans in a large pot, pour in 3 cups of water, cover pot and let beans soak for 8 hours or overnight.
- Add 2 more cups of water and rest of ingredients except salt pork and ground pepper.
- Bring to a boil over med-high heat. Reduce heat to simmer, and boil, covered, for 1 hour or until skins of beans begin to wrinkle.
- Preheat oven to 250 degrees.
- Cut salt pork at ½ inch intervals almost all the way through. Place the salt pork in a 2 quart bean pot or casserole dish. Cover with the hot beans and their liquid. Generously sprinkle with fresh pepper.
- Bake for 6 to 8 hours, covered, until tender.
- When beans are 2/3s baked, add about ¾ cup water, or enough to just cover.
- Uncover for last ½ hour of baking.
Makes 4-6 servings.
According to my mother, this isn't "authentic" but awfully tasty. However, I did some research and so-called authentic recipes are fairly similar. I did notice a lack of tomato in a lot of recipes, some in others. So, if you like a more tomato-ey flavour, add a teaspoon or so of tomato paste or a tablespoon of ketchup.
Et voilà mes amis! D'autre bouffe s'en vien plus tard.
My deepest apologies for straying from this topic for so long. So many new experiences and adventures in the culinary arts have distracted me from this cultural examination.
Mais là, ciboire, on va ben examiner d'la bouffe québecoise!
1 - Cipâte (Meat pot pie)
Imagine a massive pot pie with all kinds of meat and veggie goodness! Cipâte is one of the other French Canadian treats my mother would make when I was a kid, albeit occasionally. Like tourtière, it comes in as many variations as there are families. And in Quebec, that's a LOT!
Cipâte
Ingredients
1 ½ lbs chicken meat, cubed
½ lb sliced mushrooms
4 cups chicken stock (Mom uses her own, but for simplicity's sake, use store bought. Your local butcher probably has really good stuff for fairly cheap)
2 lbs boned pork shoulder
2 cups diced potatoes
2 lbs boneless stewing veal
2 tsp salt
1 lb boneless stewing beef
½ tsp pepper
2 cups chopped onion
½ tsp savory
1 ½ cups diced celery
1 recipe for double pie crust (see previous post)
1 cup thinly sliced carrots
Directions
- Remove fat from pork, dice finely and fry, until crisp, in fry pan coated with 1 tsp butter. Drain on paper towels and set aside.
- Cut pork, veal and beef in ¾ inch cubes and mix with chicken in bowl.
- Mix vegetables and seasonings in a large bowl.
- Scatter fried pork fat over bottom of large heavy casserole [18 cup] or Dutch oven. Fill dish with alternate layers of meat mixture and vegetable and seasoning mixture.
- Prepare pastry. Roll out to fit top of casserole. Seal pastry to edges of dish and cut several steam vents on top of pastry.
- Refrigerate dish overnight to blend flavors.
- Next day, pour in enough chicken stock through steam vents to fill pie.
- Cover dish and bake at 300 degrees until meat is tender, 4 ½ to 5 ½ hours.
- After 2 hours cooking, if pie seems dry, add a little more stock.
- Uncover dish for the last 30 mins to brown pastry.
- Remove from oven and cool for 15 mins.
- Serve with a home-made [or store bought] relish or chili sauce.
2 - Fèvres au lard (Baked Beans, literal translation: Beans au Fat)
Baked beans have never been a favourite of mine. In fact, I couldn't bring myself to eat them until the past couple of years and even then under very specific circumstances - those circumstances essentially being "when served with a metric frakton of maple syrup". But in the past couple of years, I've had samplings from various high-end restos and a sugar shack that made me change my opinion somewhat. The key is not to over or undercook the beans, because it's not the flavour that makes baked beans unpalatable, it's the texture. If they're underdone, they're this chalky mouth-torture that is the edible equivalent of a soap-beat. When they're overdone, it's more like oral waterboarding. Of course, all this can be solved (like most culinary problems) with a cup or so of maple syrup. Conversely, you can cook them well!
So, once again taking my Mother's culinary expertise in hand, here is another taste of quebecois cooking:
MY FAVORITE BAKED BEANS RECIPE
Ingredients
- 1 lb navy beans, dried
- ¼ cup brown sugar
- 5 cups water
- ¼ cup molasses
- 2 tsp dry mustard
- 2 tbs sweet pickle juice or 2 tbsp vinegar
- ¼ tsp pepper mixed with specks of ground cinnamon
- 1 tsp salt
- 1/2 tsp cloves
- 3 quartered onions
- ¼ lb piece of salt pork
- freshly ground pepper
Directions
- Pick over beans for dirt, etc. and wash. Place beans in a large pot, pour in 3 cups of water, cover pot and let beans soak for 8 hours or overnight.
- Add 2 more cups of water and rest of ingredients except salt pork and ground pepper.
- Bring to a boil over med-high heat. Reduce heat to simmer, and boil, covered, for 1 hour or until skins of beans begin to wrinkle.
- Preheat oven to 250 degrees.
- Cut salt pork at ½ inch intervals almost all the way through. Place the salt pork in a 2 quart bean pot or casserole dish. Cover with the hot beans and their liquid. Generously sprinkle with fresh pepper.
- Bake for 6 to 8 hours, covered, until tender.
- When beans are 2/3s baked, add about ¾ cup water, or enough to just cover.
- Uncover for last ½ hour of baking.
Makes 4-6 servings.
According to my mother, this isn't "authentic" but awfully tasty. However, I did some research and so-called authentic recipes are fairly similar. I did notice a lack of tomato in a lot of recipes, some in others. So, if you like a more tomato-ey flavour, add a teaspoon or so of tomato paste or a tablespoon of ketchup.
Et voilà mes amis! D'autre bouffe s'en vien plus tard.
Thursday, July 14, 2011
Ribs Redux
Hi!
Well I'll be damned! Another smokey discovery recently made!
If you've ever done any research into smoking meat, you may have noticed that there are as many different ways to smoke food as there are kinds of wood. It can get a little frustrating when you're investing a lot of time and money and effort to find out how to do something the best way possible only to discover there are 50 other ways to do it that may or may not be better.
In my original post on smoking ribs, I presented the 3-2-1 method of smoking, which involves rubbing the meat and refrigerating it overnight, smoking them for 2.5 to 3 hours uncovered, wrapping them in foil (aka "tenting") and splashing them with some sort of flavourful liquid (apple juice, cider, etc.), smoking for another 2 hours, unwrapping and finishing for an hour. Now, this always produced super-tasty ribs, but they never were quite the right tenderness for my exacting tastes.
So, with that in mind, I went back into Internet Search mode and found a different technique, one which involves a bit more work and attention, but the results were fantastic. I give credit to The Smoker King for this method, which I didn't follow to the letter, so I'll break it down for you in my own words and personal tweaks.
OK, so first of all, nothing has changed with the basics. We're looking for back ribs, membrane removed, rubbed in whatever goodness you have since invented or found online (or, if you're still using one of the rubs I've posted, awesome! Thanks for the compliment!) and left in the fridge overnight.
It's the next day that things get interesting.
Once your meat has been sitting out for about an hour to get to room temperature and your fire is going, it's time to apply the new secret technique! Oooooo...
What is said technique? A ridiculously simple mop sauce.
Mop Sauce for Ribs
- 1 1/3 cups apple cider vinegar
- 2/3 cup olive oil
- pinch of rib rub (if you don't have any, just a pinch of brown sugar and a tiny pinch of cayenne will suffice) NOTE: This pinch of rub is optional. Sugar burns/caramelizes during the smoking process, and the rub contains sugar. Some of us, like me, like this crispy, burnt-y, bitter flavour. Many do not. If you don't, omit the rub/sugar and just add a pinch of cayenne and some salt.
- Whisk together in a ceramic/glass bowl with a whisk or fork
Apply a generous amount of mob sauce to both sides of the rack(s) of ribs.
Place ribs on the smoker (bone side down) and smoke uncovered for 5 and a half hours. Apply a layer of the mop sauce to the top side of the ribs every 45 minutes, no need to mop the underbelly. Also, if you can find it, try out pecan wood with your ribs, its flavour is just wonderful. If your smoker is like mine, you may need to move the ribs around a bit to ensure even cooking. Don't flip them over though.
At the 4 hour, 30 minute mark, wrap ribs in foil with the rest of the mop sauce. Smoke for another hour.
Remove, unwrap, and let stand about 5 minutes before cutting into sections.
Admittedly, this results with this method aren't as pretty as the mahogany coloured ribs you get from the first method I've used. These ribs are going to be "wetter", even before you add BBQ sauce. But the texture and tenderness is PERFECT. Well, at least the closest I've ever come.

So, the rib experimentation will continue until TRUE pork perfection is achieved!
Till then, may you smell of wood smoke and meat vapour! And may every bite be as tasty as the last!
Cheers!
Well I'll be damned! Another smokey discovery recently made!
If you've ever done any research into smoking meat, you may have noticed that there are as many different ways to smoke food as there are kinds of wood. It can get a little frustrating when you're investing a lot of time and money and effort to find out how to do something the best way possible only to discover there are 50 other ways to do it that may or may not be better.
In my original post on smoking ribs, I presented the 3-2-1 method of smoking, which involves rubbing the meat and refrigerating it overnight, smoking them for 2.5 to 3 hours uncovered, wrapping them in foil (aka "tenting") and splashing them with some sort of flavourful liquid (apple juice, cider, etc.), smoking for another 2 hours, unwrapping and finishing for an hour. Now, this always produced super-tasty ribs, but they never were quite the right tenderness for my exacting tastes.
So, with that in mind, I went back into Internet Search mode and found a different technique, one which involves a bit more work and attention, but the results were fantastic. I give credit to The Smoker King for this method, which I didn't follow to the letter, so I'll break it down for you in my own words and personal tweaks.
OK, so first of all, nothing has changed with the basics. We're looking for back ribs, membrane removed, rubbed in whatever goodness you have since invented or found online (or, if you're still using one of the rubs I've posted, awesome! Thanks for the compliment!) and left in the fridge overnight.
It's the next day that things get interesting.
Once your meat has been sitting out for about an hour to get to room temperature and your fire is going, it's time to apply the new secret technique! Oooooo...
What is said technique? A ridiculously simple mop sauce.
Mop Sauce for Ribs
- 1 1/3 cups apple cider vinegar
- 2/3 cup olive oil
- pinch of rib rub (if you don't have any, just a pinch of brown sugar and a tiny pinch of cayenne will suffice) NOTE: This pinch of rub is optional. Sugar burns/caramelizes during the smoking process, and the rub contains sugar. Some of us, like me, like this crispy, burnt-y, bitter flavour. Many do not. If you don't, omit the rub/sugar and just add a pinch of cayenne and some salt.
- Whisk together in a ceramic/glass bowl with a whisk or fork
Apply a generous amount of mob sauce to both sides of the rack(s) of ribs.
Place ribs on the smoker (bone side down) and smoke uncovered for 5 and a half hours. Apply a layer of the mop sauce to the top side of the ribs every 45 minutes, no need to mop the underbelly. Also, if you can find it, try out pecan wood with your ribs, its flavour is just wonderful. If your smoker is like mine, you may need to move the ribs around a bit to ensure even cooking. Don't flip them over though.
At the 4 hour, 30 minute mark, wrap ribs in foil with the rest of the mop sauce. Smoke for another hour.
Remove, unwrap, and let stand about 5 minutes before cutting into sections.
Admittedly, this results with this method aren't as pretty as the mahogany coloured ribs you get from the first method I've used. These ribs are going to be "wetter", even before you add BBQ sauce. But the texture and tenderness is PERFECT. Well, at least the closest I've ever come.
So, the rib experimentation will continue until TRUE pork perfection is achieved!
Till then, may you smell of wood smoke and meat vapour! And may every bite be as tasty as the last!
Cheers!
Adventures in Pulled Pork
Hi everybody!
Posting today on one of my more recent forays into the world of smoking that most noble animal, the Pig!

So, after months of hemming and hawing over trying pulled pork on the smoker, I finally tried my hand at it for a Canada Day BBQ. It didn't quite go as planned (maybe I should have followed the recipe more accurately), but the end result was quite tasty.
Now, as you all know, smoking is my new favourite. But most of the cuts of meat I've done have been fairly small and easy. How would a 6 pound pork shoulder turn out? I was justifiably nervous, especially as I was making it for a party! Eep!
So, let's start from the beginning. Well, there are numerous pulled pork recipes that abound on the 'Net, so I want looking and found enough info to cobble a basic recipe in my mind and I think I had the techniques well organized. And all it took to ruin that was to watch one episode of Road Grill on Food Network... For those who don't know, Road Grill is a travelling BBQ show hosted by former CFL QB Matt Dunigan (and also features Whalesbone executive chef Charlotte Langley!). As much as Mr. Dunigan's super-jock attitude might grate on my nerves, it's actually a pretty good show.
Now, in what I thought was a moment of TV serendipity, that particular episode covered off pulled pork. Awesome! And the way Mr. Dunigan made everything look was perfectly simple. Rub pork, let sit, mop (baste) with "mop sauce" once, leave on smoker for 5-6 hours and that's that! Unfortunately, I forgot to look at the actual goddamn recipe online! If I had, I would have noticed the "mop every 30 minutes" part. DAMMIT!! As a result, the pork was well-cooked, but a little dry. The fork-tender, "pullable" quality wasn't there as I took it off the smoker. I was a bit discouraged, but I had this giant slab of pork that was tasty, albeit a bit tougher than expected, and I'd be damned if I was going let it be ruined.
That being said, it looked mostly like smoked pork shoulder should, which is this:
![]()
So jealous of the forker who got it right in this picture!
Anyhoo, with resolve and knife in hand, I began the process of carving up pieces of the cooked pork shoulder and chopping it into small pieces, giving it that pulled pork look and feel. But how to make it more tender? Well, here's where I went "out of mandate", at least out of BBQ purist mandate. See, from what I've read of "Real BBQ", it has a strong presence/following/origin in North Carolina, where the slow smoked pork is indeed fork tender and is almost always served "dry" with some sort of dipping sauce on the side. Not at all like the sauce-laden messy goodness we usually find in this end of the continent.
Well, I went with the saucy method. I turned the oven to 300 F, placed all the meat and excess fat in a roasting dish, and slathered it with the Blueberry BBQ Sauce that seems to be my new signature and popped the whole mess into the oven for about 15 minutes. The heat helped render some of the fat, which in turn moistened the meat. When I took it out of the oven, I had nearly perfect pulled pork by Canadian standards.
So, disaster averted! All our guests enjoyed the pork, and Kari got to use it to make her grand experiment of the Pulled Pork Cupcake a reality (more on that in a future post, although the recipe may have to remain a closely guarded secret). But, that being said, I learned an important lesson: don't believe everything you see on TV!
OK, now that the dramatic account of "what went wrong" has been covered, maybe I should actually show y'all how it's done, and the proper directions will be provided!
Smoker Pulled Pork
First, you'll need your meat. I suggest going with a 2.5 kg pork shoulder (aka picnic roast or Boston butt), preferably bone-in, with fat cap still attached. The great thing about pork shoulder is that you don't need to prep the meat in any way as you would with ribs or tenderloin.
Once you get your meat home, rub it with a spice rub 12-24 hours before putting it on the smoker.
The following rub is my own adaptation of the rub used on Road Grill. It was really spicy and tasty.
Rub
- 1 cup brown sugar
- 4 tbsp cayenne pepper
- 4 tbsp smoked paprika
- 1 tsp onion powder
- 1 tsp garlic powder
- 1 tsp salt
- 1 tsp black pepper
- 1 tsp coriander
- 1 tsp yellow mustard powder
- 4 green cardamom pods, ground
Mix all ingredients together until well blended and coat meat with rub. You can apply a thin layer of olive oil or prepared yellow mustard to help the rub stick to the meat. Don't worry about the mustard changing the flavour of the meat, it's dissipated by the smoke.
Wrap rubbed meat in plastic and put in fridge.
The next day, remove meat from fridge about an hour before you put it onto the smoker so it warms up to room temperature.
While the meat is warming up, start your fire. You REALLY want to stick with lump charcoal when building a fire for smoking. I find briquettes, no matter how natural they say they are, smell (and, therefore, taste) like chemicals. And you don't want that flavouring your meat! What you do want flavouring your meat on top of the natural lump charcoal (usually maple in my neck of the world) is some sort of lovely wood chips. I used mesquite with my pulled pork to impart a strong flavour that can compliment the strong flavours in the rub and the mop (more on the mop in a moment). Soak 2/3 of your wood chips in water for at least 30 minutes. Reserve 1/3 of wood chips and keep dry.
OK, now it's time to apply your mop. A good mop is a thinner version of a basic BBQ sauce that helps keep the meat moist as it smokes.
I basically used the exact same formula as on Road Grill:
BBQ Mop
1 2/3 cups ketchup
1 cup apple cider vinegar
1/2 cup fresh apple cider (I used beer instead as I had no juice)
1/2 cup lightly packed brown sugar
2 tablespoons Worcestershire sauce
4 teaspoons paprika
4 teaspoons dry mustard powder
1 teaspoon cayenne
1 teaspoon salt
Whisk all ingredients together in a glass or ceramic bowl.
Using a "mop brush" (see your local hardware store or BBQ dealer, if you're lucky enough to have such things where you live!) or simple basting brush, apply a generous amount of mop sauce to the pork shoulder before putting it on the smoker.
Once on the smoker, keep adding wood chips (2 handfuls wet chips to one dry) every 30-45 minutes to keep producing smoke. You want to smoke the pork at 250-260 degrees Farenheit for about 5 to 6 hours, and apply the mop sauce every half hour or so. You may need to add charcoal to the fire as you go to keep the heat up.
As the pork is smoking, you can make your BBQ sauce as you like it. I love my Blueberry BBQ Sauce so much, I'm linking it twice in the same post and it works wonders with pork.
![]()
NOM ON THAT B*TCHES!! YEAH!
So, let's start from the beginning. Well, there are numerous pulled pork recipes that abound on the 'Net, so I want looking and found enough info to cobble a basic recipe in my mind and I think I had the techniques well organized. And all it took to ruin that was to watch one episode of Road Grill on Food Network... For those who don't know, Road Grill is a travelling BBQ show hosted by former CFL QB Matt Dunigan (and also features Whalesbone executive chef Charlotte Langley!). As much as Mr. Dunigan's super-jock attitude might grate on my nerves, it's actually a pretty good show.
Now, in what I thought was a moment of TV serendipity, that particular episode covered off pulled pork. Awesome! And the way Mr. Dunigan made everything look was perfectly simple. Rub pork, let sit, mop (baste) with "mop sauce" once, leave on smoker for 5-6 hours and that's that! Unfortunately, I forgot to look at the actual goddamn recipe online! If I had, I would have noticed the "mop every 30 minutes" part. DAMMIT!! As a result, the pork was well-cooked, but a little dry. The fork-tender, "pullable" quality wasn't there as I took it off the smoker. I was a bit discouraged, but I had this giant slab of pork that was tasty, albeit a bit tougher than expected, and I'd be damned if I was going let it be ruined.
That being said, it looked mostly like smoked pork shoulder should, which is this:

So jealous of the forker who got it right in this picture!
Anyhoo, with resolve and knife in hand, I began the process of carving up pieces of the cooked pork shoulder and chopping it into small pieces, giving it that pulled pork look and feel. But how to make it more tender? Well, here's where I went "out of mandate", at least out of BBQ purist mandate. See, from what I've read of "Real BBQ", it has a strong presence/following/origin in North Carolina, where the slow smoked pork is indeed fork tender and is almost always served "dry" with some sort of dipping sauce on the side. Not at all like the sauce-laden messy goodness we usually find in this end of the continent.
Well, I went with the saucy method. I turned the oven to 300 F, placed all the meat and excess fat in a roasting dish, and slathered it with the Blueberry BBQ Sauce that seems to be my new signature and popped the whole mess into the oven for about 15 minutes. The heat helped render some of the fat, which in turn moistened the meat. When I took it out of the oven, I had nearly perfect pulled pork by Canadian standards.
So, disaster averted! All our guests enjoyed the pork, and Kari got to use it to make her grand experiment of the Pulled Pork Cupcake a reality (more on that in a future post, although the recipe may have to remain a closely guarded secret). But, that being said, I learned an important lesson: don't believe everything you see on TV!
OK, now that the dramatic account of "what went wrong" has been covered, maybe I should actually show y'all how it's done, and the proper directions will be provided!
Smoker Pulled Pork
First, you'll need your meat. I suggest going with a 2.5 kg pork shoulder (aka picnic roast or Boston butt), preferably bone-in, with fat cap still attached. The great thing about pork shoulder is that you don't need to prep the meat in any way as you would with ribs or tenderloin.
Once you get your meat home, rub it with a spice rub 12-24 hours before putting it on the smoker.
The following rub is my own adaptation of the rub used on Road Grill. It was really spicy and tasty.
Rub
- 1 cup brown sugar
- 4 tbsp cayenne pepper
- 4 tbsp smoked paprika
- 1 tsp onion powder
- 1 tsp garlic powder
- 1 tsp salt
- 1 tsp black pepper
- 1 tsp coriander
- 1 tsp yellow mustard powder
- 4 green cardamom pods, ground
Mix all ingredients together until well blended and coat meat with rub. You can apply a thin layer of olive oil or prepared yellow mustard to help the rub stick to the meat. Don't worry about the mustard changing the flavour of the meat, it's dissipated by the smoke.
Wrap rubbed meat in plastic and put in fridge.
The next day, remove meat from fridge about an hour before you put it onto the smoker so it warms up to room temperature.
While the meat is warming up, start your fire. You REALLY want to stick with lump charcoal when building a fire for smoking. I find briquettes, no matter how natural they say they are, smell (and, therefore, taste) like chemicals. And you don't want that flavouring your meat! What you do want flavouring your meat on top of the natural lump charcoal (usually maple in my neck of the world) is some sort of lovely wood chips. I used mesquite with my pulled pork to impart a strong flavour that can compliment the strong flavours in the rub and the mop (more on the mop in a moment). Soak 2/3 of your wood chips in water for at least 30 minutes. Reserve 1/3 of wood chips and keep dry.
OK, now it's time to apply your mop. A good mop is a thinner version of a basic BBQ sauce that helps keep the meat moist as it smokes.
I basically used the exact same formula as on Road Grill:
BBQ Mop
1 2/3 cups ketchup
1 cup apple cider vinegar
1/2 cup fresh apple cider (I used beer instead as I had no juice)
1/2 cup lightly packed brown sugar
2 tablespoons Worcestershire sauce
4 teaspoons paprika
4 teaspoons dry mustard powder
1 teaspoon cayenne
1 teaspoon salt
Whisk all ingredients together in a glass or ceramic bowl.
Using a "mop brush" (see your local hardware store or BBQ dealer, if you're lucky enough to have such things where you live!) or simple basting brush, apply a generous amount of mop sauce to the pork shoulder before putting it on the smoker.
Once on the smoker, keep adding wood chips (2 handfuls wet chips to one dry) every 30-45 minutes to keep producing smoke. You want to smoke the pork at 250-260 degrees Farenheit for about 5 to 6 hours, and apply the mop sauce every half hour or so. You may need to add charcoal to the fire as you go to keep the heat up.
As the pork is smoking, you can make your BBQ sauce as you like it. I love my Blueberry BBQ Sauce so much, I'm linking it twice in the same post and it works wonders with pork.
Once the pork has finished smoking, you should be able to pull it apart with tongs and a fork in a large roasting pan. At this point, you may want to stir in your sauce to serve it "wet" or leave as is to serve "dry".
Serve on fresh buns topped with a bit of coleslaw for crunch with BBQ sauce for dipping on the side.

Tuesday, July 12, 2011
A simple meal for Summer and my favourite condiment!
Hello fledgling and full-fledged culinary aficionados,
Alright, it's time to bring it back to the easy. After gourmet steaks, polenta tortes, smoked pork and gold-leaf encrusted foie gras emulsion of rubies (OK, I made that last one up), it's time to rein it in a little and get back to the quick and easy. It's Summer, there's way too much outside to enjoy to be stuck in the kitchen for 3 hours.
Now, with all cooking, there are basics that everyone should have in the pantry/kitchen. A couple of bulbs of garlic, an onion or two, a couple of tomatoes, a stick of butter, a dozen eggs and a bottle of olive oil. With just that, you could eat pretty damn well! But, most of us crave a little variety in our diet. This can easily be achieved with a few pre-made storebought items that allow you to perk up the most basic meals into something quite tasty. Best thing is, chances are a lot of these are items you have sitting around in your fridge or pantry and might fly under the radar when you're thinking of what to make for dinner.
So, with that in mind, let's look at one quick and easy meal item that can be made with very few ingredients and almost no time: Salmon Patties. I got this one from Kari's mom, confirmed it online, and tweaked it a little. Still, easy as all git-out!
Salmon Patties - Makes 4 patties - Serves 2
Ingredients
- 1 can Sockeye salmon
- 1 egg
- 1/2 cup breadcrumbs (I used panko)
- 4 tbsp onion, minced
- 1 clove garlic, minced
- Black pepper to taste
- Additional seasonings to taste (I used a pinch each of chili powder and basil)
- 4 tbsp cooking oil for frying (olive, canola, etc.)
- Drain salmon and put in mixing bowl.
- Crack egg and add to salmon.
- Add remaining ingredients (except oil) and mix with hands.
- Form into patties, ensuring air is squeezed out and patties hold their shape.
- In a large frying pan (preferably cast iron), heat oil on medium-high heat.
- Using tongs, gently set patties in oil and cook for 5 minutes on one side until golden brown, flip and cook other side.
- Serve on buns for salmon burgers or on their own with a generous dollop of Sriracha Mayo (see below) and a nice salad.
So, that's dinner! Now, let's talk about Sriracha!
In case you don't know what Sriracha is, it's this super-tasty, fairly spicy hot sauce from Thailand (or is it Vietnam?), easily recognized by the squeeze bottle with a rooster logo on it (hence, why it's often called "cock sauce").
 |
| Move over ketchup! This is the new staple 'red sauce' |

I happen to love the stuff, so much so that I bought the cookbook! Lots of fun recipes in it, even one for making Sriracha Salt!
Srircha Mayo
In a bowl, stir together about 1 tsp of Sriracha sauce with a half cup of mayo and the juice of a quarter lime.
That's it!
Enjoy!
Monday, July 4, 2011
Simple Salad for Lunch
Good day all!
It's stupid hot again in Ottawa, and salads seem to be the way to go this week. So, I came up with this quick and easy salad just today and I think it's a great way to use up some stale bread, ripe tomato and possibly other items sitting in the fridge or pantry that you might want to great rid of.
I call this one the "Italian Sandwich Salad" because the ingredients are basically identical to those in traditional Italian sandwiches, which I discussed in an entry I posted last August.
It started with a Bean Salad that was in the fridge. I was going to eat that, but then I got the fiercest craving for some kind of soft, warm crouton on the side of it. Then I noticed some Genoa salami in the fridge as well, and the Bean Salad was quickly forgotten (sorry Bean Salad, I'm sure you're tasty). Instantly the idea for a salad with Italian flavours found in the big ol' "two-day" sandwiches from Bottega hit me. First, I would fry up the bread with olive oil into a kind of warm crouton, then mix it up with marinated eggplants, tomato, onion, garlic and roasted red pepper and some kind of light dressing. Now, this recipe features raw onion and garlic, so be aware of your own gastro-intestinal system and proceed accordingly.
The methodology changed a bit as I went into the following:
Italian Sandwich Salad - 4 servings
Ingredients
- 4 slices bread (or 1 foccacia), slightly stale
- 2 small, very ripe tomatoes, sliced
- 1/2 very thinly sliced sweet onion
- 4 cloves garlic, very finely minced
- 1/2 cup marinated eggplant (mild or hot is up to you)
- 1 roasted red pepper, diced (unfortunately, the jar of peppers I had today was moldy, so I omitted it - sadface)
- 12 slices Genoa salami, sliced into thin strips (or any other type of meat you enjoy - I bet prosciutto would rock!)
- Olive oil to taste
- Balsamic vinegar to taste
- Sea salt to taste
- Freshly ground black pepper to taste
- Dried or fresh oregano to taste
Optional
- 1/2 cup hot pepper rings
- 1/4 cup Kalamata olives
Directions
- Toast bread slices until crispy, then slice into "fingers" or cubes.
- Place the toasted bread in a mixing bowl and toss with olive oil, balsamic vinegar, salt, pepper and oregano until well coated.
- Fry toasted bread on high heat for about 3 minutes.
- Pile bread onto plates (that's right, the "croutons" go on the bottom).
- Next, pile on the marinated eggplant. Don't drain it too much, the oil it's packed in provides a lot of flavour.
- Pile on the rest of veggies and top with additional olive and balsamic vinegar if desired.
- Top with meat and serve. Garnish with flat-leaf parsley if you want.
So, that's about it! Minimal cooking involved and lots of flavour.
Bon appetit!
It's stupid hot again in Ottawa, and salads seem to be the way to go this week. So, I came up with this quick and easy salad just today and I think it's a great way to use up some stale bread, ripe tomato and possibly other items sitting in the fridge or pantry that you might want to great rid of.
I call this one the "Italian Sandwich Salad" because the ingredients are basically identical to those in traditional Italian sandwiches, which I discussed in an entry I posted last August.
It started with a Bean Salad that was in the fridge. I was going to eat that, but then I got the fiercest craving for some kind of soft, warm crouton on the side of it. Then I noticed some Genoa salami in the fridge as well, and the Bean Salad was quickly forgotten (sorry Bean Salad, I'm sure you're tasty). Instantly the idea for a salad with Italian flavours found in the big ol' "two-day" sandwiches from Bottega hit me. First, I would fry up the bread with olive oil into a kind of warm crouton, then mix it up with marinated eggplants, tomato, onion, garlic and roasted red pepper and some kind of light dressing. Now, this recipe features raw onion and garlic, so be aware of your own gastro-intestinal system and proceed accordingly.
The methodology changed a bit as I went into the following:
Italian Sandwich Salad - 4 servings
Ingredients
- 4 slices bread (or 1 foccacia), slightly stale
- 2 small, very ripe tomatoes, sliced
- 1/2 very thinly sliced sweet onion
- 4 cloves garlic, very finely minced
- 1/2 cup marinated eggplant (mild or hot is up to you)
- 1 roasted red pepper, diced (unfortunately, the jar of peppers I had today was moldy, so I omitted it - sadface)
- 12 slices Genoa salami, sliced into thin strips (or any other type of meat you enjoy - I bet prosciutto would rock!)
- Olive oil to taste
- Balsamic vinegar to taste
- Sea salt to taste
- Freshly ground black pepper to taste
- Dried or fresh oregano to taste
Optional
- 1/2 cup hot pepper rings
- 1/4 cup Kalamata olives
Directions
- Toast bread slices until crispy, then slice into "fingers" or cubes.
- Place the toasted bread in a mixing bowl and toss with olive oil, balsamic vinegar, salt, pepper and oregano until well coated.
- Fry toasted bread on high heat for about 3 minutes.
- Pile bread onto plates (that's right, the "croutons" go on the bottom).
- Next, pile on the marinated eggplant. Don't drain it too much, the oil it's packed in provides a lot of flavour.
- Pile on the rest of veggies and top with additional olive and balsamic vinegar if desired.
- Top with meat and serve. Garnish with flat-leaf parsley if you want.
So, that's about it! Minimal cooking involved and lots of flavour.
Bon appetit!
Saturday, June 18, 2011
Feeding the Fringe

Happy Summer!
One thing that Ottawa is good for in the summertime (and most cities, I guess) is the bevvy of festivals that come into being. Along with those festivals comes a lot of pre-parties. As a result, this past Wednesday (June 15), marked an interesting milestone in my cooking adventures: it was that first time I made a lot of food for a bunch of strangers in a party-catering type setting.
First, let's set the scene. My good friend Bryony (@ladylovewell on twitter) is the Associate Producer for Ottawa's Fringe Festival, which runs from the 16th to the 26th of June. The Fringe Festival is a cornucopia of diverse, unusual, ribald, silly, bizarre and *insert multitude of appropriate adjectives here* theatre in the form of plays at various venues, mostly centered around downtown Ottawa's Arts Court. But, there's many forums describing the Fringe that do it far better justice than I can, such as:
http://www.ottawafringe.com/ (official site)
http://www.fullyfringed.ca/ (play reviews and more!)
#ottfringe (twitter hashtag - and man do those Fringers like to tweet!)
I've only seen two shows so far (as of Saturday, June 18), but I found both well worth the time. Looking forward to more!
Anyway, Kari (@kira_generika on twitter) and I have signed on as volunteers for a few days here and there. Wednesday night was the opening party/gala/shindig and we were both signed up for a shift to basically help serve food and keep the party area clean and tidy. Now, Bryony being the High Queen of multitasking, had taken it upon herself to make the food for this shindig and needed a few helping hands. Being the sucker for a pretty face (and shiny soul) that I am, I offered my help (not sure if I included Kari in that without asking... oops if I did!). I also offered to make something on the smoker mostly for the challenge, exposure and experience, on top of doing it because I'm super-nice!
So, that afternoon, after putting together an order of Smoked Pork Tenderloin with Blueberry BBQ Sauce, I zipped over to Bryony and Graham's (her fella; @boogiehowser on twitter) to help with the rest of the hors d'oeuvre prep. What I discovered is that you can feed a lot of people with very, very simple recipe ideas. In a flurry of cutting, chopping, stirring, sizzling, etc., we put together a spread for dozens in about 3 hours. And it was a DAMN good spread!
Here's the menu (so far as I can remember):
- Bacon-Wrapped Dates
- Prosciutto-Wrapped Pecorino and Peaches
- Veggies and Dip
- Bruschetta with Pita Crisps
- Cherry Tomatoes Stuffed with Goat Cheese and Basil
- Smoked Pork Tenderloin w/Blueberry BBQ Sauce on Crostini
And, as expected, the hors d'oeuvres were gobbled up with the kind of efficiency only witnessed when artists have access to free food! Well, there were a lot of raw zucchini sticks left. I guess there are limits to
On top of that, there were a lot of cookies and cupcakes brought in by a couple of different local bakeries. I know B-Goods made the cookies (damn good cookies at that!), but I can't remember the name of the bakery that supplied the cupcakes. I really to take notes on these things...
So, if you're ever in the market to cater a big party for you and your friends, well, it's your lucky day, because I'm going to give you the recipes for pretty much everything we made. I didn't get a chance to take any pictures (see my last post for the sad story on my camera's passing), so I'm going to take what I can from the Internet.
Alright, let's get to it!
1 - Bacon-Wrapped Dates
- 50 pitted dates (Medjool dates are fairly common to find in the supermarket, but make sure they're pre-pitted and partially dried)
- 25 pieces of bacon, cut in half.
- 50 round toothpicks
- Fry the bacon pieces until cooked, but not crispy.
- Drain bacon on paper towels.
- Wrap bacon half around date and secure with toothpick.
- Lay all pieces on serving tray.
Not exactly rocket surgery, eh? Time permitting, you can also give it an extra bit of awesomeness by stuffing the dates with some kind of cheese before wrapping them.
Here's what the final product basically looked like:
2 - Prosciutto-Wrapped Pecorino and Peaches
- 6-8 large peaches, slightly under-ripe, pitted and cut into 8 pieces (for a total of 48-64 pieces)
- 12-16 slices of prosciutto, cut into four equal pieces (or you can try speck, a smoked Italian ham that's very similar to prosciutto, but with smoke undertones)
- 500 g pecorino cheese, cut into 50 pieces (the pieces are going to be rather small, but the cheese has a very strong flavour)
- 48-64 round toothpicks
- Preheat broiler.
- Lay out peach pieces on a foil-lined cookie sheet.
- Place under broiler for a minute or two, just long enough to soften the peaches (but not turn them into mush).
- Remove peaches from broiler and cool until you can handle them.
- Wrap a piece of prosciutto around a piece of peach and of cheese, fasten using a toothpick.
- Lay all pieces on serving tray.
This one is a little more delicate than the Bacon-Wrapped Dates, so it's important to be careful when handling.
No accurate pics were available on the 'Net, but I'm sure you can figure out what the final result might look like.
3 - Veggies and Dip
Alright, I'm not going to go into this whole rigmarole over Veggies and Dip, the preparation is nearly self-explanatory: cut your favourite veggies into stick-like shapes or wedges, arrange pretty-like on a tray, serve with some sort of awesome dip.

Ironically, Bryony made the dip in this case and it tasted very much like my Mom's Curry Dip, the recipe for which was featured in a post from back in August of last year. Although, in an interesting change of flavour profiles, she used balsamic vinegar instead of tarragon vinegar. I'm undecided as to which is better!
4 - Bruschetta with Pita Crisps
Well, here with the Bruschetta we have another example of an appetizer I've already featured on this blog, specifically in the same post as the Veggies and Dip. So, I'm not re-inventing that wheel either.
That being said, I've never covered the "how-to" of making pita chips. It's awfully easy!
- Preheat oven to 350 degrees Farenheit.
- Take a regular sized pita bread and cut it into 8 even pieces, then split each piece in two by tearing at the outer edge. This should leave you with 24 pieces. You can also leave the pieces whole, making 12 "double-layered" chip.
- Brush all pieces lightly with olive oil, season with salt, pepper (and anything else you like) and arrange on a cookie sheet.
- Bake in oven for about 5 minutes, until pita pieces are a light golden brown. It doesn't take long for these to burn, so pay close attention!
- Remove from heat and store in a large bag or plastic container.

5 - Cherry Tomatoes with Goat Cheese and Basil
Alright, these little bundles of awesome were about the simplest appetizer/hors d'oeuvre/tapas I've ever seen, but they're DAMN tasty. And only 3 ingredients (not counting salt and pepper)!
- 50 larger cherry tomatoes (about 3 pints), halved and "guts" spooned out. Essentially, you want to make a kind of tomato "cup" for the filling. The "guts" are excellent for anything calling for tomato liquid, e.g. gazpacho.
- 1 large log of goat cheese (300 g), softened
- 1 bunch fresh basil, cleaned and finely chopped
- Salt and pepper to taste
- Additional seasonings as desired (dry basil, oregano, chili powder, paprika, etc.)
- In a bowl, mix together basil, goat cheese and seasonings and stir until well-mixed.
- Spoon enough mix into each tomato half to fill.
- Serve on large tray (you should cover this tray with plastic wrap before transporting to avoid flying tomatoes!).
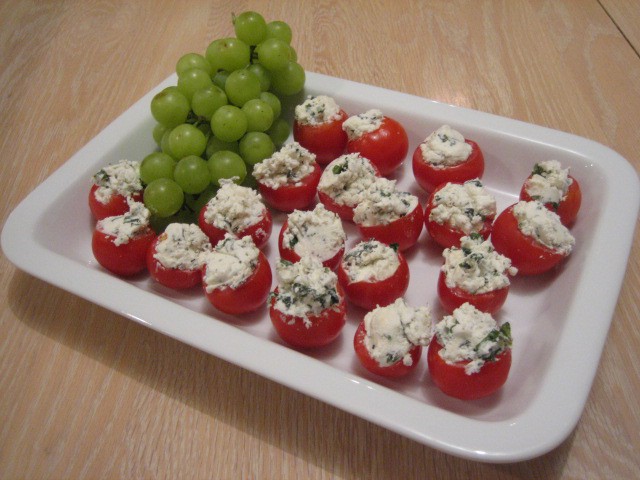
So, it's really not too tough to string together a lot of tasty goodness on a budget and in one afternoon!
The final item was a little more on the complicated side, but you know me and how much I love to smoke porcine vittle! So, with visions of catering contracts burgeoning on all sides, I took Wednesday morning to put together this collection of tastiness:
6 - Smoked Pork Tenderloin w/Blueberry BBQ Sauce on Crostini
Well, first off, I'm going to repeat myself here when it comes to the pork. I went through the process in my exposé on smoking food back in January. But there were some tweaks this time.
The first step in smoking any pork is to make sure the membrane is removed. Anything that peels off or looks hard to chew should be removed or cut away. Be careful not to overdo it a mangle your meat. For this project I used 3 tenderloins.
Next, the rub. I wanted to keep it fairly simple and not too spicy. So, in honour of the occasion, here's the rub I used:
Fringe Rub
- 2 tbsp smoked paprika
- 3 green cardamom pods, ground
- 2 cloves, ground
- 1/2 tsp Chinese five-spice powder
- 1/2 tsp salt
- 1/2 tsp ground white pepper
- 1 tsp ground black pepper
- pinch cayenne pepper
- 1 cup brown sugar
- Mix this all together and rub into the pork tenderloins.
- Wrap tenderloins in plastic wrap and leave in the fridge for at least 8 hours (overnight).
(this next part is copy-pasted from January's post)
The next morning, remove meat from fridge and let warm up a little.
Prep fire in the smokebox and soak wood chips. The great thing about pork is that it tastes good with almost any kind of smoke flavouring it. In the case of a tenderloin, I would avoid using just hickory or mesquite, the smoke flavour would be too strong. Now, I use maple lump charcoal for everything on my BBQ and just on its own imbues a tasty smoke flavour, but it's a bit one-dimensional. For pork tenderloin, I've used either a mix of hickory and cherry (the first time, which nicely complimented the spicy rub), or apple (for the 'festive' meal). (Note: for the Fringe party, I used cherry wood).
Once your fire is going and you reach a cooking temperature of around 225-250 degrees Fahrenheit, place the tenderloin(s) inside the the grill and smoke for 1.5 to 2 hours. Wrap the tenderloin in foil, spray with a bit of apple juice (or pineapple juice), and return to smoker for another hour. Unwrap and smoke for another 30 minutes to finish. You will need to put it in the oven for 10 minutes at 350 F to "solidify" the meat. I find it too mushy right off the smoker. The thing about tenderloin is that it stays a little more pink than other cuts of pork even when it's overcooked. So, don't think that it isn't done just it's a bit pink. If the meat is no longer translucent and juices run clear when you cut it, it's done. Basically that's the rule for all pork and chicken.

This is what a smoked tenderloin looks like! Pretty, eh?
In the final hour of smoking the meat, I made the Blueberry BBQ Sauce.
Blueberry BBQ Sauce
- 3 cloves garlic, minced
- 1 inch piece of ginger, minced
- 1 small onion, minced
- 2 tbsp olive oil
- 1 cup frozen wild blueberries
- 4-5 drops liquid smoke
- 1/2 cup dark beer
- 1 tsp cocoa powder
- 1/2 tsp cayenne pepper
- 1/2 cup HIGH QUALITY ketchup (that means homemade or organic. NOT Heinz garbage)
- 2 tbsp brown sugar
- 1 tbsp molasses
- 2 tbsp honey
- salt and pepper to taste
- 1 tsp favourite hot sauce (optional)
- In a medium saucepan, sauté garlic, ginger and onion in olive oil on medium-high heat.
- Stir in blueberries, liquid smoke, beer, cocoa, cayenne, ketchup and brown sugar.
- Bring to a boil, then reduce heat to medium-low (3-4).
- After 10 minutes, stir in molasses. Allow sauce to reduce for another 20 minutes or so.
- Stir in honey and taste to determine if you need salt, pepper and hot sauce. Add these as desired and continue to reduce for another 10 minutes.
- Remove from heat and store in glass jar. Sauce will keep for about 2 weeks in the fridge.
Following that, it was time to make the crostini. I was aiming for 50 pieces so two baguettes were sufficient.
Crostini (50 pieces)
- 2 baguette, sliced into 50 pieces
- olive oil
- Preheat oven to 400 F
- Brush olive on one side of each piece of bread.
- Bake in oven for about 10 minutes.
- Switch oven to broil and broil pieces until they turn a light golden colour.
- Cool and store in a large bag or plastic container.
Now to put everything together!
First off, I sliced the meat, albeit too thick this time, about 4-6 mm thick. If possible, slice the meat almost paper thin.
Next, take the crostini and dab a tiny bit of sauce on each piece. This will hold the meat in place on the crostini.
Place a slice or two of tenderloin on each crostini (depending on thickness of meat).
Spoon on about a 1/4-1/2 tsp of sauce on each piece.
Garnish each piece with a sprig of fresh cilantro.
Aaaaand that's it! I really wish I had pictures, it was an awfully pretty-looking hors d'oeuvre!
Well, there you go, Nick's first foray into amateur catering. And, while I haven't got anyone knocking down my door to cater their golf tournament or gallery opening (YET!), the fact that the Tenderloin was the first thing to run out (or maybe the Bacon-wrapped Dates, but that's ok, it's BACON!) made me darn proud of the work I'd done. Working with three of my favourite people to feed dozens made me even prouder!
And, as an added bonus, my efforts earned me an extra pass to a Fringe play, which is payment enough!
Let's hope this is the first expedition of many into cooking for a crowd. I'm just glad it was much less challenging than expected!
So, dear Ottawa readers, my parting words to you on this day is to GET YOUR BUTT TO THE FRINGE AND SEE SOME PLAYS! Or at least have a pint or two in the beer garden...
Enjoy!
Subscribe to:
Posts (Atom)