Monday, June 6, 2011

Just an average night at Casa Unicorn...

Hi there!

OK, before we get into today's post, I'd just like to take my hat off in solemn remembrance of my point-and-shoot camera that finally died about a week ago. What you're about to see represents one of its last efforts in catching images of edible beauty. Lesson learned: don't keep a digital camera in your shorts pocket while you're digging out the sand on a playground. Sand and electronics don't mix!

So, as those of you who are "Dude, Cook!" regulars already know, I recently moved in to a rather lovely apartment with my girlfriend Kari. One of the selling points of the place was its huge open-concept kitchen.

Kari and I are both pretty hardcore foodophiles (maybe even foodies), and we both love to cook. We also have both been blessed (or cursed) with a certain talent for taking a simple meal and kicking it up multiple notches. This has led to a lot of rather extravagent meals, some of them being competition for a gourmet restaurant meal. But I think none of them can top what we made about 3 weeks ago.

I guess it all started with fiddleheads. In case you may have forgotten my write-up on fiddleheads from last year, they're a kind of fern that grows in April and May (although the inordinately wet April meant a later start to the season). Anyhoo, we'd bought a whole bunch of them, and had to eat some of those bad boys!

Naturally, the thought process went to "Well, what do we have with it?" Steak, of course! So off we went to Aubrey's Meats in the Byward Market (our "local" butcher) and bought a couple of gorgeous New York strip steaks. Now, I'd rarely eaten blue cheese before meeting Kari, but I've since become a fan. So when she suggested picking up a nice blue to put on top of the steak, who was I to deny a lady? We had the rest of the ingredients at home waiting, so back we went to figure out how to create some culinary awesome.

Now, another area of fun we'd been having was in the area of dried mushrooms. Kari had bought this massive container from Price Club and I already had some dried porcini. So, in the interest of using up some of our dried goods (and space-occupying food in general), Kari decided she'd reconstitute (i.e. rehydrate) a bunch of them to make some sort of risotto (everyone has their speciality in the kitchen. Me, I'm all meat, sauces and stuff in a pot. Kari's ALL about starch. Risotto, polenta, bread, etc. The girl makes a meeeeeean side dish!). Meanwhile, I remembered hearing about or seeing someone using dried porcini powder as a rub for meat. So, I figured I should do the same!

With that in mind, here's the recipe for the Steak:

Porcini-Rubbed Steak à deux w.Blue Cheese

- 2x 12 oz. New York striploin steaks
- 1 tbsp olive oil
- 1 tsp dried porcini mushrooms, ground into powder
- salt and pepper to taste
- 50 g blue cheese (medium flavoured; not sure what kind we got to go with dinner, I think it was Danish?), sliced thin (4 small slices total, enough to almost cover the surface of the steak)

- Mix porcini powder, pepper and salt in a bowl.
- Brush olive oil on steaks
- Coat with porcini powder mix. Use clean hands to run seasoning into meat.
- Let meat sit for about 20 mins., until it reaches room temp.
- Heat grill to about 350 F
- Place steak on grill. Grill for about 5 minutes per side for medium doneness.  
- Serve topped with 2 slices of blue cheese per steak.

NOTE: To make lovely grill marks on steak, place it at a 45 degree angle to the grill 'lines' as seen to left. After about 2 minutes, lift and rotate 180 degrees. Repeat this process when you flip the steak.


This should be the end result:


Pretty, ain't it?

On the side, we had the Mushroom Risotto (I'll post the recipe some other time, once Kari gives it to me!) and an Avocado Salad (basically ripe avocado and tomato coarsely cut and mixed together with chopped Kalamta olives, capers, lemon juice and olive oil). As for the fiddleheads, I steamed them for about 10 minutes to get them tender, then sautéed with butter and garlic, finished with a bit of ground black pepper.


And here we are with the final result! Not too shabby, eh?


Even better with a lovely glass of vino and awesome company! (also note how awesome dinner can be even when you've barely unpacked your living space) 

And let's not forget dessert!


So yeah, all this to say, the difference a really nice kitchen can make in the preparation of amazing food is pretty remarkable. Not that you can't do the same in a small kitchen, it's just so much easier this way!

Alright, so enjoy it folks!  

P.S. It's called "Casa Unicorn" because when Kari and I first saw the place, we were sure it had unicorn parking out the back. Turns out it's the parking lot for an Anglican cathedral, but it was an awfully nice place nonetheless!

Thursday, May 26, 2011

Beautiful Screw-ups

Note: Title is not to be confused with Beautiful Losers (I'm not much of a Leonard Cohen fan anyway). I already worry about breaking copyright when I reproduce someone else's recipe!

The thing that I might love most about cooking is its experimental nature, which I talked about a few posts back. What's even better about that aspect is this: even when you try something new or experimental, there's a darn good chance that when it doesn't go as planned, it can sometimes be for the better! Of course, there's just as good a chance, if not better, that when you do screw it up, it turns into an inedible mess of charred crud. It's on those occasions, if you're someone like me who can't stand wasted food, that you learn to pretend that "burnt" and "caramelized" are fairly similar... Really! But, I doubt I represent the norm in that respect.

But once in a while, things go wrong in the best way possible. Sometimes it's the simplest thing (like a few drops more booze than originally called for) and sometimes it changes the whole complexion of the dish.

So, with that in mind, I'm going to walk you through a couple of recent culinary escapades that involved "whoopsies" that ended up being better than what was intended.

1 - Praline Salad

In our first example from a couple of weeks ago, me and my "common-law missus" Kari (at least, according to the census) were engaging in our usual culinary pursuit of excellence. She was putting together a lovely veggie and polenta torte, which I always enjoy trying, while we were also putting together a simple tomato salad with a few tweaks. Before I get into that, I need to go on a tangent for you under-rock-dwellers.

What the frak is polenta? Basically, it's a mush made of yellow cornmeal that can be used to make a crust, can be fried to make a kind of cornmeal cake, or can be served as a kind of gruel, similar to grits in the Southern U.S. As the picture depicts, there's some culinary wonderment to be discovered through polenta!


Ok, that's polenta, back to the subject at hand.

What happened with the salad is where the whole idea of beautiful screw-ups came in. It started simply enough: a tomato-based salad, with some peripheral greens and herbs, boccaccini balls (boccaccini is a kind of fresh mozarella that has little flavour on its own, but absorbs flavours from dressings and oils magnificently, great in salads) and fresh blueberries. Now, at this point I thought of riffing on classic spinach salad, which usually has toasted walnuts or pecans in it. I thought it might be a good idea to lightly sugar some pecans for this salad.

Here's where the screw-up happened: Whipping up a combination of brown sugar, butter and maple syrup in a saucepan, I created clusters of, essentially, praline candy rather than lightly sugared pecans. Ooops. But, as I looked at those gorgeous chunks of sweetness, it totally hit me that we should stick 'em in the fridge to solidify, break up the clusters and throw it on the salad anyway!

Well, as it turns out, we inadvertently created (possibly) the first ever Praline Salad! Oh wait, Google says I didn't. Damn. Buuuuut, our version has probably never been done before! Now, let me say this right now, other than the praline part, this is Kari's recipe. She gets the credit.

Tomato-Praline Salad

- 12 yellow cherry tomatoes, halved
- handful spinach leaves, stemmed, washed and patted dry
- 1/2 cup small boccaccini balls
- 1/3 cup fresh blueberries
- 2 tbsp (handful) fresh Thai basil (or regular basil), roughly torn


- Toss ingredients together with Dressing, top with Praline (see below)


Dressing

- 2-3 tbsp high quality extra-virgin olive oil
- 1-2 tbsp balsamic vinegar
- 1/2 tsp maple syrup
- a couple of dashes of the best, most interesting hot sauce you have in your fridge (that sweet's gonna need some heat!). Failing that, a pinch of cayenne pepper. But as you can see, hot sauce is much more interesting!


- Whisk together or shake like crazy in a tightly covered jar. I find the shaking method works best and is quite therapeutic! Imagine it's a bully from grade school!


And there you go, well-shaken and tasty!


Praline

- 1/2 cup roughly crushed pecans
- 1 tbsp butter
- 2 tbsp brown sugar
- 1 tsp maple syrup

- In a small saucepan, melt together butter, sugar and maple syrup, until mixture is liquid and bubbling.
- Remove from heat, toss in pecans and coat well with mixture.
- Place a sheet of wax paper on a plate and set melted praline on that.
- Put in the fridge for 30 mins to solidify. Remove and break into small pieces.
- Sprinkle praline pieces over salad, toss and serve!


Above is the finished praline. Below is the salad, ready to go!


Looks good eh? Wait, what's that you say? "Give us the recipe for the Veggie Polenta Torte, you bastard!"? OK, fair enough, but as it stands, this post is getting awfully long and it's a pretty complex recipe. Tell you what, I'll give you the "Coles Notes" version...

First off, I asked Kari for her polenta recipe and she shrugged her shoulders and said there really isn't a foolproof method with polenta. It involves a lot of stirring and avoidance of getting scalded by molten cornmeal. So, here's a basic recipe filched from About.com:

Ingredients:


- 1 pound or slightly more (500 g) coarsely ground corn meal (you want corn meal the consistency of fine to medium-grained sand, not flour)
- 2 quarts (2 liters) boiling water (have more handy)
- A heaping teaspoon of salt

Preparation:

Set the water on the fire in a wide bottomed pot and add the salt. When it comes to a boil, add the corn meal in a very slow stream (you don't want the pot to stop boiling), stirring constantly with a wooden spoon to keep lumps from forming. Continue stirring, in the same direction, as the mush thickens, for about a half-hour (the longer you stir the better the polenta will be; the finished polenta should have the consistency of firm mashed potatoes), adding boiling water as necessary. The polenta is done when it peels easily off the sides of the pot.

Easy, right? Now, the torte!

Basically, you take your polenta, pour it into a spring-form pan (the kind used to make cheesecake), top it with whatever veggies tickle your fancy (peppers, tomatoes, onions, eggplant, zucchini, broccoli, etc.), and then top that with grated cheese of your choice and some breadcrumbs (or panko if you have it). Fire that in the oven at 350 F for about 30 minutes (until the cheese is golden and bubbly), remove from the oven, remove from spring-form pan, slice and serve!


So, in the end, we were presented with the following plate full of tasty (apologies for the blurred shot):


2 - Chocolate-Whiskey Pâté

It all started with the 'munchies'. Who am I kidding, it ALWAYS starts with the munchies (yes, I mean THOSE munchies).

It was a couple of hours after another awesome dinner of Striploin Steak dusted with Porcini and topped with Blue Cheese, a Mushroom Risotto, an Avocado Salad and Sautéed Fiddleheads (more on that epic meal coming in a future post) at the new place (forget what I've said about cooking in a tiny kitchen, big kitchens rule!) when Kari busted out yet ANOTHER brilliant food idea.

The day before we'd bought these really high end potato chips from a stand at Ottawa's Tulip Festival (I'll be damned if I can remember the name) and not quite finished the whole bag. So Kari's above-head light bulb went off: "Let's spread out the chips and cover them in melted chocolate, sort of like a bark!"

Ummmm, OK! Twist my rubber arm!

So, using a simple water bath method (take a small saucepan, boil water in it, place a metal bowl over the saucepan, melt chocolate in bowl - this allows a much smoother melting process and reduces the risk of burning the chocolate), she melted some chocolate. Right before she was going to pour it over the chips, I thought "Hey, why not add some whiskey?"

Well, here's where it gets interesting and a lesson was learned about mixing booze and chocolate. Somehow, the reaction between the whiskey and the chocolate caused the mix to solidify into what Kari described as a "fondant" (she meant to say pâté). It reminded me of my mother's Chocolate Mousse, but not quite light enough. There was a density to it that is hard to describe, but it was REALLY tasty. So, not being wastrels, we decided we'd go ahead and eat it. And, of course, melt more chocolate for the chip bark.

Cut to Kari's finger flying up in the "hey wait" position. "You go sit down, I have an idea." she says (I hear that a lot). So, I leave her to it.

Next thing I know, I'm presented with this spoonful of loveliness:


Below is a less flash-laden version:


She topped the "pâté" with cream, raspberry jam and cream cheese. And it was DEEEEEEELISH!


So, here's a more formal recipe:

Chocolate-Whiskey Pâté

Ingredients
 
- 1/2 cup bittersweet chocolate chips
- 1/2 oz. Irish whiskey
- 1 tbsp raspberry jam
- 1 tbsp heavy cream
- 1 tsp plain cream cheese
 
Directions
 
- Using water bath method, melt chocolate chips
- Stir in whiskey until chocolate solidifies into "fondant"
- Spoon some of mixture into an Asian-style soup spoon
- Top with cream, jam and cream cheese
- Serve! (you could also garnish with chocolate shavings)

And, as a bonus (without the benefit of flash photography):

Chocolate and Potato Chip Bark

Ingredients 

- 50g or so very high quality potato chips, roughly crushed
- 100g or so (1/3 package) semi-sweet chocolate chips

Directions

- Spread potato chips out over cookie sheet lined with wax paper
- Melt chocolate using water bath method
- Pour chocolate over potato chips, ensuring all are covered
- Put bark in fridge for about 30 minutes
- Break bark into bite-size pieces and EAT!
 

So, hopefully today's post removes another barrier to your sense of experimentation in the kitchen. Cooking is as much art as science, and neither is ever exact. But sometimes, as shown here, the unintended and unexpected is the best result any artist, scientist or cook can ask for.
 
Enjoy!

Tuesday, May 3, 2011

Living out of boxes doesn't mean you're stuck with takeout

Hi  there! Ouch!


I moved in with my girlfriend Kari this past Sunday and, due to a combination of a) Sweet Jesus we have a lot of stuff! and b) being too effing sore and tired to unpack stuff, one would think that we'd be living off of pizza and McDonald's. Like heck! With a little bit of work and determination, you can make a pretty spiffy meal with a few tools and minimal space.

I consider this post a kind of throwback to the good ol' "Dude, Cook" days when the purpose of the blog was to demonstrate how to make a good meal with minimal tools, space and knowhow.

So, there I was on Monday, day after the move, wallowing in aches and fatigue and with zero clue as to what I could make for dinner (I had the day off but Kari had to work, so I was obviously in charge of cooking that night!). Luckily, I broke out my cookbook collection and found a book on Southwestern cooking I'd picked up from the discount rack at Chapters.

In it I found a simple quesadilla recipe that I was able to bash out fairly easily with a few twists. In case you've been living under a culinary rock, a quesadilla is basically when you take a flour tortilla, top it with cheese and other goodness, top that with another tortilla, and fry it or bake it until the cheese melts and the tortillas are crispy. It's almost a kind of Mexican grilled cheese.

But chances are you've had them a gazillion times in some pub environment.

Also, in case you're still under the rock, chorizo is a kind of Spanish sausage. It's super tasty. It can usually be found in hot or mild.

Anyhoo, here it is, the first meal made in my new apartment, using four implements (spoon, spatula, kitchen knife and frying pan) and a couple of plates.


Chorizo and Cheddar Quesadillas

Makes 3 large quesadillas (6 appetizer sized servings or 3 meal-sized)

Ingredients

- 4 green onions, thinly sliced
- 1/2 red pepper, finely diced
- 1/2 tomato, finely diced
- 150 g chorizo sausage, sliced in half, then chopped (I prefer to use hot. Makes the jalapeno unnecessary)
- 1 cup grated extra-old cheddar, refrigerated (this helps with the mixing)
- 3 cloves garlic, minced
- 1 tsp minced jalapeno (optional)
- salt and pepper to taste
- 6 flour tortillas (I prefer whole wheat)
- 3 tbsp vegetable or olive oil

Directions

- In a large bowl, mix green onion, red pepper, tomato, chorizo, cheddar, garlic, jalapeno (if using) and salt and pepper.
- Heat 1 tbsp of oil in large frying pan on medium heat. Swirl to coat bottom of pan with oil.
- Once oil is hot, gently lay one tortilla flat in the pan. Spoon 1/3 of the filling and spread across tortilla with back of spoon or spatula.
- Cover with another tortilla and press down using spatula (here's where the comparison with grilled cheese comes in)
- Flip with spatula once bottom of quesadilla is golden brown and crispy. Press down again with spatula, frying until golden brown.
- Cut quesadilla into quarters and place in warmed oven.
- Repeat steps with 4 remaining tortillas.
- Serve quesadillas with sour cream, salsa and/or favourite hot sauce. And cold, cold beer!

See, easy enough, delicious, and minimal clean-up!

Cheers!

Friday, April 29, 2011

A Toast To My Hometown's Better Eateries - Jean Albert

Hey everybody!

It's time to let you know about another sources of tastiness in Ottawa. So, let's into it. I present to you Jean Albert  (no Web site available).

Jean Albert (pronounced like it's an English name - I thought it was French) is Ottawa's only soul food restaurant (so far as I can tell). It's run by a couple in their late-20s/early 30s, Jennifer and LeRoy Walden,  and the recipes are from LeRoy's grandmother from back in the heart of Georgia. This is the real deal. Ribs, Catfish, Fried Chicken (including Chicken n' Waffles!), Pulled Pork, Mac n' Cheese, so on and so forth. In case you hadn't noticed, southern food and soul food have been creeping their way back into the collective foodie consciousness in recent years and it's no secret that I've developed a bit of an obsession with this kind of cooking. Well, there's a fix for that craving, and it's just a few blocks away from my apartment!

Now, Kari and I decided on a cool March night to FINALLY give this place a try, only 6 months after learning of its existence. We were greeted with lots of enthusiasm from Jennifer, our server (and co-owner). After much salesmanship, we were convinced to order the speciality spiked drinks, I had the tequila-spiked lemonade while Kari had the rum-spiked iced tea. Both were delicious and we had two rounds each. Dangerously addictive stuff!

The menu is quite loaded with choices for appetizers and mains. So, we decided to go whole hog with the appetizer and try the Pork Smothered Fries (pun utterly intended).

The pulled pork was very tender and tasty and not too overladen with sauce (a problem with some pulled pork), although I suspect the smokiness came from liquid, not actual smoking, but that's understandable in any conventional restaurant kitchen. However, I'm pretty sure the fries came from a bag. If I'm wrong, I humbly apologize!

As an in-betweener side, we got a small sampler of Sweet Water (Corn)Bread. This was very different from the only other cornbread I've had, which is Kari's. Hers uses corn kernels and is very fluffy. The Jean Albert version was sweeter and spongier, having more of a texture akin to a mix of a pancake and a polenta cake. I liked the difference. Here's what it looks like:


But if the only foray into cornbread you've had has been at Jean Albert, I humbly offer up a completely different version in this recipe:

Kari’ s Cornbread (adapted from an old Martha Stewart Web post)

- Preheat oven to 350. put 4 tbsp butter in 8" square baking pan or 9" skillet; place in oven until melted.
- In a bowl, combine 1 cup flour, 1 cup cornmeal, 1/4 cup sugar, 2 tsp baking powder, 1 tsp salt.
- Stir in one egg, 3/4 milk, and a can of corn until just combined.
- Spoon batter into prepared pan.
- Bake until golden. 30 minutes in pan, 20 minutes in skillet.

Next we ordered the exact same 3-piece plate of Fried Chicken each, with the same side orders of Candied Yams and Collard Greens. This was a bit funny because after discussing what we should get so that we can sample a wider variety of items, Kari vetoed me and said "Just get what you want". So I did, and it turns out we have identical wants re: soul food. I'll add that to the pile of reasons why that woman rocks all kinds of YEAH! Right, back to the food...

The Candied Yams and Collard Greens were served on the side in large ramekins

The Candied Yams has a very nice flavour, full of syrup and butter. Decadent, but what soul food isn't?

The Collard Greens were like nothing I've ever tasted, with a smoky flavouring (thanks to smoked ham hocks in the cooking pot, which the traditional way collards are done) mixed with the nutty bitterness of al dente greens was one of the most interesting flavour combos I've ever had.

I've only experimented with Collard Greens once and the version I made was anything but traditional. Essentially, I boiled them until they were almost nothing (about 15-20 minutes), sauteed them quickly in butter and garlic, and squeezed some lime juice over top. It was tasty, but not the same experience as collards done Southern-style. Of course, the traditional version would break a vegetarian's brain. At least mine could be served to herbivores.

On to the Fried Chicken! I've read a lot of negative reviews on various restaurant review site about the Fried Chicken being lacking in flavour, but I think the folks writing them are missing the point. Fried Chicken at Jean Albert comes with your choice of BBQ sauce for dipping (for 1.50$), or baked in (for 2.50$). THAT was the main "ka-pow" flavour element, the chicken is simply the vehicle. You want intensely flavoured fried chicken on its own? Go to KFC and ingest 3 days worth of sodium.

As you can tell, I really liked the less intense flavour in their chicken. Not too salty and very tender. I did find that the coating was lacking in crunch, but that's in comparison to my Mom's recipe. And no one's fried chicken is better than Mom's. (yours, mine, whomever's).

I got mine with the Whiskey BBQ sauce on the side. It was lovely and smokey with that distinctive whiskey tang that makes all food better, but a bit too mild for my taste. I likes it spicy! Still, really effing good BBQ sauce! Kari got hers with the Candy-coat Glaze baked on. That was reeeeeally sweet, a bit too much for taste.

We were too full about halfway through the chicken to finish, but it made one heck of a tasty cold lunch the next day!

More recently, I was at an event at Babyon nightclub called The Cook-Off, where I had the chance to try LeRoy's Chicken 'n' Waffles, albeit on a Stick. Imagine a carnival-style snack made with juicy fried chicken chunks and waffle batter. TASTY!!!!!!!!!!!!!!!!!!

They also have an upstairs bar (I didn't see it, but I know it's there!) and serve breakfast and lunch as well as dinner.
One thing I REALLY liked about Jean Albert is that it appears to be a successful restaurant that doesn't take itself too seriously. It came across to me as being as much a labour of love as a business. I know that probably isn't the case behind the scenes, but it's the kind of food I'd like to prepare if I had my own place, and it shows there's a market for it. Not that I intend to offer competition to Jean Albert, my resto idea has always centered around a ski resort. So, Jennifer and LeRoy, your niche is safe! Well, safe from me at least...

So, do yourself a favour and get out there to enjoy some of the most comforting comfort food there is in this whitebread town! I also suggest, if you're having dinner, skipping lunch that day...

Sunday, April 24, 2011

Mom, COOK! (Because you're so damn good at it) - Part 1 - Appetizers

Good day all!

I'm back to tell you about the greatest cook I know and someone who always keeps my culinary aspirations soaring while humbling me with her talent. Of course, I'm talking about my Mom.

As the mother of seven children, six of whom were boys, she had to restrain herself in what she made when we were kids. Because there was a whole lot of picky in there. I admit being the one of the worst culprits. To this day, I feel a pang of guilt when I eat vegetable soup because of the royal stink I'd raise when it was on the menu when I was 7. In many ways, we were spoiled rotten by the quality of the food we ate growing up. Rare were the nights of pizza, McDonalds's or TV dinners, even with 7 mouths to feed! Mind you, this is a little bit before the days (like now) where the cost of healthy food is far greater than that of processed crap.

Just an example: When a birthday rolled around, the menu was decided by the birthday boy/girl and we could have whatever we wanted (although we always chose Chocolate Cake for dessert!). I'm pretty sure I had Southern Fried Chicken and Corn Fritters as my bday dinner of choice for about a decade straight.

Recently Mom decided to compile all her "greatest hits" into a bunch of Word documents for easy dissemination to her kids and grandkids.

And you, lucky readers, get to reap the reward along with all the rest of my siblings!

So, the plan for is to present some of my favourites amongst the recipes she's compiled over a few posts. This is the food I grew up on. Lucky me!

 Before I get into it, I'll give honourable mentions (and links) to items posted in previous entries that came from the genius of my mother:

- Doomsday Bars (from June 30, 2010) - This recipe was first given to my Mom by a colleague or student about 20 years ago. The whole clan was hooked from the get-go. Now I've made it an annual tradition at Blue Skies.

- Curry Dip (from "Classic Appetizers" - August 20, 2010) - The best, easiest way to get a kid to eat his/her veggies. A staple of get-togethers in the 70s and 80s. Addictive!

- Tourtière (from "Les mets d'chez nous - première partie" - March 24, 2011) - A staple of Quebecois cuisine and our Xmas dinners.


So, already you've had some insight into how good the eating was growing up in our house. Well, strap in, lots more to come! Today we're going to cover appetizers. Apologies for the lack of visual stimulus.

Appetizers

1 - Salmon Pâté

This is another classic from the 70s-80s that takes very basic ingredients and combines them into addictive treats (Mom really mastered this concept). This is pretty much a standard appetizer at every family gathering. Serve with crackers or bread/crostini.

Ingredients

- 1x 8 oz. package of cream cheese (the brick kind)
- 1/4 tsp salt
- 2x 8 oz. cans of red (Sockeye) salmon (I suppose you could try using fresh or frozen salmon, but that would be gilding the lily, as they say)
- 1/4 tsp Tabasco sauce
- 1 tbsp of lemon juice
- 1/4 tsp Worcestershire sauce
- 1 tbsp chopped onion
- 1/2 cup pecans
- 2 tsp prepared horseradish
- 3 tbsp parsley

Directions

- Drain salmon and remove skin.

- Place all ingredients in Food Processor and mix until well blended (if you're like me and try to avoid using the food processor as much as possible, I imagine bashing this mix together with a mortar and pestle would produce an interesting result).

- Refrigerate until firm.
 

2 - Brandied Cheese
 
As with so much great food, it's a deceptively simple recipe, but I betcha dimes to donuts it would be a hit in any restaurant that served it. It will certainly impress your guests!

Ingredients
 
- 1x 8oz package of cream cheese, softened (again, brick kind)
- 1x 8oz carton of sour cream
- 3 tbsp brandy
- 1 ½ cups [6oz] shredded Edam or Gouda cheese

Directions

- In a bowl, stir together cream cheese, sour cream and brandy.
- Stir in shredded cheese.
- Transfer to an 8 inch oven-proof dish.
- Bake in a 350 degree oven about 30 mins or until lightly browned.
- Serve warm with crackers or French bread.


Quote Mom: "I think that I have given this recipe to 256 people." - Make that a few more now...

3 - Mushroom and Seafood Tarts


Sheer, utter guilt-inducing decadence. This was my absolute favourite treat as a kid around the Christmas holidays, and that's including the 12 or so different kinds of cookies! Mom hasn't made these much in recent years, probably because there are a lot of really impressive appetizers out there that aren't nearly this involved in making (see above). But, some day I'm going to give them a go. On a side note, I remember more than once scooping a seafood tart fresh out of the oven and snarfing it in one bite, thus completely burning the inside of my mouth. The filling in these things is like gourmet napalm.

So, basically these are small (2-inches in diameter) puff pastry cups with a hot, gooey, cheesy, creamy filling based on either mushroom or seafood. Soooooo tasty!

Pastry Cups

To make your own cups: Roll out pastry (from whichever source works for you, the dough recipe for tourtière works here, as does any pie or pastry recipe), cut out circles {about 2 ½ inches in diameter}. Fit pastry circles into small muffin cups. Pierce pastry 4-5 times with fork. Bake at 400 degrees for 5 mins. Lower heat to 350 degrees and bake for about another 15 mins. or until browned. Cool pastry rounds on wire rack.

OR: pastry cups can be purchased at most grocery stores or delis.

Mushroom Filling

Ingredients

- ¾ lb chopped fresh mushrooms
- ¼ cup chopped green onions
- salt and freshly ground black pepper
- 2 tbsp butter
- 2 tbsp dry bread crumbs
- 1 cup béchamel sauce [recipe below]
- 1 tbsp grated Swiss cheese
- 1 tsp finely chopped fresh parsley

Directions

- In a heavy, 8-10 inch skillet, cook the green onions in the butter over moderate heat, stirring constantly, for 2 mins or until they are soft.

- Add the chopped mushrooms and cook, stirring occasionally, for 8-10 mins, or until all the moisture has evaporated and they are beginning to brown lightly.

- Transfer mixture to the bowl of a food processor. Process, using pulse mode until the mixture is finely chopped. Do not over process.

- Transfer mixture to a large bowl. Stir in the béchamel sauce and parsley and season to taste with salt and pepper.

- Spoon the mixture into the pastry cups. Top with a pinch of breadcrumbs and cheese.

- Place tarts on baking sheet. Heat in 350 degree oven until mixture starts to bubble.


Béchamel Sauce

Ingredients

- 2 tbsp butter
- 1 cup hot milk
- 3 tbsp flour
- salt and pepper

Directions

- In a heavy 2-3 quart saucepan, melt the butter over moderate heat. Add the flour, mix well with a whisk. Reduce the heat to low, and heat for 2 mins stirring constantly. Add the milk, turn heat up to med-high and stir constantly with a whisk until mixture thickens and comes to a boil. Reduce heat to simmer and cook for 2-3 minutes, still stirring. Remove from heat.

Makes about 1 cup.


Seafood Filling

Ingredients

- 1 lb medium-size shrimp ground nutmeg to taste
- 1 lb scallops
- 1 can crab meat
- salt and pepper to taste
- 2 tbsp brandy or sherry [optional]
- bread crumbs
- cheese (something sharp, like an extra-old Cheddar or a Swiss, usually works well to contrast the richness)
- 1 cup Béchamel sauce [as per mushroom tarts]

Directions

- Bring about 2 cups of water to boil in large frying pan. Add scallops and cook until done [about 5 mins].

- Remove scallops with slotted spoon, chop and place in large bowl. Add shrimp to pan and cook until pink.

- Chop and add to scallops in bowl. Drain crab meat, chop and add to bowl. Add the Béchamel sauce, seasonings to taste and brandy or sherry if using. Mix well.

- Spoon filling into pastry shells. Top with pinch of breadcrumbs and cheese.

- Heat as for mushroom tarts.


To Make Ahead

- After filling tarts, place them on a baking sheet. Either refrigerate them, if using in 1-2 days, or if freezing, place baking sheets in freezer. Once tarts are frozen, put them in an airtight container and keep in freezer.

- To reheat, place tarts on baking sheet and put in a 350 degree oven for about 20-30 mins until mixture is bubbly.

- Each recipe will fill about 30 tarts or so.


So, that's just a sampling of Appetizer madness. Last night was the family Easter dinner at my Mom's, where she unleashed hot crab dip, artichoke-cheese spread, and a gourmet refried bean dip. And, as always, deeeeelicious!

'Til next time!

PS: On a side note, I've been missing the charger for my camera for months now, which meant I wasn't able to take pictures of some of my cooking projects. Finally found the damn thing as I was packing up my apartment, so I'll be including pictures of any goodness I produce and blog about in the future.

Saturday, March 26, 2011

Not Your Average Sandwich! - 1st edition

For a change of pace, I'm going to take some time to take a look at some of the best sandwiches I've ever made or purchased. So, with the help of my trusty camera and brain, let's take a look at some creations that have come along. Because who doesn't love a good sandwich?

Ah, the sandwich. There's something so wonderfully simple about the sandwich. Anyone can make one out of whatever's at hand as long as they have some sort of bread product handy - that's pretty much the only "rule" that applies. Unless you consider the KFC Double Down a sandwich, and God help you if you do!

I think the vast majority of us can consider sandwiches the first thing we ever made; whether it was a sloppily assembled mess of PBJ that you put together to impress your Mom when you were 5, a tentative attempt at grilled cheese at 8, or an ingredient-crammed Peter Fox-style monstrosity to help fuel your rampaging 15-year old hormones. People who 'can't cook' can still make a good sandwich.

Now, that being said, there is still a level of sandwich making that goes a little above and beyond, usually based on a combination of ingredients and techniques. I like to experiment with "gourmet sandwiches" once in a while, but I'll admit that the best sammich in existence is the BLT, although I usually forego the L.

It's a fairly standard practice for me, when I have a morning off, to fry up 4-5 strips of bacon, toast some 12-grain bread, slice up a ripe tomato, pile the whole things together and finish it with a healthy dose of President's Choice Garlic Mayo and black pepper. Recently I pushed it a bit further and added onions to the mix. But not just any old onion! I had just finished frying up the bacon and there was all this wonderful bacon grease sitting in the pan waiting for some extra purpose. So, I sliced up some onion into rings and flash-fried them in bacon grease. YEAH! I also happened to have some delicious sourdough baguette from Bread and Sons bakery and topped it off with some of Chamomile Desjardins' Bluenose hot sauce, so it was indeed an epic sammich, as the picture will attest to.


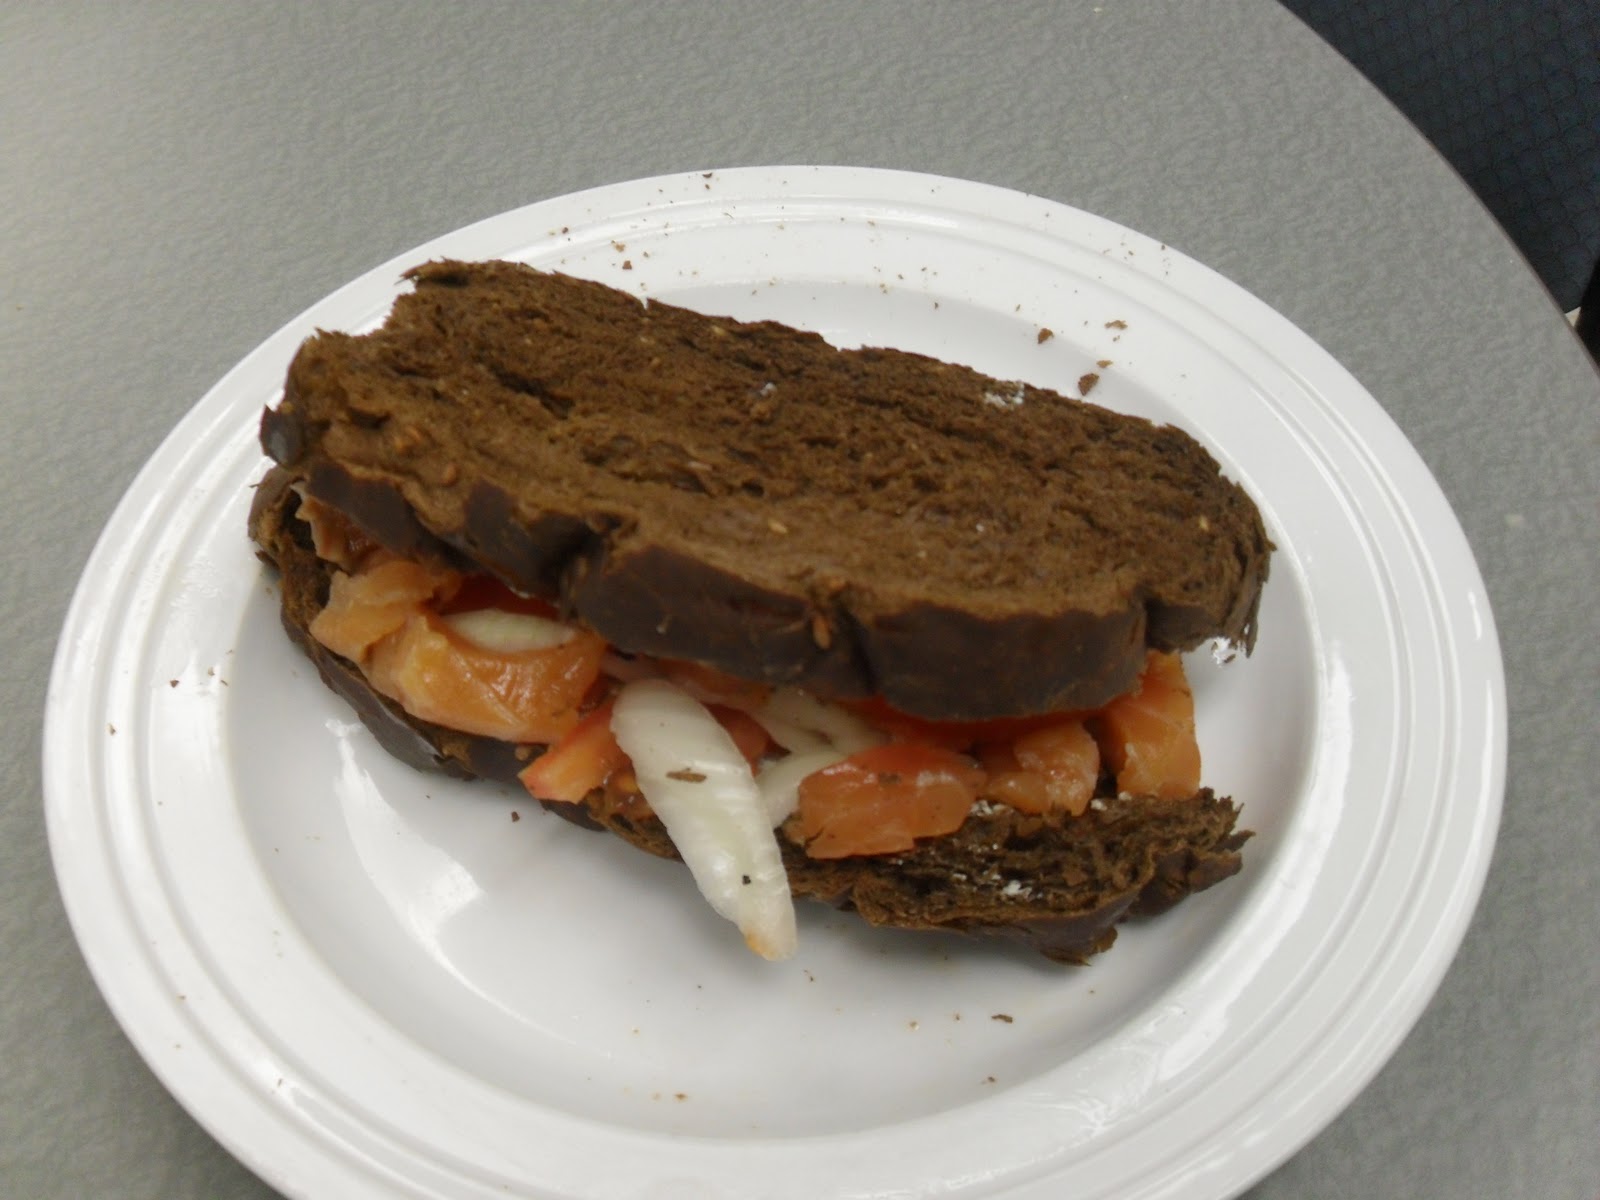
Another creation was from an experiment in fish that I tried around the New Year. I've smoked fish, grilled it, baked it and pan-fried it. But there's one type I've never tried and that's gravlax. Now, the recipe (as shown in this recent post) called for 2 pounds, which is a LOT of fish for one person, something I should have considered before undertaking this recipe. In the end, I had to throw some out because I just couldn't eat it all before it went bad. I left some for my girlfriend, but she had a rather squeamish reaction. She's new to fish. Either way, next time I'll use a lot less or make sure I give some away.

But from this culinary experiment came a rather gorgeous piece of sandwichery. I picked up a loaf of fresh pumpernickel, some garlic and herb Boursain cheese, a vidalia onion and a fresh tomato (yeah, I like onions and tomatoes, who doesn't?). So after slicing up all the necessary elements, here's what I ended up with:

 
It was utterly delicious!

So that's the first edition of "Not Your Average Sandwich". Any contributions you can provide will be greatly appreciated, especially with photographic depictions.

Eat well!

Thursday, March 24, 2011

Les mets d'chez nous! (1ère partie)

Bonjour les amis!

As you may have guessed (or I may have told you), I'm proudly French Canadian. Well, half so, the other half is dairy-farming, Potato-Famine-era Irish immigrant (although my Dad is a judge, my Grampa and all great-uncles grew up on farms and were very typically Irish-Canadian).

My Mom did some family tracing and my French roots in Canada are pretty deep. My great-great-grandfather was the mayor of Vaudreuil sometime in the late 19th Century and I've often joked that my Grandpapa's oldest Canadian ancestor is "third from the left of Champlain" is one of those old 17th C. portraits of the explorer (for those of you who have no idea what I'm talking about, look up Samuel de Champlain and get a taste of early Canadian history).

Now, that being said, our family, while being of fine quebecois stock, didn't really eat much in the way of traditional quebecer fare. With one notable exception: tourtière (more on that shortly). It might have something to do with the fact that my Mom hated most traditional quebecer food (again, except tourtière) and tended to go with more standard "North American" meals: roast beef, spaghetti, chili, etc.

It wasn't until I met my Dad's second wife that I learned a little more about some of the other traditional goodies like 'ragoût de boulettes' (meatball stew) and 'pattes de cochon' (pig's feet stew). Quebec food focuses a lot on making the most out of very little. Expect to find lots of fat, cheap cuts of meat and a crapton of maple syrup!

You've already seen one very common quebecois food, cretons, in an earlier post, and we ALL know about the fatty deliciousness of poutine, but there are quite a few foods out there that you might be have encountered in other cuisines that the Quebecois put a special twist on.

With that in mind, I'll be running down some of the tastier samplings of quebecois goodness I've had in my life and throwing out a few recipes here and there.

Here are the items I'll be exploring over several posts, with their more common versions in parentheses:

- Soupe aux pois (split pea soup)
- Oreilles de crisse (pork rinds)
- Tourtière (meat pie)
- Cipâte (pot pie)
- Fèvres au lard (baked beans)
- Pattes de cochons (pig's feet stew - OK, maybe this one's purely Quebecois)
- Ragoût de boulettes
- Sucre à la crème (fudge, but totally not fudge)
- Pouding chômeur (bread pudding)
- Tarte au sucre (sugar pie)

So, today's post will cover the first three items: Soupe aux pois, Oreilles de crisse, and Tourtière.

1 - Soupe aux pois (Pea soup)

Pea soup is one of the most common of traditional quebecois meals, being so commonplace that Quebecers would often be called "Peasoup" in a derogatory manner, somewhere along the same lines of "Frog". Luckily, we have our own comeback against Anglos, who've earned the charming title of "Têtes-carrés", literally translated to "Square Heads". Also, in a funny twist of product development, a company called "Habitant" is well-known for their canned pea soup. "Habitant" is also a common term to reference Quebecers, albeit not actually derogatory. Hence, why you may hear reference to the "Habs" when talking about the Montreal Canadiens hockey teams, Habs being short for Habitants.

How's that for some obscure Canadian culture? And you thought we were just a fusion of wannabe Yanks and Brits!

Now, traditional quebecois pea soup is a split yellow pea soup cooked with a ham bone or other form of smoked pork. Now, having never actually HAD pea soup, except the odd time out of a can, I didn't realize it was supposed to be yellow. Oops... Instead, in a fit of longing for comfort food, I got my brain circling around the idea of making a pea soup, but using something a little more gourmet than ham. The thought hit me like a bolt - Hey, Pancetta! Pancetta's good and I'd never used it before. So with a vague concept in mind, I now needed a recipe! Luckily, Google provides.

What I found was a made-up recipe from this nice lady out of Oregon who writes a food blog entitled "Bread & Honey". I've made a few tweaks with the herbs and added an extra touch using frozen peas.


Split Green Pea soup (w.pancetta)

Makes about 8 cups (about 4 servings)

Ingredients

- 3 cups dried split green peas (rinsed in cold water and drained)
- about 200 grams pancetta, diced (use more if you want more salt/fat content)
- 8 cups vegetable stock (NOTE: I make veggie stock using a powder if I don't have anything home made available. To reduce salt amounts, I use half the amount of powder the package calls for)
- 2 onions, diced
- 1 large carrot, diced
- 2 celery stalks, diced
- 1 potato, diced
- 5 cloves garlic, minced (or more, there's no such thing as too much garlic)
- 3 bay leaves
- 1/2 tsp dried thyme
- 1/2 tsp dried/powdered sage
- Cracked black pepper to taste
- Salt to taste (I generally add no salt, since the pancetta and veggie stock tend to add enough on their own)
- 1/2 cup frozen peas

Directions

- In a very large pot, fry pancetta on medium high heat with a splash of olive oil until crispy and browned.
- Remove from heat and spoon out all the pancetta onto a plate, leaving the fat in the pan.
- Place pot back on heat and sauté veggies until onions are glassy and begin to soften.
- Reduce heat to medium. Add broth and stir.
- Add potatoes, then split peas and bring to a boil.
- Turn heat down, add seasoning, and simmer on medium-low (3-4) for about an hour, or until peas become soft and soup thickens.
- 10 minutes before soup is done, stir in frozen peas
- Sprinkle with crunchy pancetta before serving.


The above image is purely an approximation, albeit fairly accurate, of how it'll turn out.

I like to throw in a few shots of hot sauce and eat with LOTS of warm bread and butter.

So there's my take on Soupe aux pois. It's very hearty and thick and easily serves as a meal on its own.

2 - Oreilles de crisse

These are standard fare at the multitude of cabanes à sucre (sugar shacks, where maple syrup is made in the Spring) in the province. They're essentially smoked pork rinds, fried in lard and bathed in syrup.

They mostly taste like bacon, but crispier.

I haven't yet tried my hand at this one, mostly because I'm frightened to try it... Oh so very frightened! Here's what they look like. You can see why I originally thought they were some special form of bacon...


With that in mind, I'm going to plug the cabane à sucre where I first tried oreilles de crisse. Sucrerie de la montagne makes for a a lovely family or foodie outing where you'll be stuffed to the gills with traditional quebecer fare, listen to some old-time Quebecois music, and be served by pretty French Canadian girls (and trust me, French Canadian girls ARE hotter, it's a fact. I'm totally not biased by the fact that I'm dating one). It's just outside Rigaud, Quebec, about 90 minutes from Ottawa by car, 45 from Montreal. In case you're wondering what "sucrerie" means, it's also a word for sugar shack. Yes, Quebecers love their maple syrup so much that they have two words for the place where it's made!

3 - Tourtière

Tourtière is one of the most recognizable quebecois contributions to cuisine, yet it's rarely found outside the province and certainly doesn't enjoy as much exposure in English Canada as it deserves. Living in Ottawa makes it a bit easier to find it in butcher shops since there is a strong French-speaking population here. Might have something to do with being across the river... But you'd be hard pressed to find it in amongst the Anglos...

Lord knows amongst the Francos it's as common during the Christmas holidays as roast turkey. Now for another bit of quebecer culture:

Christmas amongst French Canadian Catholics (which is almost redundant) entails a tradition known as Réveillon. The Réveillon is essentially a massive feast that occurs after celebrating Midnight Mass (which happens around midnight of December 25th, but usually begins before). Réveillon is a tradition in most French Catholic cultures, including Cajuns in Lousiana, but in Fench Canadian culture, one of the main dishes is tourtière. It certainly was when I was a kid! The turkey dinner would happen the following evening.

So what is tourtière? Basically, it's a meat pie. But, depending on which part of Quebec you're from, the details vary. For example, if you're from the Saguenay region, a tourtière is more like a cipâte (see below). But around our house, tourtière was a mix of ground beef, veal and pork with a bunch of seasonings served with either store-bought ketchup or some kind of wonderful home made version (aka ketchup maison, or similar preserves such as green tomato relish or chow-chow). I also find a medium or hot salsa is a great condiment to tourtière.

What I'm posting here is my Mom's recipe, I've never tried making it myself (the thought of trying to make the pie crust intimidates me), but Lord knows I've eaten my share! It's nothing too fancy, but its tasty simplicity is a good analogy for Quebecois cooking in general. This recipe has handed down over many generations, with tweaks coming from every cook that makes it. There is no real "standard" tourtière recipe.

Tourtière

Ingredients

Pie crust (makes four 10-inch crusts. Use one for the tourtière and freeze the rest for more tourtières, or make some pie!)

- 1 cup very cold butter
- 1 cup very cold Crisco shortening (store Crisco in fridge. Place in freezer for 1-2 hours before using)
- 4 heaping cups flour
- 1 cup ice cold water

Filling (for 1 pie)

- ¾ tsp ground cloves
- 1 lb lean ground pork (this is how my family does it. Others combine ground beef, pork and veal or any variation therein)
- ½ tsp cinnamon
- 1 clove garlic, minced salt and pepper to taste
- 1 med onion, chopped
- water

Directions

For the dough

- Divide the butter or margarine and Crisco in half and cut each half into quarters.

- Place the quarters [that’s 1/2 cup of each] in the bowl of a food processor.
- Add 2 heaping cups of the flour. Process until the fat and flour are well blended and are the consistency of coarse meal.
- Transfer mixture to a large bowl and repeat process for the rest or the fat and flour. If mixture seems too wet, add flour a bit at a time.
- Make a well in the middle of the fat/flour mixture.
- Pour in the ice water and quickly mix with a fork to blend. Work mixture as little as possible. The more you work it, the tougher the crust will be.
- Gather up the mixture and form into a ball. Wrap ball in plastic or waxed paper and refrigerate for 1 hour. Divide dough into quarters. If making a double crust pie, one “quarter” should be slightly larger than the other.
- On a floured surface, roll out dough to desired size. Again, work as little as possible. Transfer dough to pie plates and fill as desired.
- When making a baked pie shell, place dough on an inverted pie plate making sure that dough extends a bit over the edge of the plate. Cut off the extending edges with a sharp knife, wet your thumb and gently crimp edges of dough to seal to edge of plate. Pierce the top and sides of dough several times with the tines of a fork. Bake in a pre-heated 400 degree oven for 12 mins. Lower heat to 350 and continue baking for 15-20 mins or until golden. Cool on a rack for 15 mins. Gently loosen edges of crust with a knife then invert crust into another pie plate and finish cooling on a rack.
- Do not use food processor to add liquid. Dough will be “overworked” and turn out tough.
- You can always halve the recipe or freeze any dough you don’t use.


For the tourtière

- In a large frypan, fry pork, garlic and onions.
- Add spices and enough water to cover meat mixture.
- Bring to a boil, reduce heat and simmer, stirring frequently, for 1 hour.
- Drain fat and place mixture in a food processor or meat grinder to mince.
- Roll out bottom layer of pie crust. Place in pie pan.
- Place meat mixture on top of crust.
- Roll out top layer of crust and place on top of meat mixture.
- Seal edges of crust.
- Bake in 400 degree oven for 12 mins. Reduce heat to 350 degrees and continue baking until pie is done [about 30 mins].
- If freezing pie, reduce baking time to 15 mins. Cool pie, wrap in foil and freeze.

Hopefully, your efforts will come out looking like this:
Tourtière - Quebec Meat Pie
This is basically your standard tourtière presentation (with ketchup maison on the side). Slice yourself up a big ol' piece while it's still warm and enjoy! To note: it can also be served cold (but it's better warm).


On retourne aussitôt que possible avec plusieurs d'autres recettes et histoires des mets québecois!

A plus tard!